
Desktop Computer Hardware Maintenance Manual
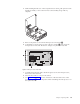

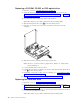


4. Disconnect the signal and power cables from the hard disk drive.
5. Rotate the hard disk drive and bracket to the rear by pulling on the blue
handle provided in the direction of the arrow.
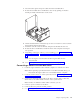
6. Lift the hard disk drive and bracket up to remove. The drive is removed from
the bracket by flexing the bracket.
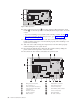
7. Install the new drive into the bracket and place the bracket into the slot.
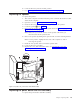
8. Rotate the drive and bracket towards the front of the computer and snap it
into position.
9. Depending on the type of drive you are installing, go to “Connecting a serial
ATA hard disk drive” or “Connecting an IDE hard disk or CD drive” on page
42.
Note: Do not forget to reconnect the CD drive signal cable if it was
disconnected.
10. Go to “Closing the cover and connecting the cables” on page 46.
Connecting a serial ATA hard disk drive
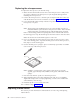
1. Locate the signal cable that came with the computer or with the new drive.
Note: When replacing a parallel ATA with a serial ATA hard disk drive, you
must obtain the signal cable. It is not included with the computer.
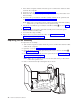
2. Locate the SATA connectors on the system board. See “Identifying parts on the
system board” on page 28.
3. Connect one end of the signal cable to the drive and the other to either the
SATA 1 IDE or the SATA 2 IDE connector on the system board.
Note: It makes no difference which SATA connector you use.
4. Connect a power connector to the drive.
5. Lower the drive bay into the normal position.
6. Go to “Closing the cover and connecting the cables” on page 46.
Chapter 6. Replacing FRUs 41