T84H_setup0926_final.fm Page 2 Thursday, October 5, 2000 8:45 AM Setup Hardware Requirements This monitor requires a computer with a suitable on-board sub-system or Video Adapter card that can support SXGA 1280 x 1024, XGA 1024 x 768, SVGA 800 x 600, or VGA 640 x 480 at 60 Hz. For optimal performance, the recommended video setting is 1280 x 1024 at 60 Hz. The monitor has the capability to receive input either from an analog graphics adapter or a Digital Visual Interface DVI-D graphics adapter.
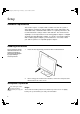
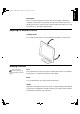
Orientation Choose a position that gives the least reflection from lights and windows, usually at a right angle to any windows. The monitor should be positioned directly in front of you so that you do not have to twist your body to use it. Tilt the monitor to a comfortable viewing angle. Adjusting the Monitor Position DEUTSCH Viewing Angle FRANÇAIS ENGLISH T84H_setup0926_final.
T84H_setup0926_final.fm Page 4 Thursday, October 5, 2000 8:45 AM Use a light touch on the keyboard, keeping your hands and fingers relaxed. Allow a space in front of the keyboard to rest your wrists when not typing. Consider using a wristpad. Eyesight Working with monitors, in common with any prolonged close work, can be visually demanding. Look away from the screen periodically and have your eyesight checked regularly. Screen settings Set the screen brightness and contrast to a comfortable level.
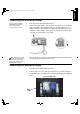
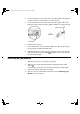
ENGLISH T84H_setup0926_final.fm Page 5 Thursday, October 5, 2000 8:45 AM 1. Turn off your PC and all attached devices. 2. Connect the signal cable to the video port on the back of your computer. This port might be directly attached to your computer (figure A), or it might be part of a video adapter card (figure B). The video port on your computer or video adapter card may be colored blue to match the blue connector on your monitor’s video cable.
T84H_setup0926_final.fm Page 6 Thursday, October 5, 2000 8:45 AM 4. Connect the DVI connector at the end of the signal cable to the DVI port located on the back of the Monitor. See above picture. 5. Connect the DVI connector at the other end of the signal cable to the DVI port located on the back of the graphics adapter. See picture below. graphics adapter DVI Signal Cable 6. Replace the rear covers. 7.
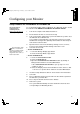
Configuring your Monitor Setup Diskette for Windows95 or Windows 98 2. Ensure that the monitor is connected correctly. 3. Turn on the monitor and then the system unit. Allow the system to boot into Windows 95 or Windows 98. Your computer’s Plug and Play code may warn you that your system hardware has changed. This probably means that it has detected your new monitor for the first time. 4.
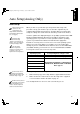
T84H_setup0926_final.fm Page 8 Thursday, October 5, 2000 8:45 AM Setup Diskette for Windows 2000 This section must be completed before continuing with the Windows 2000 confguring for your monitor on page 10. On LCD monitors, unlike CRTs, a faster refresh rate does not improve display quality. IBM recommends using either 1280 x 1024 at a refresh rate of 60Hz. To use the Plug and Play feature in Windows 2000, files should be loaded from the IBM Flat Panel Monitor Installation diskette. 1.
ENGLISH T84H_setup0926_final.fm Page 9 Thursday, October 5, 2000 8:45 AM The Setup Utility included on the setup diskette is for displaying do patterns. They do not replace or modify the display dirver. The Auto Setup instructions require the monitor to be warmed up for 15 minutes. This is not required for normal operation. When you first use your monitor you must perform Auto Setup.
T84H_setup0926_final.fm Page 10 Thursday, October 5, 2000 8:45 AM Auto Setup for DOS If the monitor is in standby mode (STANDBY ON), it may automatically turn off while you are waiting for it to warm up. If this happens, switch off the monitor and switch it on again after a few seconds. 1. Turn on the monitor first; then the PC. If you are using PC-DOS/ V, change to U.S. mode by typing ‘CHEV US’ and pressing ENTER at the command prompt. You must use DOS when you run DOS Auto Setup. 2.
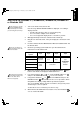
ENGLISH T84H_setup0926_final.fm Page 11 Thursday, October 5, 2000 8:45 AM Turn on the monitor first; then the PC. 2. Wait approximately 15 minutes, until the monitor warms up. 3. Drag the icon bar and tool bar, if they are displayed, to the bottom of the screen. 4. Insert the diskette labelled ‘IBM Flat Panel Monitor Installation Disk’ into the diskette drive. 5. Check the operating system installed on your PC and follow the instructions from the table below. Operating System Windows 3.
T84H_setup0926_final.fm Page 12 Thursday, October 5, 2000 8:45 AM 10. Press the ESC key to return to Windows. You have completed the monitor setup for Windows. If you use other operating systems, perform the appropriate AUTO SETUP for those systems, also: see Auto Setup for DOS on page 10.
1. Have your monitor turned on for about 15 minutes, until the monitor warms up. 2. Display the image you most frequently use on the screen. 3. Press the OSD Enter button the initial OSD menu. 4. Use an Arrow button ( or ) to select the IMAGE LOCK icon and press the OSD Enter button to access the function. 5. Using an Arrow button ( or ), select MANUAL, press and then press once to select COARSE. Left and right arrow adjustment indicators become illuminated (see page 18). 6.
T84H_setup0926_final.
Press the Exit button to move backwards through the sub-menus and exit from the OSD. FRANÇAIS Note: After making adjustments, the Power indicator LED will briefly turn amber to indicate that the new value has been saved. OSD Lock / Unlock This feature allows you to secure the current control settings, while allowing the user to adjust Brightness and Contrast, so that they cannot be inadvertently changed. You can unlock the OSD controls at any time by using the same procedure.
T84H_setup0926_final.fm Page 16 Thursday, October 5, 2000 8:45 AM On-screen display (OSD) controls The settings adjustable with the user controls are viewed through the OnScreen Display (OSD). Press any of the OSD buttons to activate the OSD. The LCD monitor needs time to become thermally stable the first time you turn it on each day. Thus, to achieve more accurate adjustments for parameters, allow the LCD monitor to warm up (be On) for at least 15 minutes before making any screen adjustments.
ENGLISH T84H_setup0926_final.fm Page 17 Thursday, October 5, 2000 8:45 AM (continued) COLOR Select the preset Color mode you find most comfortable and then fine tune the colors using the User submenu, if necessary. Fine Coarse PRESET Use the Arrow buttons to adjust away the interference. If satisfactory results are not obtained using the Fine adjustment, use the Coarse adjustment and then use Fine again. This function may change the width of the display image.
T84H_setup0926_final.fm Page 18 Thursday, October 5, 2000 8:45 AM OSD Icon IMAGE EFFECT LANGUAGE Description Select this icon to optimize the display for the type of software you are using. Scaling smooths an image which may help the eye to see more detail. Filtering sharpens text by adding a fine, contrasting line around each character so that it is easier to recognize. OSD MENU POSITION INFORMATION 18 Controls and Adjustments(Analog) SCALING ON - Turns Scaling on. OFF - Turns Scaling off.
The display mode the monitor uses is controlled by the computer. Therefore, you should refer to your computer documentation for details on how to change display modes. The image size, position and shape may change when the display mode changes. This is normal and the image can be readjusted using AUTO SETUP and the monitor controls. Unlike CRT monitors, which require a high refresh rate to minimize flicker, TFT technology is inherently flicker-free.
T84H_setup0926_final.fm Page 20 Thursday, October 5, 2000 8:45 AM Factory Set Display Modes For image problems, you may want to run AUTO Setup again before consulting to this section. In most cases, AUTO SETUP can fix the problems. See Auto Setup on page 8 for details. Addressability Refresh Rate Horizontal Frequency Analog Digital 640 × 350 70 Hz 31.5 kHz O O 640 × 480 75 Hz 37.5 kHz O O 640 × 480 72 Hz 37.8 kHz O O 640 × 480 66 Hz 35.0 kHz O O 640 × 480 60 Hz 31.
ENGLISH T84H_setup0926_final.fm Page 21 Thursday, October 5, 2000 8:45 AM The power management feature is invoked when the computer recognizes that you have not used your mouse or keyboard for a user-definable period. There are several states as described in the table below. As an ENERGY STAR® Partner, IBM has determined that this product meets the ENERGY STAR® guidelines for energy efficiency.
T84H_setup0926_final.fm Page 22 Thursday, October 5, 2000 8:45 AM Troubleshooting If you have a problem setting up or using your monitor, you may be able to solve it yourself. Before calling your retailer or IBM, try the suggested actions that are appropriate to your problem.
ENGLISH T84H_setup0926_final.fm Page 23 Thursday, October 5, 2000 8:45 AM Possible Cause Suggested Action Reference No power to monitor Screen is blank and power indicator is steady green Brightness and Contrast may be too low w Adjust brightness and contrast. Connecting your Monitor for Analog section on page 5 ESPAÑOL Screen is blank and power indicator is off Ensure that the electrical outlet and the monitor are both switched on.
T84H_setup0926_final.fm Page 24 Thursday, October 5, 2000 8:45 AM Power consumption figures are for the monitor and the power supply combined. 24 Problem Possible Cause Screen is blank and power indicator is flashing amber every 0.5 or 1 second The monitor is in the Power Management Suspend or Off state Image appears to be smeared There are noises in the video signal Image appears to be discolored The Color setting may be incorrect A few dots are missing, discolored, or inappropriately lighted.
ENGLISH T84H_setup0926_final.fm Page 25 Thursday, October 5, 2000 8:45 AM If you are unable to correct the problem yourself, you may seek further help as follows: Call the IBM HelpCenter(R). FRANÇAIS Further Help In the US call 1-800-772-2227 DEUTSCH In Canada (Toronto Only) call 416-383-3344 In Canada (all others) call 1-800-565-3344 In other countries contact your dealer, retailer, or other IBM authorized Servicer. http://www.pc.ibm.
T84H_setup0926_final.fm Page 26 Thursday, October 5, 2000 8:45 AM 2. Carefully insert the head of a flathead (–) screwdriver into the slot visible along either side of the cable cover (a) and pry it off. a b c 3. Squeeze the sides of the hinge cover (b) and pull it off. 4. Gently lift the stand cover (c) along the top and then slide it backwards and off the stand. 5. Remove the signal cable and the power cord from the monitor by disconnecting the corresponding adapters.
ENGLISH T84H_setup0926_final.fm Page 27 Thursday, October 5, 2000 8:45 AM FRANÇAIS Specifications Unpackaged: Packaged: 9.0 Kg (19.8 lb) 12.0 Kg (30.5 lb) Tilt / Swivel Tilt: Swivel: – 4° / + 41° – 230° / + 90° Image Viewable Image Size: Maximum Height: Maximum Width: Pixel Pitch: 459.7 mm (18.1 in.) 287 mm (11 in.) 359 mm (14 in.) 0.281 mm (.011 in.) (H) × 0.281 mm (.011 in.) (V) Power Input Supply Voltage: Max Supply Current: 90 - 260 Vac, 60/50 ± 3 Hz 1.
T84H_setup0926_final.
ENGLISH T84H_setup0926_final.fm Page 29 Thursday, October 5, 2000 8:45 AM FRANÇAIS Warranty Statements Warranty period - Three (3) years Your Installation Diskette includes translation of IBM’s Statement of DEUTSCH Warranty in following languages: Z1255697.bra.html Bulgarian Z1255697.bul.html Chinese Z1255697.chi.html Croatian Z1255697.cro.html Czech Z1255697.cze.html Danish Z1255697.dan.html Dutch Z1255697.dut.html English Z1255697.eng.html Finnish Z1255697.fin.html French Z1255697.
T84H_setup0926_final.fm Page 30 Thursday, October 5, 2000 8:45 AM Slovenian Z1255697.sle.html Spanish Z1255697.spa.html Swedish Z1255697.swe.html Taiwanese Z1255697.tai.html Turkiye Statement of Warranty: Turkish Z1255698.tur.html English Z1255698.eng.html United States, Puerto Rico and Candada Statement of Limited Warranty: 30 English Z1254753.eng.html French Canadian Z1254753.fca.