Color Monitor T541A User's Guide English
ENGLISH FRANÇAIS DEUTSCH ESPAÑOL ITALIANO JAPANESE Note: For important information, refer to the Monitor Safety and Warranty manual that comes with this monitor.
Device driver Installation . . . . . . . . . . . . . . . . . . . . . . . . . . . . . . . . . . . . . . . . . . . . . . . . . . . Windows XP . . . . . . . . . . . . . . . . . . . . . . . . . . . . . . . . . . . . . . . . . . . . . . . . . . . . . . . . . Windows Millennium . . . . . . . . . . . . . . . . . . . . . . . . . . . . . . . . . . . . . . . . . . . . . . . . . . . Windows 2000 Windows 98 .................................................... Windows 95 .................................................
Ennen kuin asennat tä mä n tuotteen, lue turvaohjeet kohdasta Safety Information. Pred instalací tohoto produktu si prectete prírucku bezpecnostních instrukcí.
Setting up the monitor Product Description The IBM T541A Color Monitor works with a computer with a suitable onboard sub-system or Video Card that supports XGA1024 x 768, SVGA 800 x 600, or VGA 604 x 408 resolutions at 60Hz.
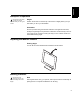
ENGLISH Workplace Preparation Height FRANÇAIS This section gives advice on what you should consider before you set up your monitor. Position the monitor so that the top of the screen is slightly below your eye level when you sit at your workstation. Choose a position that gives the least reflection from lights and windows, usually at a right angle to any windows. Position the monitor directly in front of you so that you do not have to twist your body to use it.
Back Sit back in your chair and use the backrest. Hands Adjust the seat height so that your forearms are approximately horizontal and your wrists are straight when using the keyboard. Your upper arms should be relaxed with your elbows near your body. Use a light touch on the keyboard, keeping your hands and fingers relaxed. Allow a space in front of the keyboard to rest your wrists when not typing. Consider using a wristpad.
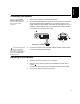
ENGLISH 1. Turn off your computer and all attached devices. 2. Connect the signal cable to the video port on the back of your computer. This port might be directly attached to your computer (figure A), or it might be part of a video adapter card (figure B). The video port on your computer or video adapter card may be colored blue to match the blue connector on your monitor’s video cable. The ac adapter and signal cable are connected to your monitor.
Device driver installation Use the User’s Guide and Installation Files CD that comes with your monitor to install the appropriate device driver for your operating system. Installing the Windows XP device driver ® To manually install or update the device driver for the Microsoft XP operating system, perform the following steps: ® Windows 1. Insert the User’s Guide and Installation Files CD into the computer CDROM drive. 2. Click Start Control Panel Appearance & Themes and then click the Display icon. 3.
ENGLISH Installing the Windows 2000 device driver FRANÇAIS To manually install or update the device driver for the Microsoft Windows 2000 Professional operating system, perform the following steps: ESPAÑOL DEUTSCH 1. Click Start Settings Control Panel and then double-click Display. 2. In the Display Properties window, click the Settings tab, and then click Advanced. 3. Click the Monitor tab, and then click Properties Driver Update Driver. 4.
Installing the Windows 95 device driver Right-click the My Computer icon on the computer desktop and then select Properties -> System to view the version number listed in the System window. Perform the steps below for the appropriate version. If you have Windows 95 Version 4.00.950A, use the following steps to manually install or update the device driver: 1. Click Start Settings Control Panel and then double-click Display. 2.
ENGLISH Auto Setup When you first use your monitor you must perform Auto Setup. This procedure sets up your monitor to process the video signals from your computer without image discoloration or smearing. After you perform Auto Setup, the settings are stored and used each time you turn on the monitor. The Auto Setup instructions require the monitor to be warmed up for 15 minutes. This is not required for normal operation. In order to optimise the displayed image a set-up utility is provided on the CD.
Auto Setup for DOS If the monitor is in standby mode (STANDBY ON), it may automatically turn off while you are waiting for it to warm up. If this happens, switch off the monitor and switch it on again after a few seconds. 1. Turn on the monitor first; then the PC. If you are using PC-DOS/ V, change to U.S. mode by typing ‘CHEV US’ and pressing ENTER at the command prompt. You must use DOS when you run DOS Auto Setup. 2. Wait approximately 15 minutes, until the monitor warms up. 3.
ENGLISH If the message CHECK SIGNAL CABLE is displayed, or if nothing is displayed check: • that the video interface cable is connected properly. • the correct video adapter card is installed. • the correct supported display mode is selected for your PC. Wait approximately 15 minutes, until the monitor warms up. 3. Drag the icon bar and tool bar, if they are displayed, to the bottom of the screen. 4. Insert the User’s Guide and Installation Files CD into the computer CDROM drive. 5.
9. When finished, the OSD main menu returns. Press the Exit button once to exit from the OSD. 10. Press the ESC key to return to Windows. You have completed the monitor setup for Windows. If you use other operating systems, perform the appropriate AUTO SETUP for those systems, also: see Auto Setup for DOS.
ENGLISH Adjusting Your LCD Monitor DEUTSCH FRANÇAIS User controls User control features Left Arrow Displays the OSD main menu Moves the cursor to highlight icons and other options Right Arrow Displays the OSD main menu Moves the cursor to highlight icons and other options OSD Enter Displays the OSD main menu Enters menus and sub-menus and selects the highlighted option Power Switch ESPAÑOL Displays the OSD main menu Exits from menus and sub-menus Exits the OSD ITALIANO Exit Description JAP
The settings are saved after adjustment and when exiting the OSD and will be effective thereafter. • Press the Exit button to move backwards through the sub-menus and exit from the OSD. Note: After making adjustments, the Power indicator LED will briefly turn amber to indicate that the new value has been saved. OSD Lock / Unlock This feature allows you to secure the current control settings, while allowing the user to adjust Brightness and Contrast, so that they cannot be inadvertently changed.
ENGLISH On-screen display (OSD) controls Initial appearance of OSD MAIN MENU DEUTSCH The LCD monitor needs time to become thermally stable the first time you turn it on each day. Thus, to achieve more accurate adjustments for parameters, allow the LCD monitor to warm up (be On) for at least 15 minutes before making any screen adjustments. FRANÇAIS The settings adjustable with the user controls are viewed through the OnScreen Display (OSD). Press any of the OSD buttons to activate the OSD.
OSD Icon Description Sub-menu(s) Manual • • IMAGE LOCK (continued) Moves the screen left and right or up and down. Fine Coarse Controls and Adjustments Use the Arrow buttons to adjust away the interference. If satisfactory results are not obtained using the Fine adjustment, use the Coarse adjustment and then use Fine again. This function may change the width of the display image. Use the H-Position function on the Image Position menu to center the display image on the screen.
Sub-menu(s) Resets the Brightness, Contrast and Color settings. Color Reset ENGLISH Controls and Adjustments NO - Does not make the adjustment RESET YES - Resets the color Resets the Image position settings Geometry Reset NO - Does not make the adjustment The language chosen affects only the language of the OSD. It has no effect on any software running on the computer. OSD MENU POSITION H-Position ITALIANO Changes the position of the OSD on the screen.
Further Information Display modes The display mode the monitor uses is controlled by the computer. Therefore, you should refer to your computer documentation for details on how to change display modes. The image size, position and shape may change when the display mode changes. This is normal and the image can be readjusted using AUTO SETUP and the monitor controls. Unlike CRT monitors, which require a high refresh rate to minimize flicker, TFT technology is inherently flicker-free.
ENGLISH The power management feature is invoked when the computer recognizes that you have not used your mouse or keyboard for a user-definable period. There are several states as described in the table below. As an ENERGY STAR® Partner, IBM has determined that this product meets the ENERGY STAR® guidelines for energy efficiency.
Troubleshooting If you have a problem setting up or using your monitor, you may be able to solve it yourself. Before calling your retailer or IBM, try the suggested actions that are appropriate to your problem. Problem Suggested Action Ensure that the electrical outlet and the monitor are both switched on. Check that the power cord is firmly plugged into the electrical outlet and the power supply unit. If the power cord plug has a removable fuse, replace it. Try another power cord.
ENGLISH The monitor is in the Power Management Suspend or Off state Press any key on the keyboard or move the mouse to restore operation. Check the Power Management software on your computer. Image appears to be smeared There is noise in the video signal Select IMAGE LOCK menu in the OSD. Then select MANUAL to adjust FINE/COARSE settings. Image appears to be discolored The Color setting may be incorrect Adjust the Color settings. A few dots are missing, discolored, or inappropriately lighted.
Further Help Product warranty and support information The following information describes the technical support that is available for your product, during the warranty period or throughout the life of the product. Refer to your IBM Statement of Limited Warranty for a full explanation of IBM warranty terms. Warranty information on the World Wide Web The IBM Machine Warranties Web site at http://www.ibm.
ENGLISH Description of the problem Hardware and software configuration information for your system If possible, be at your computer. Your technical support representative might want to walk you through the problem during the call. For the support telephone number and support hours by country, refer to the following table. If the number for your country or region is not listed, contact your IBM reseller or IBM marketing representative.
3. Squeeze the sides of the hinge cover (b) and pull it off. 4. Gently lift the stand cover (c) along the top and then slide it backwards and off the stand. 5. Remove the signal cable from the monitor and connect the new cable. 6. Slide the stand cover back on the stand. 7. Put the hinge cover back on, making sure that the straight side is at the top. 8. Insert the three tabs at the top of the cable cover into the slots in the back of the monitor and push the cover into place.
ENGLISH FRANÇAIS Specifications This color monitor (Type-model 9512-Ax0) uses a 15-inch TFT LCD Width: Depth: Height: 365.2 mm (14.38 in.) 202.1 mm ( 7.96 in.) 344.8 mm (13.57 in.) Weight Unpackaged: Packaged: 4.1 Kg (9.03 lb) 5.3 Kg (11.68 lb) Tilt Forward Tilt: Backward tilt: – 4° + 41° Image Viewable Image Size: Maximum Height: Maximum Width: Pixel Pitch: 381 mm (15 in.) 228.1 mm (8.98 in.) 304.1 mm (11.97 in.) 0.297 mm (H) × 0.297 mm (V) ( 0.012 in.(H) x 0.012 in.
Service Information The following parts are for use by IBM service, or IBM authorized dealers, to support the customer warranty. Parts are for service use only.
ENGLISH Notices and trademarks FRANÇAIS This section contains information on notices and trademarks. Notices IBM may not offer the products, services, or features discussed in this document in all currently available in your area. Any reference to an IBM product, program, or service is not intended to state or imply that only that IBM product, program, or service may be used.
Compliances Federal Communications Commission (FCC) Declaration of Conformity IBM T541A or T541D Color Monitor 9512-Ax0 and 9512-Dx0 Tested To Comply With FCC Standards FOR HOME OR OFFICE USE This equipment has been tested and found to comply with the limits for a Class B digital device, pursuant to Part 15 of the FCC Rules. These limits are designed to provide reasonable protection against harmful interference in a residential installation.
Declaration of Conformity Trade name: IBM Corporation Model Nos.: 9512-Ax0 & 9512-Dx0 Responsible Party: Samsung Electronics Co.,Ltd. Address: QA Lab of Samsung America Telephone No.: 408-554-5124 This Device complies with Part 15 of the FCC Rules. Operation is subject to the following two conditions: (1) This device may not cause harmful interference, and (2) this device must accept any interference received, including interference that may cause undesired operation.
IBM power cord part number 13F9959 Used in these countries or regions Antigua, Aruba, Bahamas, Barbados, Belize, Bermuda, Bolivia, Brazil, Caicos Island, Canada, Cayman Islands, Costa Rica, Columbia, Dominican Republic, Guam, Ecuador, El Salvador, Guatemala, Haiti, Honduras, Jamaica, Japan, Mexico, Netherlands Antilliles, Nicaragua, Panama, Peru, Phillipines, Saudi Arabia, Thailand, Taiwan, United States, Venezuela 1838576 Antigua, Aruba, Bahamas, Barbados, Belize, Bermuda, Bolivia, Brazil, Caicos Islan
Cet appareil numérique de la classe B respecte toutes les exigences du Réglement sur le matériel brouilleur du Canada. Avis de conformité à la réglementation d'Industrie Canada Cet appareil numérique de classe B est conforme à la norme NMB-003 du Canada.
TCO Compliances Section OGY ENER OL I ICS OM E MISS ON GY EC Models 9512-Ax0 and 9512-Dx0 comply with TCO ’95 guidelines. Model 9512-Ax0 and 9512-Dx0 comply with TCO ’99 guidelines S ERGON Congratulations! You have just purchased a TCO’95 or TCO’99 approved and labeled product! Your choice has provided you with a product developed for professional use.
Approval requirements cover a wide range of issues: environment, ergonomics, emission of electric and magnetic fields, energy consumption and electrical safety. Environmental criteria impose restrictions on the presence and use of heavy metals, brominated and chlorinated flame retardants, CFCs (freons) and chlorinated solvents, and other materials .
The relevant TCO’99 demand requires that plastic components weighing more than 25 grams must not contain flame retardants with organically bound bromine or chlorine. Flame retardants are allowed in the printed circuit boards since no substitutes are available. Cadmium** Cadmium is present in rechargeable batteries and in the colour-generating layers of certain computer displays.
Lead** Lead can be found in picture tubes, display screens, solders and capacitors. The relevant TCO’99 requirement permits the inclusion of lead since no replacement has yet been developed. _____________________________ **Lead, Cadmium and Mercury are heavy metals which are bio-accumulative.
Electronic emission notices Hinweise Gemäß der Amtsblätter des BMPT Nm. 61Ú1991 und 6Ú1992 wird der Betreiber darauf aufmerksam gemächt, daß die von ihm mit diesem Gerät zusammengestellte Anlage auch den technischen Bestimmungen dieser Amtsblätter genügen muß. Aus ergonomischen Gründen wird empfohlen, die Grundfarbe Blau nicht auf dunklem Untergrund zu verwenden (schlechte Erkennbarkeit, Augenbelastung bei zu geringem Zeichenkontrast).
Spécifications de la CEE Ce produit est conforme aux exigences de protection de la directive 89/ 336/ EEC du Conseil de l’UE sur le rapprochement des lois des États membres en matière de compatibilité électromagnétique. IBM ne peut accepter aucune responsabilité pour le manquement aux exigences de protection résultant d’une modification non recommandée du produit, y compris l’installation de cartes autres que les cartes IBM.
Anmerkung: Um die Einhaltung des EMVG sicherzustellen sind die Geräte, wie in den IBM Handbüchern angegeben, zu installieren und zu betreiben. Declaración de la Unión Europea (UE) Este producto satisface los requisitos de protección del Consejo de la UE, Directiva 89/ 336/ CEE en lo que a la le gislatura de los Estados Miembros sobre compatibilidad electroma gnética se refiere.
gionevole protezione da interferenze mediante dispositivi di comunicazione in concessione in ambienti residenziali tipici. Utilizzare cavi e connettori colle gati a terra per ridurre il rischio potenziale di interferenza delle comunicazioni radiotelevisive e di a; tri apparecchi elettrici o elettronici. I cavi sono disponibili presso i rivenditori IBM.
Japanese statement of compliance for products less than or equal to 20 A per phase: 13 13
Trademarks The following terms, used in this publication, are trademarks or service marks of the IBM Corporation in the United States, other countries, or both: HelpCenter IBM ENERGY STAR is a U.S. Govt. registered trademark. Microsoft, Windows, and Windows NT are trademarks of Microsoft Corporation in the United States, other countries, or both. Other company, product, and service names may be trademarks or service marks of others. © Copyright International Business Machines Corporation 2002.