
Computer Drive User Manual


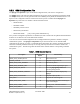

Table Of Contents
- Chapter 1. HPSS 7.1 Configuration Overview
- Chapter 2. Security and System Access
- Chapter 3. Using SSM
- 3.1. The SSM System Manager
- 3.2. Quick Startup of hpssgui
- 3.3. Configuration and Startup of hpssgui and hpssadm
- 3.4. Multiple SSM Sessions
- 3.5. SSM Window Conventions
- 3.6. Common Window Elements
- 3.7. Help Menu Overview
- 3.8. Monitor, Operations and Configure Menus Overview
- 3.9. SSM Specific Windows
- 3.10. SSM List Preferences
- Chapter 4. Global & Subsystem Configuration
- 4.1. Global Configuration Window
- 4.2. Storage Subsystems
- 4.2.1. Subsystems List Window
- 4.2.2. Creating a New Storage Subsystem
- 4.2.3. Storage Subsystem Configuration Window
- 4.2.3.1. Create Storage Subsystem Metadata
- 4.2.3.2. Create Storage Subsystem Configuration
- 4.2.3.3. Create Storage Subsystem Servers
- 4.2.3.4. Assign a Gatekeeper if Required
- 4.2.3.5. Assign Storage Resources to the Storage Subsystem
- 4.2.3.6. Create Storage Subsystem Fileset and Junction
- 4.2.3.7. Migration and Purge Policy Overrides
- 4.2.3.8. Storage Class Threshold Overrides
- 4.2.4. Modifying a Storage Subsystem
- 4.2.5. Deleting a Storage Subsystem
- Chapter 5. HPSS Servers
- 5.1. Server List
- 5.1. Server Configuration
- 5.1.1. Common Server Configuration
- 5.1.1. Core Server Specific Configuration
- 5.1.2. Gatekeeper Specific Configuration
- 5.1.3. Location Server Additional Configuration
- 5.1.4. Log Client Specific Configuration
- 5.1.1. Log Daemon Specific Configuration
- 5.1.2. Migration/Purge Server (MPS) Specific Configuration
- 5.1.3. Mover Specific Configuration
- 5.1.3.1. Mover Specific Configuration Window
- 5.1.3.1. Additional Mover Configuration
- 5.1.3.1.1. /etc/services, /etc/inetd.conf, and /etc/xinetd.d
- 5.1.3.1.2. The Mover Encryption Key Files
- 5.1.3.1.3. /var/hpss/etc Files Required for Remote Mover
- 5.1.3.1.1. System Configuration Parameters on IRIX, Solaris, and Linux
- 5.1.3.1.1. Setting Up Remote Movers with mkhpss
- 5.1.3.1.2. Mover Configuration to Support Local File Transfer
- 5.1.1. Physical Volume Repository (PVR) Specific Configuration
- 5.1.1. Deleting a Server Configuration
- 5.1. Monitoring Server Information
- 5.1.1. Basic Server Information
- 5.1.1. Specific Server Information
- 5.1.1.1. Core Server Information Window
- 5.1.1.1. Gatekeeper Information Window
- 5.1.1.1. Location Server Information Window
- 5.1.1.2. Migration/Purge Server Information Window
- 5.1.1.3. Mover Information Window
- 5.1.1.1. Physical Volume Library (PVL) Information Window
- 5.1.1.2. Physical Volume Repository (PVR) Information Windows
- 5.1. Real-Time Monitoring (RTM)
- 5.2. Starting HPSS
- 5.1. Stopping HPSS
- 5.2. Server Repair and Reinitialization
- 5.1. Forcing an SSM Connection
- Chapter 6. Storage Configuration
- 6.1. Storage Classes
- 6.2. Storage Hierarchies
- 6.3. Classes of Service
- 6.4. Migration Policies
- 6.5. Purge Policies
- 6.6. File Families
- Chapter 7. Device and Drive Management
- Chapter 8. Volume and Storage Management
- 8.1. Adding Storage Space
- 8.2. Removing Storage Space
- 8.3. Monitoring Storage Space
- 8.4. Dealing with a Space Shortage
- 8.5. Volume Management
- 8.6. Monitoring and Managing Volume Mounts
- 8.7. New Storage Technology Insertion
- Chapter 9. Logging and Status
- Chapter 10. Filesets and Junctions
- Chapter 11. Files, Directories and Objects by SOID
- Chapter 12. Tape Aggregation
- Chapter 13. User Accounts and Accounting
- Chapter 14. User Interfaces
- Chapter 15. Backup and Recovery
- Chapter 16. Management Tools

% /opt/hpss/bin/hpssuser -add john -ssm
[ adding ssm user ]
1) admin
2) operator
Choose SSM security level
(type a number or RETURN to cancel):
> 1
[ ssm user added : admin ]
After SSM users are added, removed, or modified, the System Manager will automatically discover the
change when the user attempts to login. See the hpssuser man page for details.
Removing an SSM user or modifying an SSM user's security level won't take effect until that user
attempts to start a new session. This means that if an SSM user is removed, any existing SSM
sessions for that user will continue to work; access won't be denied until the SSM user attempts
to start a new SSM session. Likewise, if the SSM user's security level is changed, any existing
sessions for that user will continue to work at the old security level; the new security level access
won't be recognized until the SSM user starts a new SSM session).
3.3.2.2. SSM User Authorization
SSM user authorization is set properly by the hpssuser utility with no further modification required. This
section explains how the authorization levels are stored internally and how they may be viewed for
debugging or modified.
The SSM admin and operator security authorization levels are defined in the AUTHZACL table in the
HPSS DB2 database. Each SSM user must have an entry in this table. The permissions supported in the
table are:
• r – read
• w – write
• x – execute
• c – control
• i – insert
• d – delete
• t – test
SSM administrators must be granted all permissions: rwxcidt. SSM operators must be granted
r—c—t permissions. All other permission combinations are not recognized by the SSM server and will
be treated as no permissions at all.
The AUTHZACL table may be viewed or updated with the hpss_server_acl utility. The hpssuser
utility program creates and deletes SSM user entries in the AUTHZACL table using the hpss_server_acl
utility. Normally, there is no need to invoke the hpss_server_acl utility directly because it is invoked by
the hpssuser utility. However, it is a useful tool for examining and modifying the authorization table.
HPSS Management Guide November 2009
Release 7.3 (Revision 1.0) 36