
Computer Drive User Manual
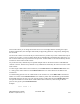

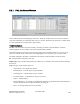


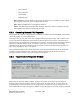
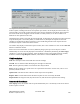
Table Of Contents
- Chapter 1. HPSS 7.1 Configuration Overview
- Chapter 2. Security and System Access
- Chapter 3. Using SSM
- 3.1. The SSM System Manager
- 3.2. Quick Startup of hpssgui
- 3.3. Configuration and Startup of hpssgui and hpssadm
- 3.4. Multiple SSM Sessions
- 3.5. SSM Window Conventions
- 3.6. Common Window Elements
- 3.7. Help Menu Overview
- 3.8. Monitor, Operations and Configure Menus Overview
- 3.9. SSM Specific Windows
- 3.10. SSM List Preferences
- Chapter 4. Global & Subsystem Configuration
- 4.1. Global Configuration Window
- 4.2. Storage Subsystems
- 4.2.1. Subsystems List Window
- 4.2.2. Creating a New Storage Subsystem
- 4.2.3. Storage Subsystem Configuration Window
- 4.2.3.1. Create Storage Subsystem Metadata
- 4.2.3.2. Create Storage Subsystem Configuration
- 4.2.3.3. Create Storage Subsystem Servers
- 4.2.3.4. Assign a Gatekeeper if Required
- 4.2.3.5. Assign Storage Resources to the Storage Subsystem
- 4.2.3.6. Create Storage Subsystem Fileset and Junction
- 4.2.3.7. Migration and Purge Policy Overrides
- 4.2.3.8. Storage Class Threshold Overrides
- 4.2.4. Modifying a Storage Subsystem
- 4.2.5. Deleting a Storage Subsystem
- Chapter 5. HPSS Servers
- 5.1. Server List
- 5.1. Server Configuration
- 5.1.1. Common Server Configuration
- 5.1.1. Core Server Specific Configuration
- 5.1.2. Gatekeeper Specific Configuration
- 5.1.3. Location Server Additional Configuration
- 5.1.4. Log Client Specific Configuration
- 5.1.1. Log Daemon Specific Configuration
- 5.1.2. Migration/Purge Server (MPS) Specific Configuration
- 5.1.3. Mover Specific Configuration
- 5.1.3.1. Mover Specific Configuration Window
- 5.1.3.1. Additional Mover Configuration
- 5.1.3.1.1. /etc/services, /etc/inetd.conf, and /etc/xinetd.d
- 5.1.3.1.2. The Mover Encryption Key Files
- 5.1.3.1.3. /var/hpss/etc Files Required for Remote Mover
- 5.1.3.1.1. System Configuration Parameters on IRIX, Solaris, and Linux
- 5.1.3.1.1. Setting Up Remote Movers with mkhpss
- 5.1.3.1.2. Mover Configuration to Support Local File Transfer
- 5.1.1. Physical Volume Repository (PVR) Specific Configuration
- 5.1.1. Deleting a Server Configuration
- 5.1. Monitoring Server Information
- 5.1.1. Basic Server Information
- 5.1.1. Specific Server Information
- 5.1.1.1. Core Server Information Window
- 5.1.1.1. Gatekeeper Information Window
- 5.1.1.1. Location Server Information Window
- 5.1.1.2. Migration/Purge Server Information Window
- 5.1.1.3. Mover Information Window
- 5.1.1.1. Physical Volume Library (PVL) Information Window
- 5.1.1.2. Physical Volume Repository (PVR) Information Windows
- 5.1. Real-Time Monitoring (RTM)
- 5.2. Starting HPSS
- 5.1. Stopping HPSS
- 5.2. Server Repair and Reinitialization
- 5.1. Forcing an SSM Connection
- Chapter 6. Storage Configuration
- 6.1. Storage Classes
- 6.2. Storage Hierarchies
- 6.3. Classes of Service
- 6.4. Migration Policies
- 6.5. Purge Policies
- 6.6. File Families
- Chapter 7. Device and Drive Management
- Chapter 8. Volume and Storage Management
- 8.1. Adding Storage Space
- 8.2. Removing Storage Space
- 8.3. Monitoring Storage Space
- 8.4. Dealing with a Space Shortage
- 8.5. Volume Management
- 8.6. Monitoring and Managing Volume Mounts
- 8.7. New Storage Technology Insertion
- Chapter 9. Logging and Status
- Chapter 10. Filesets and Junctions
- Chapter 11. Files, Directories and Objects by SOID
- Chapter 12. Tape Aggregation
- Chapter 13. User Accounts and Accounting
- Chapter 14. User Interfaces
- Chapter 15. Backup and Recovery
- Chapter 16. Management Tools
Fill Count. The number of cartridge labels to be added to the end of the list when the Volume Label
field is next modified. This number may be one or greater. If the list fills up before the Fill Count is
exhausted, filling stops, and a message box is displayed (see Maximum Volumes Allowed below).
Fill Increment. In a multiple-cartridge fill, this field determines how each new cartridge label is
generated from the previous one. A cartridge label is six alphanumeric characters. The Fill Increment is
added to the least significant part of a cartridge label to generate a new label.
Volume Label. The cartridge label to be added to the end of the Volume List. If Fill Count is greater
than 1, this will be the first label of a fill sequence. The label must be exactly six characters long.
Maximum Volumes Allowed. The maximum number of cartridge labels that will be allowed in the
Volume List (10,000).
Total Count. The total number of labels currently in the Volume List.
Volume List. A list of cartridge/volume labels specifying the cartridges to be moved. You cannot enter
labels directly into this list, but must construct it in one of the three ways described above. Use the
scrollbar to move up and down the list of labels.
You can select one or more labels from the list for the purpose of removing them from the list (see Clear
Selected below).
Buttons
Clear All. Clears the Volume List, and resets Fill Count and Fill Increment to 1.
Clear Selected. If one or more cartridges are selected (highlighted) in the Volume List, clicking on this
button will remove them from the list. Note that this does not actually delete anything from HPSS.
Move Cartridges. Begins moving the listed cartridges. A start message is displayed on the message line
at the bottom of the window, and all window features are disabled, except for the Dismiss button; this
prevents you from modifying any data on the window while the move is in progress.
It is a good idea to have the HPSS Alarms and Events window open while moving proceeds, so that all
relevant log messages can be viewed. Move operation initiation, completion and errors will be reported
in the HPSS Alarms and Events window.
While moving proceeds, status messages are displayed on the status bar. When the move is finished, a
completion message is displayed and the window features are reenabled. At this point new data can be
entered for a new move.
8.6. Monitoring and Managing Volume Mounts
Volume mounts are performed by the PVL. Every volume mount is associated with a PVL job. The PVL
Job Queue window, lists all PVL jobs and the PVL Request Information window lists detailed
information about a single PVL job.
The PVL reports every tape mount request in the Tape Mount Requests window. Tapes which need to be
returned to the robot from a shelf or vault location are reported in the Tape Check-In Requests window.
Each of these windows is described in detail in this section.
HPSS Management Guide November 2009
Release 7.3 (Revision 1.0) 283