
Computer Drive User Manual
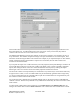


Table Of Contents
- Chapter 1. HPSS 7.1 Configuration Overview
- Chapter 2. Security and System Access
- Chapter 3. Using SSM
- 3.1. The SSM System Manager
- 3.2. Quick Startup of hpssgui
- 3.3. Configuration and Startup of hpssgui and hpssadm
- 3.4. Multiple SSM Sessions
- 3.5. SSM Window Conventions
- 3.6. Common Window Elements
- 3.7. Help Menu Overview
- 3.8. Monitor, Operations and Configure Menus Overview
- 3.9. SSM Specific Windows
- 3.10. SSM List Preferences
- Chapter 4. Global & Subsystem Configuration
- 4.1. Global Configuration Window
- 4.2. Storage Subsystems
- 4.2.1. Subsystems List Window
- 4.2.2. Creating a New Storage Subsystem
- 4.2.3. Storage Subsystem Configuration Window
- 4.2.3.1. Create Storage Subsystem Metadata
- 4.2.3.2. Create Storage Subsystem Configuration
- 4.2.3.3. Create Storage Subsystem Servers
- 4.2.3.4. Assign a Gatekeeper if Required
- 4.2.3.5. Assign Storage Resources to the Storage Subsystem
- 4.2.3.6. Create Storage Subsystem Fileset and Junction
- 4.2.3.7. Migration and Purge Policy Overrides
- 4.2.3.8. Storage Class Threshold Overrides
- 4.2.4. Modifying a Storage Subsystem
- 4.2.5. Deleting a Storage Subsystem
- Chapter 5. HPSS Servers
- 5.1. Server List
- 5.1. Server Configuration
- 5.1.1. Common Server Configuration
- 5.1.1. Core Server Specific Configuration
- 5.1.2. Gatekeeper Specific Configuration
- 5.1.3. Location Server Additional Configuration
- 5.1.4. Log Client Specific Configuration
- 5.1.1. Log Daemon Specific Configuration
- 5.1.2. Migration/Purge Server (MPS) Specific Configuration
- 5.1.3. Mover Specific Configuration
- 5.1.3.1. Mover Specific Configuration Window
- 5.1.3.1. Additional Mover Configuration
- 5.1.3.1.1. /etc/services, /etc/inetd.conf, and /etc/xinetd.d
- 5.1.3.1.2. The Mover Encryption Key Files
- 5.1.3.1.3. /var/hpss/etc Files Required for Remote Mover
- 5.1.3.1.1. System Configuration Parameters on IRIX, Solaris, and Linux
- 5.1.3.1.1. Setting Up Remote Movers with mkhpss
- 5.1.3.1.2. Mover Configuration to Support Local File Transfer
- 5.1.1. Physical Volume Repository (PVR) Specific Configuration
- 5.1.1. Deleting a Server Configuration
- 5.1. Monitoring Server Information
- 5.1.1. Basic Server Information
- 5.1.1. Specific Server Information
- 5.1.1.1. Core Server Information Window
- 5.1.1.1. Gatekeeper Information Window
- 5.1.1.1. Location Server Information Window
- 5.1.1.2. Migration/Purge Server Information Window
- 5.1.1.3. Mover Information Window
- 5.1.1.1. Physical Volume Library (PVL) Information Window
- 5.1.1.2. Physical Volume Repository (PVR) Information Windows
- 5.1. Real-Time Monitoring (RTM)
- 5.2. Starting HPSS
- 5.1. Stopping HPSS
- 5.2. Server Repair and Reinitialization
- 5.1. Forcing an SSM Connection
- Chapter 6. Storage Configuration
- 6.1. Storage Classes
- 6.2. Storage Hierarchies
- 6.3. Classes of Service
- 6.4. Migration Policies
- 6.5. Purge Policies
- 6.6. File Families
- Chapter 7. Device and Drive Management
- Chapter 8. Volume and Storage Management
- 8.1. Adding Storage Space
- 8.2. Removing Storage Space
- 8.3. Monitoring Storage Space
- 8.4. Dealing with a Space Shortage
- 8.5. Volume Management
- 8.6. Monitoring and Managing Volume Mounts
- 8.7. New Storage Technology Insertion
- Chapter 9. Logging and Status
- Chapter 10. Filesets and Junctions
- Chapter 11. Files, Directories and Objects by SOID
- Chapter 12. Tape Aggregation
- Chapter 13. User Accounts and Accounting
- Chapter 14. User Interfaces
- Chapter 15. Backup and Recovery
- Chapter 16. Management Tools
Based on the Import Type, the import request will be processed depending on how the media is currently
labeled. See Section 8.1.1.4: Selecting Import Type for Disk Volumes on page 234 for more information
on selecting the appropriate Import Type.
File Containing Volume List. The name of an external file containing a list of volume labels to be
added to the end of the Volume List.
Fill Count. The number of labels to be added to the Volume List when a value is typed into the Volume
Label field. Valid values are positive integers greater than or equal to 1. The default value is 1. If the
value specified for Fill Count would cause the list to grow beyond the Maximum Volumes Allowed, an
error message is displayed (see Maximum Volumes Allowed below).
Fill Increment. This field determines how each new volume label is generated. The Fill Increment is
the number by which each automatically generated label will differ from the previous one when a value
is typed into the Volume Label field and the Fill Count is greater than 1. Valid values are any positive
integer. The default value is 1. The Fill Increment is added to the least significant part of a volume label
to generate a new label.
Volume Label. The six-character alpha-numeric label of a volume to be imported. The label is added to
the end of the Volume list. If Fill Count is greater than 1, multiple labels are generated using the entered
label as a starting point.
Maximum Volumes Allowed. The maximum number of volume labels that will fit in the Volume List.
The value is 10,000 and is set by SSM. This field is non-editable.
Total Count. The total number of disks to be imported. This is an informational field reflecting the
number of volume names generated in the Volume List and is not directly editable.
Volume List. A list of volume labels specifying the volumes to be imported. You cannot enter labels
directly into this list, but must construct it using one of the three ways described above. Use the scrollbar
to move up and down the list of labels.
You can select one or more labels from the list for the purpose of deleting them from the list (see Clear
Selected below). To select one label, click on it with the mouse; the selection will be highlighted. To
select a range, select one label; then select a second label while holding down the Shift key. The selected
labels, and all labels between the two, will be highlighted. You may also hold down the Control key
while selecting, to select or deselect individual labels without affecting any of the others.
Buttons
Clear All. Clears the Volume List, and resets Fill Count and Fill Increment to 1.
Clear Selected. If one or more volumes are selected (highlighted) in the Volume list, clicking on this
button will remove them from the list. Note that this does not actually delete anything from HPSS.
Import. Begins the volume import using the displayed data. A start message is displayed on the message
line at the bottom of the window, and all window features are disabled, except for the Dismiss button;
this prevents you from modifying any data on the window while the import is in progress.
It is a good idea to have the Alarms and Events window open while import proceeds, so that all relevant
log messages can be viewed.
When the import is finished, a completion message is displayed and the window features are sensitized
HPSS Management Guide November 2009
Release 7.3 (Revision 1.0) 233