Color Monitor P97 Operating Instructions English
First Edition (October 2001) This publication could contain technical inaccuracies or typographical errors. Changes are made periodically to the information herein; these changes will be made in later editions. IBM may make improvements and/or changes in the product(s) and/or program(s) at any time. It is possible that this publication may contain reference to, or information about, IBM products (machines and programs), programming, or services that are not announced in your country.
Table of Contents Precautions . . . . . . . . . . . . . . . . . . . . . . . . . . . . . . . . . . . . . . . . . . . 2 Identifying parts and controls . . . . . . . . . . . . . . . . . . . . . . . . . . . . . . 3 Setup . . . . . . . . . . . . . . . . . . . . . . . . . . . . . . . . . . . . . . . . . .4 Step 1: Connect your monitor to your computer . . . . . . . . . . . . . . . 4 Step 2: Connect the power cord . . . . . . . . . . . . . . . . . . . . . . . . . . . 4 Step 3: Turn on the monitor and computer . .
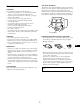
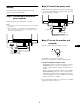
Use of the Tilt-Swivel Precautions This monitor can be adjusted within the angles shown below. To find the center of the monitor’s turning radius, align the center of the monitor’s screen with the centering mark on the stand. Hold the monitor at the bottom with both hands when you turn it horizontally or vertically. Be careful not to pinch your fingers at the back of the monitor when you tilt the monitor up vertically.
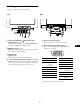
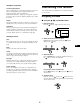
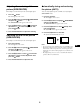
Identifying parts and controls See the pages in parentheses for further details. Front Rear 5 1 6m (contrast/down) and M (brightness/up) buttons (pages 5 – 12) These buttons are used to display the BRIGHT/CONTRAST menu and to highlight the desired menu item. 2 6 5 AC input connector (page 4) This connector provides ac power to the monitor. 6 Video input connector (HD15) (page 4) This connector inputs RGB video signals (0.700 Vp-p, positive) and sync signals.
Step 2: Connect the power cord Setup With the monitor and computer turned off, first connect the proper power cord for your local supply to the monitor, then connect it to a properly grounded power outlet. This monitor works with platforms running at horizontal frequencies between 30 and 107 kHz. Step 1: Connect your monitor to your computer Turn off the monitor and computer before connecting. Notes • Do not touch the pins of the video signal cable connector as this might bend the pins.
Workplace Preparation Customizing Your Monitor Positioning the Monitor Choose a suitable place to position the monitor where it is not near fluorescent desk lighting or any equipment that produces magnetic fields that could cause interference. Ensure that the furniture or equipment can support the weight of the monitor. Allow at least 2 in. (50 mm) ventilation space around the monitor. You can make numerous adjustments to your monitor using the on-screen menu.
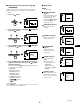
x Selecting the on-screen menu language (LANGUAGE) x Menu items EXIT Close the menu. English, French, German, Spanish, Italian, Dutch, Swedish, Russian, and Japanese versions of the on-screen menus are available. 1 Press the BRIGHT/CONTRAST (page 7) Adjusts the brightness and contrast. You can call up this menu directly by pressing the M or 6 m buttons while there is no menu on the screen. button.
OPTION (page 12) Adjusts the monitor’s options. The options include: • locking the controls • changing the on-screen menu’s language • changing the on-screen menu position 0 RESET (page 12) Resets the adjustments. Adjusting the brightness and contrast (BRIGHT/CONTRAST) OPT I ON CONTROL LOCK ON OFF These settings are stored in memory for all signals. 1280x1024 / 85Hz 1 Press the M button to call up the BRIGHTNESS adjustment window, or press the 6 m button to call up the CONTRAST adjustment window.
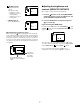
Adjusting the centering of the picture (SIZE/CENTER) Automatically sizing and centering the picture (AUTO) This setting is stored in memory for the current input signal. You can easily adjust the picture to fill the screen by using the SIZE/CENTER menu. 1 Press the button. The menu appears on the screen. 1 Press the button. The menu appears on the screen. 2 Press the m/M buttons to highlight SIZE/CENTER and press the button. The SIZE/CENTER menu appears on the screen.
Adjusting the shape of the picture (GEOMETRY) Adjusting the convergence (CONVERGENCE) VERGENCE) The GEOMETRY settings allow you to adjust the rotation and shape of the picture. The (rotation) setting is stored in memory for all input signals. All other settings are stored in memory for the current input signal. The CONVERGENCE settings allow you to adjust the quality of the picture by controlling the convergence. The convergence refers to the alignment of the red, green, and blue color signals.
Adjusting the picture quality (SCREEN) Adjusting the color of the picture (COLOR) The SCREEN settings allow you to degauss (demagnetize) the monitor manually and adjust the picture quality by controlling the moire. • If the color is not uniform or the picture is fuzzy, degauss the monitor (DEGAUSS). • If elliptical or wavy patterns appear on the screen, cancel the moire (CANCEL MOIRE). The monitor is automatically demagnetized (degaussed) when the power is turned on.
x PRESET mode x EXPERT mode 1 Press the You can make additional adjustments to the color in greater detail by selecting the EXPERT mode. button. The menu appears on the screen. 1 Press the 2 Press the m/M buttons to highlight button. The menu appears on the screen. COLOR and press the button. The COLOR menu appears on the screen. 2 Press the m/M buttons to highlight press the 3 Press the m/M buttons to highlight the . Then press COLOR button. COLOR COLOR and button.
Additional settings (OPTION) Resetting the adjustments (RESET) You can lock the controls, change the on-screen language, change the menu position. This monitor has the following 2 reset methods. x Resetting all the adjustment data for the current input signal 1 Press the button. The menu appears on the screen. 1 Press the button. The menu appears on the screen. 2 Press the m/M buttons to highlight OPTION and press the button. The OPTION menu appears on the screen.
Technical Features Troubleshooting Before contacting technical support, refer to this section. Preset and user modes If thin lines appear on your screen (damper wires) When the monitor receives an input signal, it automatically matches the signal to one of the factory preset modes stored in the monitor’s memory to provide a high quality picture at the center of the screen. (See page 18 for a list of the factory preset modes.
If OUT OF SCAN RANGE appears on line 1 This indicates that the input signal is not supported by the monitor’s specifications. 2 1 I NFORMAT I ON MON I TOR I S WORK I NG I NPUT : 2 0 0 . 0 k H z / 8 5 Hz OUT OF SCAN RANGE CHANGE S I GNAL T I M I NG W R G B 3 2 The frequencies of the current input signal If the monitor recognizes the frequencies of the current input signal, the horizontal and vertical frequencies are also displayed. 3 The remedies CHANGE SIGNAL TIMING appears on the screen.
Trouble symptoms and remedies If the problem is caused by the connected computer or other equipment, please refer to the connected equipment’s instruction manual. Use the self-diagnosis function (page 17) if the following recommendations do not resolve the problem. Symptom Check these items No picture If the 1 (power) indicator is not lit • Check that the power cord is properly connected. • Check that the 1 (power) button is in the “on” position.
Symptom Check these items Picture is ghosting • Eliminate the use of video cable extensions and/or video switch boxes. • Check that all plugs are firmly seated in their sockets. Picture is not centered or sized properly • Set the AUTO ( ) function to OK (on) in the SIZE/CENTER menu (page 8). • Adjust the size or centering (page 8). Note that with some input signals and/or graphics boards the periphery of the screen is not fully utilized. Edges of the image are curved • Adjust the geometry (page 9).
Self-diagnosis function Specifications This monitor is equipped with a self-diagnosis function. If there is a problem with your monitor or computer(s), the screen will go blank and the 1 (power) indicator will either light up green or flash orange. If the 1 (power) indicator is lit in orange, the computer is in power saving mode. Try pressing any key on the keyboard or moving the mouse.
x Preset mode timing table No. Resolution (dots × lines) Service Information Horizontal Vertical Graphics Frequency Frequency Mode The following parts are for use by IBM service, or IBM authorized dealers, to support customer warranty. Parts are for service use only. 1 640 × 480 31.5 kHz 60 Hz VGA-G 2 640 × 480 43.3 kHz 85 Hz VESA 3 720 × 400 31.5 kHz 70 Hz VGA-Text 4 720 × 400 37.9 kHz 85 Hz VESA Part No. M/T-Model Description 5 800 × 600 37.