3-867-449-11 (1) Color Monitor P76 Operating Instructions GB Mode d’emploi FR Bedienungsanleitung DE Manual de instrucciones ES Istruzioni per l’uso IT
DANGER Getting Started Getting Started To avoid shock hazard: • Do not remove the covers. • Do not operate this product unless the stand is attached. • Do not connect or disconnect this product during an electrical storm. • The power cord plug must be connected to a properly wired and grounded power outlet. • Any equipment to which this product will be attached must also be connected to properly wired and grounded power outlets.
PELIGRO Para evitar riesgos de descargas eléctricas: • No retire bajo ningún concepto las cubiertas. • No maneje el monitor sin antes acoplar el soporte. • No conecte ni desconecte el equipo de una toma de alimentación durante una tormenta eléctrica. • El cable de alimentación debe estar conectado a un enchufe debidamente cableado y con toma de tierra.
FARE Getting Started Getting Started Slik unngår du fare for elektrisk støt: • Ikke ta av dekslene. • Ikke bruk produktet dersom sokkelen ikke er montert. • Ikke koble produktet til eller fra under tordenvær. • Pluggen på strømledningen må kobles til korrekt montert og jordet strømuttak. • Utstyr som dette produktet eventuelt blir koblet til, må også kobles til korrekt montert og jordet strømuttak. • For å isolere skjermen fra strømkilden må du ta ut pluggen fra strømuttaket.
TEHLİKE Elektrik çarpması tehlikesinden kaçınmak için: • Kapakları çıkarmayınız. • Bu cihazı kaidesine takılı durumda değilken çalıştırmayınız. • Bu cihazı elektriksel fırtına sırasında prize takmayınız veya prizden çıkarmayınız. • Elektrik kablosunun fişi, elektrik ve toprak bağlantıları usulüne uygun olarak yapılmış bir prize takılmalıdır. • Bu cihazın bağlanacağı diğer tüm cihazlar da elektrik ve toprak bağlantıları usulüne uygun olarak yapılmış prize takılmış olmalıdır.
Getting Started Getting Started English GB F ES C
Edition 1 This publication could contain technical inaccuracies or typographical errors. Changes are made periodically to the information herein; these changes will be made in later editions. IBM may make improvements and/or changes in the product(s) and/or program(s) at any time. It is possible that this publication may contain reference to, or information about, IBM products (machines and programs), programming, or services that are not announced in your country.
Getting Started TABLE OF CONTENTS Getting started Precautions ...................................................................................................... 2 Identifying Parts and Controls ..................................................................... 3 Setup ................................................................................................................. 4 Customizing Your Monitor Selecting the On-screen Display Language ................................................
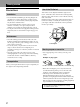
Getting started Started Precautions Installation • Prevent internal heat build-up by allowing adequate air circulation. Do not place the monitor on surfaces (rugs, blankets, etc.) or near materials (curtains, draperies) that may block the ventilation holes. • Do not install the monitor near heat sources such as radiators or air ducts, or in a place subject to direct sunlight, excessive dust, mechanical vibration or shock.
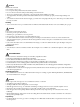
Getting Started Getting Started Identifying Parts and Controls See the pages in parentheses for further details. Front Rear 1 ? (reset) button (page 13) 6 AC IN connector (page 4) Resets the adjustments to the factory settings. 2 ¨ (brightness) down and up (./>) buttons (pages 5 – 13) 7 Video input connector (HD15) (page 4) F Inputs RGB video signals (0.700 Vp-p, positive) and SYNC signals. Adjust the picture brightness. Function as the (./>) buttons when adjusting other items.
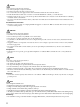
Getting Started Step 4: Turn on the monitor and computer Setup This monitor works with platforms running at horizontal frequencies between 30 and 96 kHz. Step 1: Make sure the computer and monitor are switched off Step 5: Adjust the monitor’s controls according to your personal preference The installation of your monitor is complete. Note Step 2: Connect the monitor to the computer Connect the video signal cable to the video output of the computer.
Customizing Your Monitor Getting Started Customizing Your Monitor Before adjusting • Connect the monitor and the computer, and turn them on. Selecting the On-screen Display Language If you need to change the OSD language, see “Using the LANGUAGE On-screen Display” on page 10. The default setting is English. Introducing the On-screen Display System Most adjustments are made using the MENU OSD. MENU OSD Press the button to display the MENU OSD.
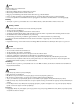
Customizing Your Monitor Using the SIZE/CENTER screen Display On- The SIZE/CENTER settings allow you to adjust the picture’s size, centering or zoom. Once the setting is adjusted, it will be stored in memory for the current input signal. 1 2 Press the button. The MENU OSD appears. Press the ./> buttons to select “ and press the button again. The SIZE/CENTER OSD appears. 4 Press the ? //buttons to adjust the settings. Select To (Horizontal Centering) / . . . to move the picture right ? . . .
Getting Started Customizing Your Monitor Using the GEOMETRY screen Display On- The GEOMETRY settings allow you to adjust the shape and orientation of the picture. Once the (Rotation) is adjusted, it will be stored in memory for all input signals received. All other adjustments will be stored in memory for the current input signal. 4 Press the ? //buttons to adjust the settings. For Press (Rotation) / . . . to rotate the picture clockwise ? . . .
Customizing Your Monitor Using the COLOR Display On-screen You can change the monitor’s color temperature. For example, you can adjust or change the colors of a picture on the screen to match the actual colors of the printed picture. Once the setting is adjusted, it will be stored in memory for all input signals received. 1 Press the button. The MENU OSD appears. 3 Press the . /> buttons to select the color temperature. TherearetwocolortemperaturemodesintheOSD.
Getting Started Customizing Your Monitor Using the CONVERGENCE screen Display On- The CONVERGENCE settings allow you to adjust the quality of the picture by controlling the convergence. The convergence refers to the alignment of the red, green, and blue color signals. If you see red or blue shadows around letters or lines, adjust the convergence. Once the setting is adjusted, it will be stored in memory for all input signals received. 1 2 Press the button. The MENU OSD appears.
Customizing Your Monitor Using the LANGUAGE screen Display On- English, French, German, Spanish, Italian, Dutch, Swedish, Russian and Japanese versions of the OSDs are available. 1 Using the OPTION Display On-screen The OPTION OSD allows you to manually degauss the screen, adjust the moire cancellation level, and adjust the OSD position. It also allows you to lock the controls. Press the button. The MENU OSD appears.
Getting Started Customizing Your Monitor Adjusting the moire Changing the on-screen display position If elliptical or wavy patterns appear on the screen, adjust the moire cancellation level. You can change the OSD position (for example, when you want to adjust the picture behind the OSD). 1 Press the button. The MENU OSD appears. 1 Press the button. The MENU OSD appears. 2 Press the ./> buttons to select “ press the button again. The OPTION OSD appears. 2 Press the .
Customizing Your Monitor Locking the controls You can protect adjustment data by locking the controls. 1 Press the button. The MENU OSD appears. 2 Press the ./> buttons to select “ press the button again. The OPTION OSD appears. Using the HELP Display On-screen The HELP OSD contains helpful hints and information about this monitor. If your monitor is displaying symptoms that match those listed in the HELP OSD, follow the onscreen instructions to resolve the problem.
Getting Started Customizing Your Monitor DISTORTED SHAPE If the shape of the picture on the screen seems distorted, try adjusting the picture’s geometry. Press the / button to jump directly to the GEOMETRY OSD. OUT OF FOCUS The picture may seem to be out of focus when the red and blue color signals are not aligned properly, causing red or blue shadows to appear around letters and lines. Try adjusting the picture’s convergence to make the shadows disappear.
Technical Features Note Power Saving Function This monitor meets the power-saving guidelines set by VESA and Energy Star, as well as the more stringent NUTEK . If the monitor is connected to a computer or video graphics board that is VESA DPMS (Display Power Management Signaling) compliant, the monitor will automatically reduce power consumption in three stages as shown below.
Technical Features Preset Modes Warning Messages Resolution Horizontal Vertical No. (dots × lines) Frequency Frequency 1 640 × 480 2 640 × 480 31.5 kHz 37.5 kHz Getting Started Additional Information Technical Features 60 Hz 75 Hz Graphics Mode If no pictures appears on the screen, one of the following messages appears on the screen. VGA I NFORMA T I ON VESA MON I TOR 3 640 × 480 43.3 kHz 85 Hz VESA 4 800 × 600 46.9 kHz 75 Hz VESA 5 800 × 600 53.
Additional Additional Information Information Troubleshooting This section may help you isolate the cause of a problem and as a result, eliminate the need to contact technical support. Symptom Check these items No picture If the u indicator is not lit • Check that the power cord is properly connected. • Check that the u (power) switch is in the “on” position.
Getting Additional StartedInformation Symptom Check these items Screen image is not centered or sized properly • Adjust the size or centering (page 6). Some video modes do not fill the screen to the edges. This problem tends to occur with certain graphic boards. Edges of the image are curved • Adjust the geometry (page 7). White lines show red or blue shadows at edges • Adjust the convergence (page 9). Picture is fuzzy • Adjust the contrast and brightness (page 4). • Degauss the monitor (page 10).
Additional Information Self-diagnosis Function Specifications This monitor is equipped with a self-diagnosis function. If there is a problem with your monitor or computer, the screen will go blank and the u indicator will either light up green or flash orange. Picture tube 0.24 mm aperture grille pitch 17 inches measured diagonally 90-degree deflection Viewable image size Approx. 327 × 243 mm (w/h) (12 7/8 × 9 5/8 inches) 16.0” viewable diagonal Resolution Horizontal: Max. 1600 dots Vertical: Max.
Federal Communications Commission (FCC) Statement This equipment has been tested and found to comply with the limits for a Class B digital device, pursuant to Part 15 of the FCC Rules. These limits are designed to provide reasonable protection against harmful interference in a residential installation. This equipment generates, uses, and can radiate radio frequency energy and, if not installed and used in accordance with the instructions, may cause harmful interference to radio communications.
MPRII This product complies with Swedish National Council for Metrology (MPR) standards issued in December 1990 (MPRII) for very low frequency (VLF) and extremely low frequency (ELF). Hinweise Gemäß der Amtsblätter des BMPT Nm. 61/1991 und 6/1992 wird der Betreiber darauf aufmerksam gemächt, daß die von ihm mit diesem Gerät zusammengestellte Anlage auch den technischen Bestimmungen dieser Amtsblätter genügen muß.
European Union (EU) Statement This product has been tested and found to comply with the limits for Class B Information Technology Equipment according to CISPR 22 / European Standard EN 55022. The limits for Class B equipment were derived for typical residential environments to provide reasonable protection against interference with licensed communication devices.
Statement of Limited Warranty U.S., Canada and Puerto Rico The warranties provided by IBM in this Statement of Limited Warranty apply only to Machines you originally purchase for your use, and not for resale, from IBM or your reseller. The term “Machine” means an IBM machine, its features, conversions, upgrades, elements, or accessories, or any combination of them. Unless IBM specifies otherwise, the following warranties apply only in the country where you acquire the Machine.
Extent of Warranty IBM does not warrant uninterrupted or error-free operation of a Machine. The warranties may be voided by misuse, accident, modification, unsuitable physical or operating environment, improper maintenance by you, removal or alteration of Machine or parts identification labels, or failure caused by a product for which IBM is not responsible.
TCO’99 Eco-document Congratulations! You have just purchased a TCO’95 approved and labelled product! Your choice has provided you with a product developed for professional use. Your purchase has also contributed to reducing the burden on the environment and also, to the further development of environmentally adapted electronics products.
On this page, you will find a brief summary of the environmental requirements met by this product. The complete Getting Started Appendix environmental criteria document may be ordered from: TCO Development Unit S-114 94 Stockholm Sweden Fax: +46 8 782 92 07 Email (Internet): development@tco.se Current information regarding TCO’95 approved and labelled products may also be obtained via the Internet, using the address: http://www.tco-info.
TCO’99 Eco-document Congratulations! You have just purchased a TCO’99 approved and labelled product! Your choice has provided you with a product developed for professional use. Your purchase has also contributed to reducing the burden on the environment and also to the further development of environmentally adapted electronics products.
Labelled products must meet strict environmental demands, for example, in respect of the reduction of electric and magnetic Getting Started Appendix fields, physical and visual ergonomics and good usability. Below you will find a brief summary of the environmental requirements met by this product. The complete environmental criteria document may be ordered from: TCO Development SE-114 94 Stockholm, Sweden Fax: +46 8 782 92 07 Email (Internet): development@tco.
Service Information The following parts are for use by IBM service, or IBM authorized dealers, to support customer warranty. Parts are for service use only.
Getting Started Getting Started XI
P202 User Guide Part Number 61H0239 EC D03285 Printed in Japan *61H0239*