Infoprint Color 1454 & 1464 Help guide G510-4097-00
Infoprint Color 1454 & 1464 Help guide G510-4097-00
Help guide Page 1 of 1 Help guide Other languages Help Menu pages The Help Menu pages, User’s Guide, and Setup Guide are also available on the publications CD. Other Help Menu pages available include: • • • • Color quality guide Printing guide Connection guide Print media guide • Clearing jams guide • Print quality guide • Repetitive defects guide • Moving guide Setup Guide The Setup Guide provides information about setting up the printer and its options.
Color quality guide Page 1 of 6 Color quality guide This Color Quality guide is intended to help users understand how operations available on the printer can be used to adjust and customize color output. A brief description of the purpose and operation of the functions available that affect color output is provided. Additionally, some helpful suggestions are provided on how to use these functions to produce desirable color output and to solve certain color related problems commonly experienced by users.
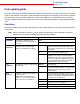
Color quality guide Page 2 of 6 Menu item Purpose Color Balance To provide users with the ability to Cyan make subtle color adjustments to Magenta printed output by increasing or decreasing the amount of toner being Yellow used for each color plane individually. Black Note: This function is only applied to files printed using the PostScript Reset driver. Defaults -5, -4, -3, -2, -1, 0*, 1, 2, 3, 4, 5 To assist users in selecting colors to be printed.
Color quality guide Page 3 of 6 Menu item Purpose Values Color Adjust To manually recalibrate the color conversion tables, adjusting for variations in output that can occur as a result of changing conditions, such as room temperature or humidity. No selections exist for this operation. To conserve toner. If selected, this setting will override Toner Darkness settings. On Color Saver Pressing Select initiates this operation. Applies a lower Toner Darkness level. Toner Darkness setting is ignored.
Color quality guide Page 4 of 6 Should I use the PostScript or PCL driver for the best color? What driver settings should I use for the best color? The PostScript driver is strongly recommended for best color quality. The default settings in the PostScript driver will provide preferred color quality for the majority of printouts.
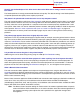
Color quality guide Page 5 of 6 How can I match a particular color (such as a color in a corporate logo)? Occasionally users have a need for the printed color of a particular object to closely match a specific color of interest. A typical example of this situation is when a user is trying to match the color of a corporate logo. While instances can occur in which the printer cannot exactly reproduce the desired color, users should be able to identify adequate color matches for the majority of cases.
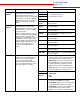
Color quality guide Page 6 of 6 Color specification of object being printed CMYK Classification of object being printed Text Graphic Image Printer Color Correction setting Color Samples pages to print and use for color matching Auto US CMYK Off Off - CMYK Manual US CYMK*, Vivid CMYK, Off, Euro CMYK* Auto US CMYK Off Off - CMYK Manual US CYMK*, Vivid CMYK, Off, Euro CMYK* Auto US CMYK Off Off - CMYK Manual US CYMK*, Vivid CMYK, Off, Euro CMYK* * The default Manual setting.
Printing guide Page 1 of 2 Printing guide 4 Flex the sheets back and forth to loosen them, and then fan them. Get the most out of your printer by properly loading the trays and setting the types and sizes. Never mix media types within a tray. 5 Place the paper against the back left corner of the tray, print side down. Note: Paper Size cannot be adjusted when auto size sensing is enabled. Auto size sensing is enabled by default for printer trays, but is not available for the multipurpose feeder.
Printing guide Page 2 of 2 7 If you are loading a different type of media than was previously loaded in the tray, change the Paper Type setting for that tray on the operator panel. See “Set Paper Type and Paper Size” on page 2. Loading other input options For information about loading other input options, refer to the publications CD that came with the printer.
Connection guide Page 1 of 9 Connection guide Follow these steps to properly connect your printer to your computer or network system: 1 Install drivers for local printing on page 1. 2 Verify printer setup on page 3. Using Windows Server 2003, Windows 2000, Windows XP, and Windows 98 SE, Windows Me, and Windows NT 1 Insert the drivers CD. 3 Configure for TCP/IP on page 4. 4 Install drivers for network printing on page 5. If the CD does not auto launch, click Start à Run, and then type D:\Setup.
Connection guide Page 2 of 9 Using Windows 95 and Windows 98 (first edition) Note: Some Windows operating systems require that you have administrative access to install printer drivers on your computer. 1 Turn on your computer. 2 Click Start à Settings à Printers, and then double-click Add Printer. Note: USB support is not available for the Windows 95 operating system. 3 When prompted, select Local printer. 4 Select the manufacturer and model of your printer, and then click Have Disk.
Connection guide Page 3 of 9 7 In the PostScript Printer Description (PPD) File section, click Auto Setup. Make sure your printer PPD now matches your printer. 8 Click Create, and then click Save. 9 Specify a printer name, and then click Save. Your printer is now saved as a desktop printer. Creating a queue in Print Center or Printer Setup Utility (Macintosh OS X) 1 Install a printer PostScript Printer Description (PPD) file on your computer.
Connection guide Page 4 of 9 also provides important information that helps you configure for network printing. Note: If an optional MarkNet print server is installed, you see Print Net1 Setup on the display. 1 Make sure the printer is on. 2 Press Menu until you see Utilities Menu, and then press Select. 3 Press Menu until you see Print Net Setup, and then press Select. The network setup page prints and the printer returns to Ready status.
Connection guide Page 5 of 9 Verifying the IP settings 1 Print another network setup page. Look under the “TCP/IP” heading and make sure the IP address, netmask, and gateway are what you expected. 2 Ping the printer and verify that it responds. For example, at a command prompt on a network computer, type ping followed by the new printer IP address (for example, 192.168.0.11). If the printer is active on the network, you should receive a reply.
Connection guide Page 6 of 9 3 Click Printer and Software. 4 Click Agree to accept the license agreement. 5 Select Suggested, and then click Next. The Suggested option is the default installation for local and network-attached setup. If you need to install utilities, change settings, or customize device drivers, select Custom, and follow the instructions on your screen. 6 Select Network Attached, the printer manufacturer, and then click Next. 7 Select the printer you are setting up, and then click Next.
Connection guide Page 7 of 9 7 Check the following to make sure the printer was successfully shared. – The printer object in the Printers folder now has a shared indicator. For example, in Windows NT 4.0, a hand appears under the printer object. – Browse Network Neighborhood. Find the host name of the server and look for the shared name you assigned to the printer. 5 Close Network Neighborhood. 6 Print a test page to verify printer installation.
Connection guide Page 8 of 9 Macintosh Note: A PostScript Printer Description (PPD) file provides detailed information about the capabilities of a printer to your UNIX or Macintosh computers. A PostScript Printer Description (PPD) file must be installed on each computer used to print to a network printer. In addition, the computer must also have either a desktop printer (Mac OS 8.6 to 9.x) or a print queue in Print Center (Mac OS X). A print queue can be created either through AppleTalk or IP Printing.
Connection guide Page 9 of 9 Step 2: Create a print queue in Print Center or Printer Setup Utility 4 Choose IP Printing from the pop-up menu. Using AppleTalk 5 Enter the IP address or the printer DNS name in the Printer’s Address box. Follow these steps to create a print queue using AppleTalk. To create an IP print queue, see “Using IP Printing” on page 9. 6 Choose the printer manufacturer from the Printer Model pop-up menu. 1 Open Finder, click Applications, and then click Utilities.
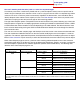
Print media guide Page 1 of 2 Print media guide MPF 9 • • • • • 500 • • • • MPF • • • • 500 • • MPF • • 500 • • • 2000 • • • MPF • • • • • 500 • • • • MPF • • • 500 • • MPF • • Card stock 2 Upper limit, grain long: Index Bristol: 163 g/m2 (90 lb) Tag: 163 g/m2 (100 lb) Cover: 176 g/m2 (65 lb) Upper limit, grain short: Index Bristol: 199 g/m2 (110 lb) Tag: 203 g/m2 (125 lb) Cover: 216 g/m2 (80 lb) Transparency • • • • • • • • • • • • • • •
Print media guide Page 2 of 2 Storing paper Use the following guidelines to avoid paper feeding problems and uneven print quality. • Store paper in an environment where the temperature is approximately 21° C (70° F) and the relative humidity is 40%. • Store cartons of paper on a pallet or shelf rather than directly on the floor. • If you store individual packages of paper out of the original carton, make sure they rest on a flat surface so the edges do not buckle or curl.
Clearing jams guide Page 1 of 6 Clearing jams guide Access doors and trays When a paper jam occurs, the jam number will appear on line one of the operator panel and the number of pages jammed will appear on line two. The following illustrations show areas in the printer where jams can occur.
Clearing jams guide Page 2 of 6 Understanding jam messages Note: Always clear the entire paper path when you receive any jam message. Paper jam message Check Areas... What to do… 200 Paper Jam A, B, T1 Follow the instructions for clearing Area A, Area B, and Area T1. (Tray 1 and left access door beside tray 1) 201 Paper Jam If the jam message persists, paper may be caught in the image transfer unit.
Clearing jams guide Page 3 of 6 Area B 1 Open the left access door. 2 Pull down the lever until it stops. b Close the door. 2 If you have an optional 2000-sheet drawer: a Open the 2000-sheet drawer access door. Pull the jam down and out of the rollers. 3 Remove all visible media. Note: Remove any torn media from the printer. 4 Return the lever to its upright position. b Close the door. 5 Close the door. Note: Open Tray 1 and make sure the entire media stack is pushed all the way down into the tray.
Clearing jams guide Page 4 of 6 Area T1 Area T 1 If clearing Area B did not clear your jam, then carefully open tray 1. Remove any jams. 1 If you cannot clear all the 500-sheet drawer jams from Area C: Note: Make sure the paper is pushed all the way down into the tray. a Carefully open trays 2 through 4 (all 500-sheet trays) and remove jams. Note: Make sure the paper is pushed all the way down into the tray. 2 Close tray 1. Area E 1 Pull the duplex mechanism completely out.
Clearing jams guide Page 5 of 6 Area K 1 Open the lower right access door. Clearing mailbox or output expander jams (Area M) 1 Open the rear door of the 5-bin mailbox or output expander. 2 Remove any jams, and then close the door. Area L 1 Open the upper right access door. 2 Pull the jam straight out, and then close the door. 2 Remove jams from the rollers and then close the door.
Clearing jams guide Page 6 of 6 Clearing fuser jams 6 Lift up the fuser roller cover and remove the jam. 1 Clear the paper path. If the jam error message persists, go on to step 2. 2 Open both the upper right and the lower right access doors (Areas K and L). CAUTION: The fuser assembly may be hot. Let it cool before continuing. 7 Close the fuser roller cover. 8 Snap the housing back onto the fuser. 9 Insert the fuser back into the printer. 10 Slide the latches out, and then pull up to refasten them.
Print quality guide Page 1 of 4 Print quality guide You can solve many print quality problems by replacing a supply or maintenance item that has reached the end of its intended life. Check the operator panel for a message about a printer consumable. Use the following table to find solutions to print quality problems.
Print quality guide Page 2 of 4 Symptom Cause Streaked vertical lines • Toner is smeared before fusing to the • If paper is stiff, try feeding from paper. another tray. • The print cartridge is defective. • Replace the color print cartridge causing the streaks. ABCDE ABCDE ABCDE Solution • Paper has absorbed moisture due to high humidity. • You are using paper that does not meet the printer specifications. • The image transfer unit and transfer roller are worn or defective.
Print quality guide Page 3 of 4 Symptom Cause Solution Toner specks • The print cartridges are defective. • The transfer roller is worn or defective. • The image transfer unit is worn or defective. • The fuser is worn or defective. • Toner is in the paper path. • • • • • Toner rubs off the paper easily when you handle the sheets • The Type setting is wrong for the type of paper or specialty media you are using. • The Texture setting is wrong for the type of paper or specialty media you are using.
Print quality guide Page 4 of 4 Symptom Cause Incorrect margins • Guides in the selected tray are set for • Move the guides in the tray to the a different size paper than what is proper positions for the size loaded. loaded in the tray. • Set the Paper Size to match the • Auto size sensing is set to off, but media in the tray. you loaded a different size paper in a tray. For example, you inserted A4 size paper into the selected tray but did not set the Paper Size to A4.
Moving guide Page 1 of 1 Moving guide Follow these guidelines to move the printer within the office or to prepare the printer for shipment. Warning: Follow these guidelines to avoid injuring yourself or damaging the printer. • Always use at least two people to lift the printer. • Always turn off the printer using the power switch. • Disconnect all cords and cables from the printer before attempting to move the printer.
Readers’ Comments — We’d Like to Hear from You Infoprint Color 1454 & 1464 Help guide Publication No.
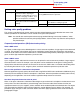
G510-4097-00 ___________________________________________________________________________________________________ Readers’ Comments — We’d Like to Hear from You Cut or Fold Along Line _ _ _ _ _ _ _Fold _ _ _and _ _ _Tape _ _ _ _ _ _ _ _ _ _ _ _ _ _ _ _ _ _ _ _ _ _ _ _ _ _ _Please _ _ _ _ _do _ _not _ _ staple _ _ _ _ _ _ _ _ _ _ _ _ _ _ _ _ _ _ _ _ _ _ _ _ _ _ _ _ _Fold _ _ _and _ _ Tape ______ NO POSTAGE NECESSARY IF MAILED IN THE UNITED STATES BUSINESS REPLY MAIL FIRST-CLASS MAIL PERMIT NO.
Part Number: 75P6580 G510-4097-00 (1P) P/N: 75P6580 Printed in USA