
User's Manual


Netfinity EXP300 Type 3531 31
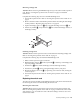
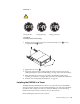
3. Unlock the door Þ3Ý and hold it at a 90 degree angle to the front of the enclosure;
then, lower the top of the door over the tab Þ1Ý on the top of the enclosure.
4. Push the bottom of the door until it snaps into place over the tab Þ2Ý on the
bottom of the enclosure.
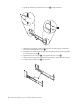
5. Verify the settings for internal Option Switch 1 and internal Option Switch 2 on
the switch card.
Internal Option Switch 1 defines hard drive enumeration as either left-to-right
(Off) or top-to-bottom (On). Internal Option Switch 2 swaps the operation of the
general system error indicator with the power-on indicator. Both switches must
be set to On when a new expansion unit is placed in a tower.
Attention: A loss of data can occur if you change the position of internal Option
Switch 1 or internal Option Switch 3 after storing data on the hard drives. Refer
to “Conversion of EXP300 to a tower or from a tower” on page 25 if you
previously stored data on the drives and you now want to change the
configuration of your expansion unit from a rack to a tower orientation.
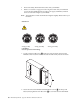
6. Install the components in the EXP300 that you removed
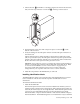
Installing identification labels
The EXP300 Rack-to-Tower Conversion Kit comes with SCSI ID labels for rack and
tower orientations. This kit also includes expansion unit ID labels for tower
orientations.
To install the identification labels:
1. Install the SCSI ID label:
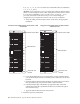
The internal Option Switch 3 on the switch card determines whether you have a
single-bus (Off) or dual-bus (On) configuration. When internal Option Switch 3 is
set to Off, all 14 drive bays are on a single SCSI bus. When internal Option Switch
3 is set to On, two independent internal seven drive SCSI buses are created.
External SCSI Bus 1 maps to internal SCSI Bus 1 and external SCSI Bus 2 maps to
internal SCSI Bus 2. The EXP300 assigns the seven internal Bus-1 bays to SCSI IDs