
Air Cleaner User Manual

11. Select the network adapter to boot from which to boot by placing a“ 1” next
to the entry.
12. Select the option to “save” your selection.
13. Press the ESC key three times. The system will begin to boot and the bootp
and tftp process should begin.
14. Continue with “Completing the Boot Process”.
Initiating the Network Boot
From the BOOTP Main menu, use these steps to initiate a network boot:
1. Select option 1, Select BOOT1, Select BOOT (Startup) Device.
2. Do not select the Default Boot (Startup) Device option, but rather the
appropriate network adapter and connector that applies to your node. Make
sure you select the appropriate interface option (BNC, DIX or built-in ethernet,
4 or 16 MB token-ring data rate).
3. Change the Client address, Server address and Gateway address as needed by
selecting the number corresponding to each entry field. Then, enter the IP
address for each. The IP address entries requires leading zeros in each portion
of the IP address (i.e. “005.001.001.024”). The Gateway address may be set to the
Server’s IP address if both systems are in the same segments.
4. When all entries are complete, type “99” to return to the MAIN MENU.
5. Select the option to Exit Main Menu and Start System (BOOT). The option
number will vary.
6. On SP Systems, put the key in NORMAL mode using the Node Front Panel.
Press Enter once more to continue.
7. Continue with the “Completing the Boot Process”.
Completing the Boot Process
If booting from a network boot server and the client is configured for no-prompt
install, the installation proceeds without any user prompts. Refer to the section Set
Network Install Client Defaults in Chapter 8, “Remote Services”, on page 8-1 for
details on the configuration of a no-prompt install.
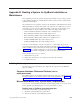
Unless this is a no-prompt install, the following prompt will appear on the screen:
****** Please define the System Console ******
Type 1 at this terminal and press <Enter>
if you want this display to be the System Console.
The above example is for an ASCII terminal. Note that the prompt Type 1 is Press
F1 for graphical displays. If the console is an ASCII terminal, press 1 and Enter. If
the console is a graphic display, press F1 and Enter.
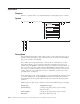
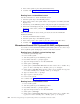
After a short time, the following SysBack Installation and Maintenance screen is
displayed:
B-4 IBM Tivoli Storage Manager for System Backup and Recovery: Installation and User’s Guide