
Air Cleaner User Manual


Accessing the SP Boot and Install Options
You can access the SP Boot and Install menu one of two ways.
Option 1
1. From the SysBack Main Menu, select Configuration Options.
Note: From a command line, type smit sb_config.
2. Select Network Boot/Install Configuration.
Note: From a command line, type smit sb_netboot_choice.
3. Select Initiate SP Node Boot and Install.
Note: From a command line, type smit sb_spboot.
Option 2
1. From the SysBack Main Menu, select Backup & Recovery Options.
Note: From a command line, type smit sb_opt.
2. Select Initiate SP Node Boot and Install.
Note: From a command line, type smit sb_spboot.
Completing the Initiate SP Node Boot and Install Menu
To initiate the SP node boot and installation:
1. Access the menu using one of the two options explained in the previous
section.
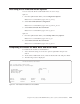
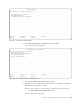
2. At the Select a NIM Client screen, select the desired SP node and press Enter.
3. The following screen is displayed:
Initiate SP Node Boot and Install
Type or select values in entry fields.
Press Enter AFTER making all desired changes.
[Entry Fields]
*SP Node Name sysback2
NIM SPOT Resource Name [] +
NIM LPP Source Name [] +
XWindow’s Display [] +
F1=Help F2=Refresh F3=Cancel F4=List
F5=Reset F6=Command F7=Edit F8=Image
F9=Shell F10=Exit Enter=Do
Figure 14-1. The Initiate SP Node Boot and Install Menu
Chapter 14. RS/6000 Scalable POWERParallel Systems
®
(SP) Boot and Install Utilities 14-3