
User's Manual


Installing options 57
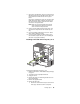
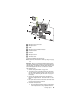
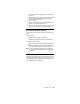
Þ1Ý Microprocessor 2 connector
Þ2Ý Microprocessor 1
Þ3Ý VRM
Þ4Ý Microprocessor orientation indicator
Þ5Ý Heatsink retainer
Þ6Ý Heatsink
Þ7Ý Microprocessor 2
Þ8Ý Terminator card
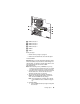
To install an additional microprocessor:
Note: Review the information in “Before you begin” on page
43.
Attention: When you handle Electrostatic Discharge-Sen-
sitive devices (ESD), take precautions to avoid damage from
static electricity. For details on handling these devices, refer
to the following Web site and use a search term of ESD:
http://www.ibm.com/.
1. Review “Safety information” on page 155.
2. Turn off the server and peripheral devices and discon-
nect all external cables and power cords; then remove
the cover (see “Removing the side cover” on page 44
for details).
3. Remove the support bracket and the air baffle from
behind the support bracket. Store them both in a safe
place.
4. Lift up the release lever and remove the terminator card
from the microprocessor connector.
5. Install the microprocessor:
a. Touch the static-protective package containing the
new microprocessor to any
unpainted
metal sur-