Infoprint 1422 User’s Guide G510-2921-00
Infoprint 1422 User’s Guide G510-2921-00
Edition: March 2004 © 2004 Lexmark International, Inc. All rights reserved. UNITED STATES GOVERNMENT RIGHTS This software and any accompanying documentation provided under this agreement are commercial computer software and documentation developed exclusively at private expense. Safety information • • • • • • If your product is not marked with this symbol , it must be connected to an electrical outlet that is properly grounded.
Contents Chapter 1: Printer overview .........................................................................7 Chapter 2: Print media ..................................................................................9 Print media sources and specifications .......................................................................... 10 Choosing the right print media ....................................................................................... 13 Paper ................................................
Contents Duplexing a print job (two-sided printing) ....................................................................... 57 Duplex printing on letterhead ................................................................................... 57 Using Duplex Bind .................................................................................................... 58 Canceling a print job ......................................................................................................
Contents Chapter 6: Understanding the printer messages ...................................102 Chapter 7: Software and network tasks ..................................................112 Printing the menu settings and network setup pages .................................................. 113 Printing the Print Quality Test Pages ........................................................................... 114 Printing a directory list ...........................................................................
Contents Using the Print and Hold function ................................................................................. 143 Selecting a user name ........................................................................................... 143 Printing and deleting held jobs ............................................................................... 143 Accessing held jobs from the operator panel ......................................................... 144 Recognizing when format errors occur .....
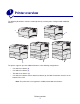
1 Printer overview The following illustrations show the standard printer (1) and the printer configured with additional drawers. 1 2 3 4 5 The printer supports up to two additional drawers in the following configurations: • One 250-sheet drawer (2) • One 500-sheet drawer (3) • Two 250-sheet drawers (4) • One 250-sheet drawer and one 500-sheet drawer (5); the 500-sheet drawer must be on the bottom of the stack Note: The printer does not support the addition of two 500-sheet drawers.
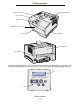
Printer overview Front paper support Standard output bin Upper front door Operator panel Multipurpose feeder door Handhold Tray 1 Rear output bin Power button The printer operator panel has a 2-line by 16-character liquid crystal display (LCD), five buttons, and one indicator light that flashes when the printer is processing a job indicated by the Busy message.
2 Print media Section Page Print media sources and specifications 10 Choosing the right print media 13 Storing print media 18 Preventing jams 19 Loading trays 20 Loading and using the multipurpose feeder 31 Using the standard output bin 39 Using the rear output bin 40 Clearing jams 43 Print media 9
Print media Print media sources and specifications For best printer performance, properly load the trays. Never mix media types within a tray.
Print media Duplex Rear output bin Standard output bin Multipurpose feeder Print media Tray 2 (optional 500-sheet drawer) Tray 1 (250-sheet tray) ✓ - indicates support ✕ - indicates no support Tray 2 (optional 250-sheet drawer) Supported print media types Paper ✓ ✓ ✓ ✓ ✓ ✓ ✓ Card stock ✕ ✕ ✕ ✓ ✕ ✓ ✕ Labels ✕ ✕ ✕ ✓ ✓* ✓ ✕ Transparencies ✓ ✕ ✕ ✓ ✓* ✓ ✕ Envelopes ✕ ✕ ✕ ✓ ✓ ✓ ✕ * Labels and transparencies may be sent to the standard output bin; however, they ma
Print media Duplex Rear output bin Standard output bin Multipurpose feeder Tray 2 (optional 500-sheet drawer) Tray 1 (250-sheet tray) ✓ - indicates support ✕ - indicates no support Tray 2 (optional 250-sheet drawer) Supported print media sizes Print media Dimensions A4 210 x 297 mm (8.27 x 11.7 in.) ✓ ✓ ✓ ✓ ✓ ✓ ✓ A5 148 x 210 mm (5.83 x 8.27 in.) ✓ ✓ ✕ ✓ ✓ ✓ ✕ JIS B5 182 x 257 mm (7.17 x 10.12 in.) ✓ ✓ ✓ ✓ ✓ ✓ ✓ Letter 215.9 x 279.4 mm (8.5 x 11 in.
Print media Choosing the right print media Selecting the right paper or other media reduces printing problems. For best print quality, try a sample of the paper or other media you are considering before buying large quantities. • Capacities listed in the Print media source specifications table are for 20 lb paper, unless otherwise noted. • The following sizes or types of print media must exit to the rear output bin: – – • Print media 165.1 mm (6.5 in.) or less in length 3 x 5 in. and 4 x 6 in.
Print media Preprinted forms and letterhead Use papers printed with heat-resistant inks designed for use in xerographic copiers. The ink must be able to withstand temperatures up to 200°C (392°F) without melting or releasing hazardous emissions. Use inks that are not affected by the resin in toner or the silicone in the fuser. Inks that are oxidation-set or oil-based should meet these requirements; latex inks might not. If you are in doubt, contact your paper supplier.
Print media Transparencies You can feed transparencies from the standard 250-sheet tray or the multipurpose feeder. Do not load transparencies in the optional 250-sheet or 500-sheet drawer. • Use transparencies designed specifically for laser printers. Transparencies must be able to withstand temperatures of 175°C (347°F) without melting, discoloring, or releasing hazardous emissions. • To prevent print quality problems, avoid getting fingerprints on the transparencies.
Print media Envelopes You can load up to 10 envelopes in the multipurpose feeder. • Use envelopes made from 75–105 g/m2 (20–28 lb) bond paper.
Print media Labels Your printer can print on many labels designed for use with laser printers. However, vinyl labels are not supported. These labels are supplied in letter size and A4 size sheets. Label adhesives, face sheet (printable stock), and topcoats must be able to withstand temperatures of 205°C (401°F) and pressure of 25 pounds per square inch (psi) (172 kilopascals). When printing on labels: • Set the Paper Type to Labels from the printer driver or from MarkVision.
Print media Card stock Card stock is single ply, and has a large array of properties, such as the orientation of paper fibers and texture, that can significantly affect the print quality. You may only print card stock from the multipurpose feeder. Card stock must always exit to the rear output bin. • Do not use card stock that is perforated or creased. Preprinting, perforation, and creasing can significantly affect the print quality and cause media handling or jamming problems.
Print media Preventing jams By carefully selecting appropriate print media and loading it properly, you should be able to avoid most jams. If you do experience a jam, see Clearing jams for instructions. The following hints can help you avoid jams: • Use only recommended print media. • Do not load wrinkled, creased, damp, or curled print media. • Flex, fan, and straighten print media before you load it. If jams do occur with print media, try feeding one sheet at a time through the multipurpose feeder.
Print media Loading trays Your printer has two standard sources, the 250-sheet tray (standard tray) and the multipurpose feeder. For more information, see Loading and using the multipurpose feeder. Load the print media you use for the majority of your print jobs in the standard 250-sheet tray. Proper print media loading helps prevent jams and helps make your printing trouble-free. Before loading print media, know the recommended print side of the print media you are using.
Print media 3 Press down on the metal plate until it locks into place. 4 Locate the tabs on both of the guides.
Print media 5 Squeeze the length guide tab and the length guide together, and then slide the guide to the back of the tray. Length guide Width guide 6 Squeeze the width guide tab and the width guide together, and then slide the guide all the way to the right. 7 Flex the sheets back and forth to loosen them, then fan them. Do not fold or crease the print media. Straighten the edges on a level surface.
Print media 8 Place the stack of print media against the left side of the tray and insert it under the metal stop. Make sure the print media fits easily under the metal stop and is not bent or wrinkled. Do not raise the metal stop or force print media under it. Note: Do not exceed the maximum stack height indicated. Overfilling the tray may cause jams.
Print media 10 Squeeze the length guide tab and the length guide together, and then slide the guide to the edge of the print media. Note: Sliding the guides too tightly against the print media may cause misfeeds. 11 Insert the tray.
Print media Loading print media over 90 g/m2 (24 lb) When you are loading print media over 90 g/m2 (24 lb) (but no greater than 105 g/m2 [28 lb]) in the standard tray or optional 250-sheet tray, the tray’s media dial must be set to position 2. 1 Remove the tray completely. 2 Remove any print media already in the tray. 3 Turn the tray over. 4 Using a coin, push the media dial down and turn it from position 1 to position 2.
Print media Loading the optional 500-sheet tray The optional 500-sheet tray only accepts paper. It has a special cover at the back of the tray to protect legal size paper from exposure to dust. To load paper in the tray: 1 Remove the tray completely. 2 Raise the cover.
Print media 3 Press down on the metal plate until it locks into place. 4 Locate the tabs on both of the guides.
Print media 5 Squeeze the length guide tab and the length guide together, and then slide the guide to the back of the tray. Length guide Width guide 6 Squeeze the width guide tab and the width guide together, and then slide the guide all the way to the right. 7 Flex the sheets back and forth to loosen them, then fan them. Do not fold or crease the paper. Straighten the edges on a level surface.
Print media 8 Place the stack of paper against the left side of the tray and insert it under the metal stop. Make sure the paper fits easily under the metal stop and is not bent or wrinkled. Do not raise the metal stop or force paper under it. Note: Do not exceed the maximum stack height indicated. Overfilling the tray may cause jams. Metal stop Maximum stack height indicator 9 Squeeze the width guide tab and the width guide together, and then slide the guide to the edge of the paper.
Print media 10 Squeeze the length guide tab and the length guide together, and then slide the guide to the edge of the paper. Note: Sliding the guides too tightly against the paper may cause misfeeds. 11 Close the cover. 12 Insert the tray.
Print media Loading and using the multipurpose feeder Your printer has a multipurpose feeder that holds several sizes and types of print media. It is located on the front of your printer and can be closed when you are not using it. Reserve the multipurpose feeder for printing on different sizes and types of print media, such as card stock, transparencies, postcards, note cards, and envelopes. You can load a stack of print media, or you can load single sheets you do not keep in a tray.
Print media Opening the multipurpose feeder 1 Open the multipurpose feeder door. 2 Pull the extension out.
Print media 3 Gently press down on the ridge. The extension unfolds. Ridge 4 Guide the extension down gently so the multipurpose feeder is extended fully.
Print media Loading the multipurpose feeder See Print media source specifications for information on sizes and types of print media you can load in the multipurpose feeder. 1 Slide the width guide all the way to the right. 2 Prepare print media for loading. Note: Do not load different sizes or types of print media at the same time. Doing so may cause a jam. • Flex sheets of paper back and forth to loosen them, then fan them. Do not fold or crease the print media. Straighten the edges on a level surface.
Print media • Hold transparencies by the edges and fan them to prevent feeding failures. Note: Avoid touching the print side of the transparencies. Be careful not to scratch them. • Fan envelopes back and forth to loosen them. Do not fold or crease the envelopes. Straighten the edges on a level surface. 3 Do not exceed the maximum stack height by forcing print media under the stack height limiter. The maximum stack height is 10 mm (0.4 in.). Overfilling could cause jams.
Print media 4 Load the print media. • Load paper, card stock, and labels with the recommended print side face up and the top edge going in first. • Load letterhead with the logo face up and the top edge entering first. Note: If you load letterhead for duplex printing, load the sheets with the logo face down and entering the printer last.
Print media • Load transparencies with the recommended print side face up and the top edge going in first. Warning: Never use envelopes with clasps, snaps, windows, coated linings, or self-stick adhesives. These envelopes may severely damage the printer. • Load envelopes with the flap side down and the stamp area going in last. Note: For best results, peel-and-stick envelopes should exit to the rear output bin. Open the rear output bin when printing on these envelopes. Do not feed stamped envelopes.
Print media 5 Slide the print media in as far as it will go without damaging the print media. 6 Slide the width guide to the left until it lightly touches the edge of the stack. Make sure the print media fits loosely and is not bent or wrinkled.
Print media Using the standard output bin The standard output bin holds 250 sheets of print media. The printer automatically sends print jobs to the standard output bin. Print jobs collate face down in this bin. Standard output bin Raising the paper rest The paper rest holds printed jobs to keep them from sliding out of the bin. Pull the paper rest forward to raise it.
Print media Using the rear output bin The printer automatically sends print jobs to the rear output bin when you open it. The rear output bin reverse collates (pages 4, 3, 2, 1) print jobs face up. The rear output bin holds 20 sheets of paper. You may want to use the rear output bin when you print on different sizes and types of print media, such as paper, transparencies, postcards, note cards, and envelopes. • • • Labels and transparencies may print more successfully when sent to the rear output bin.
Print media To use the rear output bin: 1 Grasp the tab as shown. 2 Pull the door down.
Print media 3 Pull the extension straight out using the tab. 4 Close the rear output bin door when you finish using it. Note: Make sure the door closes properly on both sides to prevent jams.
Print media Clearing jams By carefully selecting print media and loading it properly, you should be able to avoid most jams. If jams occur frequently, see Preventing jams. Note: To clear the Paper Jam error message, you must remove all jammed print media from the entire paper path and then press Go. The following illustration shows the path that print media travels through the printer. The path varies depending on the input source (trays and multipurpose feeder) and output bin you are using.
Print media 200 / 201 Paper Jam, Remove Cartridge Since the jam may occur farther back in the printer behind the print cartridge area, you may need to reach in farther to remove the jam. 1 Open the upper front door. 2 Remove the print cartridge. (See Removing the used print cartridge for instructions.) CAUTION: The rear portion of the inside of the printer may be hot. 3 Locate the jam inside the printer. • If most of the paper is visible, gently pull the print media to the right, and then out.
Print media • If only a small portion of the paper is visible, gently pull the jam straight out and then up. Note: If the print media resists, stop pulling and access it from the rear output bin door. See 202 Paper Jam, Open Rear Door to continue. 4 Reinstall the print cartridge. (See Installing the new print cartridge for instructions.) 5 Close the upper front door.
Print media 202 Paper Jam, Open Rear Door When this message is displayed, a jam can occur in one of two places: • If the print media jams before completely exiting into the standard output bin, see Exiting to the standard output bin. • If the print media jams before reaching the standard output bin, see Before reaching the standard output bin. Exiting to the standard output bin 1 Gently pull the jam straight out.
Print media Before reaching the standard output bin The print media jams before reaching the standard output bin. 1 Open the rear output bin door. 2 Gently remove the jam based on how much is visible. • If the middle of the sheet of print media is visible, but not the ends, grasp the print media on both sides and gently pull it straight out.
Print media • If an end of the jam is visible, pull it straight out. 3 Close the rear output bin door by pushing it in the middle under the tab. Note: Make sure the door closes on both sides.
Print media 23x Paper Jam (duplex jams) Print media can jam under the printer and above Tray 1 when the duplex function is in use. The printer can typically determine the location of a duplex jam, but occasionally it cannot. When a duplex jam occurs, one of three jam messages appears on the display, depending on if the location of the jam is known or not. 23x Paper Jam, Remove Tray1, Pull Down Lever At Printer Front 1 Pull Tray 1 completely out.
Print media 23x Paper Jam, Remove Tray1, Pull Down Lever At Printer Rear 1 Open the rear door and clear any jams. If you are unable to clear the jam from here, continue with step 2. 2 Pull Tray 1 completely out. 3 Look under the back of the printer on the right side to locate a green lever. 4 Push down on the lever. Rear door Lever 5 Gently pull the jam toward you. 6 Insert the tray. Note: Make sure the metal plate at the bottom of the tray is locked down.
Print media 23x Paper Jam, Check Duplex This message appears only when the printer is uncertain about the location of the duplex jam. To clear this type of jam: 1 Pull Tray 1 completely out. 2 Look under the printer on the left side to locate a green lever. 3 Push down on the green lever. Lever 4 Look for the jam. If it is not visible from the front, continue with step 6. 5 Gently pull the jam toward you. Note: If the jam does not come out easily, continue with step 6.
Print media 8 Push down on the lever. Rear door Lever 9 Gently pull the jam toward you. 10 Insert the tray. Note: Make sure the metal plate at the bottom of the tray is locked down.
Print media 24x Paper Jam, Check Tray Print media is jammed in the area under the print cartridge, but the jam is not visible. 1 Pull the specified tray out. 2 Pull the jam straight out. 3 Insert the tray. Note: Make sure the metal plate at the bottom of the tray is locked down.
Print media Jams inside a tray after clearing the metal stop Sometimes print media jams as it releases from under the metal stop, but it has not completely exited the tray. This can occur in any of the trays. You need to check each tray. 1 Pull the tray completely out. 2 Reposition the print media under the metal stop. Note: If the sheet of print media is damaged, remove it. Do not reposition it. 3 Press down on the print media until the metal plate below it locks into place. 4 Insert the tray.
Print media 250 Paper Jam, Check MP Feeder Pull the jam straight out.
3 Printing tasks Section Page Sending a print job 56 Duplexing a print job (two-sided printing) 57 Canceling a print job 59 Linking trays 60 Sending a print job Printing from a Windows environment 1 Load print media. (See Loading trays or Loading and using the multipurpose feeder.) 2 From your software application, open the file you want to print. 3 From the File menu, select Print Setup. 4 Verify the correct printer is selected in the Print Setup dialog box.
Printing tasks Duplexing a print job (two-sided printing) Duplex printing (or two-sided printing) lets you print on both sides of a sheet of paper. For paper sizes that are acceptable for duplex printing, see Duplex unit specifications. Note: Print duplex jobs only on paper weighing 16–24 lb. To duplex all jobs: 1 Make sure the printer is on and the Ready message appears. 2 Press Menu until you see Finishing Menu, and then press Select. 3 Press Menu until you see Duplex, and then press Select.
Printing tasks Using Duplex Bind Printing on both sides of the paper reduces printing costs. When you select duplex bind printing in the printer driver or Duplex Bind in the Finishing Menu on the operator panel, you must select either long edge or short edge binding. Duplex Bind defines the way duplexed pages are bound, and how the printing on the back of the sheet (even-numbered pages) is oriented in relation to the printing on the front (odd-numbered pages).
Printing tasks Canceling a print job From the printer operator panel If the job you want to cancel is printing, and Busy appears on the display: 1 Press Menu until you see Job Menu, and then press Select. 2 Press Menu until you see Cancel Job, and then press Select. From a Windows computer 1 Minimize all programs to display the desktop. 2 Double-click the My Computer icon. 3 Double-click the Printer icon. A list of available printers appears. 4 Double-click the printer you are using to print the job.
Printing tasks Linking trays If you use the same size and type of print media in two or more sources (standard tray, optional tray, and the multipurpose feeder), the automatic tray linking feature is enabled. When trays are linked in this way, the printer selects print media from a second tray when the first becomes empty. To verify Paper Size and Paper Type settings, print a menu settings page (see Printing the menu settings and network setup pages).
4 Understanding fonts Your printer has resident fonts stored permanently in its memory. Different fonts may be available in PCL and PostScript emulations. Section Page Printing a font sample list 61 Scalable fonts 62 PCL bitmapped fonts 65 PCL symbol sets 65 Printing a font sample list To print samples of all the fonts currently available for your printer: 1 Make sure the printer is on and the Ready message appears. 2 Press and release Menu until you see Utilities Menu, and then press Select.
Understanding fonts Scalable fonts Your printer supports the following scalable fonts.
Understanding fonts Supported fonts (continued) PostScript font names PCL font names CG Omega Bold Italic Garamond-Antiqua Garamond Antiqua Garamond-Halbfett Garamond Halbfett Garamond-Kursiv Garamond Kursiv Garamond-KursivHalbfett Garamond Kursiv Halbfett GoldSansMM GoldSerifMM Helvetica-Light Helvetica Light Helvetica-LightOblique Helvetica Light Oblique Helvetica-Black Helvetica Black Helvetica-BlackOblique Helvetica Black Oblique Helvetica Helvetica Helvetica-Oblique Helvetica Ital
Understanding fonts Supported fonts (continued) PostScript font names PCL font names LetterGothic-Bold Letter Gothic Bold LetterGothic-BoldSlanted Marigold Marigold NewCenturySchlbk-Roman Century Schoolbook Roman NewCenturySchlbk-Italic Century Schoolbook Italic NewCenturySchlbk-Bold Century Schoolbook Bold NewCenturySchlbk-BoldItalic Century Schoolbook Bold Italic Optima Optima-Bold Optima-BoldItalic Optima-Italic Palatino-Roman Palatino Roman Palatino-Italic Palatino Italic Palatino-Bol
Understanding fonts Supported fonts (continued) PostScript font names PCL font names Wingdings-Regular Wingdings ZapfChancery-MediumItalic ITC Zapf Chancery Medium Italic ZapfDingbats ITC Zapf Dingbats OCR-A OCR-B C39 Narrow C39 Regular C39 Wide PCL bitmapped fonts Your printer supports the following PCL bitmapped fonts: • • Line Printer 16 POSTNET Bar Code PCL symbol sets Your printer supports the following PCL symbol sets.
Understanding fonts Supported symbol sets (continued) Symbol ISO 21: German ISO 8859-15 Latin 9 PC-8 Bulgarian PC-855 Cyrillic Roman-9 PC-8 Danish/Norwegian (437N) PC-857 Latin 5 (Turkish) Roman Extension PC-8 Greek Alternate (437G) PC-858 Multilingual Euro Ventura ITC Zapf Dingbats PC-8 Turkish (437T) PC-860 Portugal Ventura International PC-8 Latin/Greek PC-861 Iceland Ventura Math PC-8 PC Nova PC-863 Canadian French Ventura US PC-8 Polish Mazovia PC-865 Nordic Windows 3.
5 Understanding the operator panel Section Page Using the operator panel 68 Using the operator panel to change printer settings 70 Menus Disabled 71 Using the printer menus 72 You can change most printer settings from your software application or printer driver. Settings you change from the application or printer driver apply only to the job you are preparing to send to the printer.
Understanding the operator panel Using the operator panel The printer operator panel has a 2-line by 16-character liquid crystal display (LCD), five buttons, and one indicator light that flashes when the printer is processing a job indicated by the Busy message. LCD 1 Menu 2 Select 3 Return 4 Go 5 Light Stop 6 See the menu map for a brief overview of the printer menus available from the operator panel. Indicator light The indicator light gives information about the status of your printer.
Understanding the operator panel The following information describes the functions of each button. Button Function Go Press Go to: • Return to the Ready state if the printer is offline (the Ready message does not appear on the display). • Exit printer menus and return to the Ready state. • Clear some operator panel messages. • Resume printing after loading print media and clearing paper jams. • Exit Power Saver.
Understanding the operator panel Using the operator panel to change printer settings From the operator panel, you can select menu items and associated values to print your jobs successfully. You can also use the panel to alter the setup and operating environment of the printer. See Using printer menus for an explanation of all the menu items.
Understanding the operator panel When you select a new setting from the operator panel, the asterisk moves next to the selected setting to identify it as the current user default. User defaults are the settings you select for different printer functions and store in printer memory. Once stored, these settings remain active until new ones are stored or the factory defaults are restored. Note: Settings you choose from your software application may override the settings you select from the operator panel.
Understanding the operator panel Using the printer menus Select a menu or menu item for more details.
Understanding the operator panel Paper Menu Use the Paper Menu to define the print media loaded in each tray and the default source and output bin. Note: Values marked by an asterisk (*) are the factory default settings. Menu item Purpose Values Configure MP To determine when the printer selects paper loaded in the multipurpose feeder. Cassette* Printer treats the multipurpose feeder like any other paper tray.
Understanding the operator panel Menu item Purpose Values Paper Loading To properly handle preprinted paper loaded in a tray, whether the job is a duplexed job or a single-sided job. 1 Select a paper type. Card Stock Load Note: If a user-defined name is available, it is displayed instead of Custom Loading. The name is truncated to 14 characters. Colored Loading Custom Loading Labels Loading Ltrhead Loading Preprint Loading Bond Loading 2 Select a value.
Understanding the operator panel Menu item Purpose Values Paper Size To identify the default paper size for each paper source. For trays with automatic size sensing, only the value detected by the hardware is displayed. 1 Select a paper source. Tray Size Manual Pap Size MP Feeder Size Manual Env Size Letter* 2 Select a value. (* Denotes country/regionspecific factory default values) Note: Size sensing must be turned off for Statement and Folio values to appear.
Understanding the operator panel Menu item Purpose Values Paper Texture To identify the texture of the paper loaded in a specific source and to ensure that characters print clearly. Use Paper Texture in connection with the Paper Type and Paper Weight menu items. You may need to change those menu items to optimize print quality for your specific paper. 1 Select a paper type.
Understanding the operator panel Menu item Purpose Values Paper Type To identify the type of paper installed in each paper source. Use this menu item to: • Optimize print quality for the specified paper. • Select paper sources through your software application by selecting type and size. • Automatically link paper sources. Any sources containing the same type and size of paper are automatically linked by the printer, if you have set the Paper Size and the Paper Type to the correct values.
Understanding the operator panel Menu item Purpose Values Paper Weight To identify the relative weight of the paper loaded in a specific source and ensure that the toner adheres properly to the printed page. 1 Select a paper type. Plain Weight Note: If a user-defined name is available, it is displayed instead of Custom Weight. The name is truncated to 14 characters.
Understanding the operator panel Finishing Menu Use the Finishing Menu to define how the printer delivers the printed output. Note: Values marked by an asterisk (*) are the factory default settings. Menu item Purpose Values Blank Pages To specify whether to include Do Not Print* Does not print applicationgenerated blank pages as part of your job. Print Prints application-generated blank pages as part of your job. Off* Prints each page of a job the number of times specified by the Copies menu item.
Understanding the operator panel Menu item Purpose Values Multipage Border To print a border around each page image when using Multipage Print. None* Does not print a border around each page image. Solid Prints a solid line border around each page image. To determine the positioning of multiple page images when using Multipage Print. The positioning depends on the number of images and whether the images are portrait or landscape in orientation.
Understanding the operator panel Menu item Purpose Values Separator Sheets To insert blank separator sheets between jobs, between multiple copies of a job, or between each page of a job. None* Does not insert separator sheets. Between Copies Inserts a blank sheet between each copy of a job. If Collation is Off, a blank page is inserted between each set of printed pages (all page 1’s, all page 2’s, and so on). If Collation is On, a blank page is inserted between each collated copy of the job.
Understanding the operator panel Menu item Purpose Values Factory Defaults To return your printer settings to the factory default values. Restore • All menu items are returned to the factory default values except: – Display Language. – All settings in the Parallel Menu, Serial Menu, Network Menu, and USB Menu. • All downloaded resources (fonts, macros, and symbol sets) in printer memory (RAM) are deleted. (Resources residing in flash memory or on the hard disk are unaffected.
Understanding the operator panel Job Menu The Job Menu is only available when the printer is busy processing or printing a job, when a printer message is displayed, or when the printer is in Hex Trace mode. Press Menu to open the Job Menu. Menu item Purpose Values Cancel Job To cancel the current print job. Note: Cancel Job is only displayed if the printer is processing a job or has a job in printer memory. Confidential To print confidential jobs stored in printer memory.
Understanding the operator panel Menu item Purpose Values Held Jobs To print Reserve Print, Repeat Print, or Verify Print jobs stored in printer memory. Print All Jobs Prints all held jobs. Print A Job Prints the specified held job. Press to scroll through the list of held jobs. Press Select to print the specific job. Menu Delete All Jobs Deletes all held jobs. Print Buffer Delete A Job Deletes the designated held job. Press Menu to scroll through the list of held jobs.
Understanding the operator panel Quality Menu Use the Quality Menu to change printer settings affecting the quality of printed characters and images. Note: Values marked by an asterisk (*) are the factory default settings. Menu item Purpose Values PictureGrade To improve the quality of grayscale printing at 600 dots per inch (dpi) in PostScript emulation. On Uses modified screening parameters to improve print quality of graphics. Off* Uses standard screening parameters.
Understanding the operator panel Setup Menu Use the Setup Menu to configure a variety of printer features. Menu item Purpose Values Alarm Control To establish whether the printer sounds an alarm when the printer requires operator intervention. Off Printer does not sound an alarm. Single* Printer sounds three quick beeps. Continuous Printer repeats three beeps every 10 seconds.
Understanding the operator panel Menu item Purpose Values Download Target To specify the storage location for downloaded resources. RAM* All downloaded resources are automatically stored in printer memory (RAM). Flash All downloaded resources are automatically stored in flash memory. On Printer reprints jammed pages. Off Printer does not reprint jammed pages. Auto* Printer reprints a jammed page unless the memory required to hold the page is needed for other printer tasks.
Understanding the operator panel Menu item Purpose Values Power Saver To specify the amount of time (in minutes) the printer waits after a job is printed before it goes into a reduced power state. Disabled This value does not appear unless Energy Conserve is set to Off. 1...240 Specifies the amount of time after a print job before the printer goes into Power Saver mode. (Your printer may not support the entire range of values.) The factory default Power Saver setting depends on your printer model.
Understanding the operator panel Menu item Purpose Values Printer Language To establish the default printer language used to communicate data from the computer to the printer. PCL Emulation PCL emulation, compatible with Hewlett-Packard printers. PS Emulation* PostScript emulation, compatible with Adobe PostScript language. PPDS Emulation PPDS emulation. Off* Printer retains downloaded resources only until memory is needed.
Understanding the operator panel PCL Emul Menu Use the PCL Emul Menu to change printer settings that only affect jobs using the PCL emulation printer language. Note: Values marked by an asterisk (*) are the factory default settings. Menu item Purpose Values A4 Width To select the width of the logical page for A4 size paper. 198 mm* Makes the logical page compatible with the Hewlett-Packard LaserJet 5 Printer. 203 mm Makes the logical page wide enough to print eighty 10-pitch characters.
Understanding the operator panel Menu item Purpose Values Lines per Page To determine the number of lines that print on each page. 1...255 60* (country/regionspecific factory default values) 64* (country/regionspecific factory default values) Orientation Pitch To determine how text and Portrait* graphics are oriented on the page. To specify the font pitch for scalable monospaced fonts.
Understanding the operator panel Menu item Purpose Values Tray Renumber Note: To configure your printer to work with printer drivers or applications that use different source assignments for the paper trays. 1 Select a paper source. Assign Tray Assign MP Feeder Assign Man Env Assign Man Paper 2 Select a value. Other Tray Renumber selections Off* Printer uses factory default paper source assignments. 0...199 Select a numeric value to assign a custom value to a paper source.
Understanding the operator panel PostScript Menu Use the PostScript Menu to change printer settings that only affect jobs using the PostScript emulation printer language. Note: Values marked by an asterisk (*) are the factory default settings. Menu item Purpose Values Font Priority To establish the font search order. Note: Font Priority is only displayed when a formatted flash or hard disk is installed, is neither defective nor Read/Write or Write protected, and Job Buffer Size is not set to 100%.
Understanding the operator panel Menu item Purpose Values Orientation To specify the default orientation of the PDF. Portrait* Prints text and graphics parallel to the short edge of the paper for the PDF. Landscape Prints text and graphics parallel to the long edge of the paper for the PDF. On The document is scaled to fit on the available print media. Off* The document is not scaled to fit on the available print media. Text or graphics outside the printable area is clipped.
Understanding the operator panel Menu item Purpose Values Character Set To determine which code page to use to print PPDS jobs. 1 The standard code pages are used. 2* The addresses from Value 1 change to represent characters and symbols used in non-US English languages. Lines per Inch To determine the number of lines that print per vertical inch. 1...
Understanding the operator panel Parallel Menu Use the Parallel Menu to change printer settings affecting jobs sent to the printer through a parallel port (either Std Parallel or Parallel Opt ). Note: Values marked by an asterisk (*) are the factory default settings. Menu item Purpose Values Advanced Status To enable bidirectional communication through the parallel port. Off Disables parallel port negotiation. On* Enables bidirectional communication through the parallel interface.
Understanding the operator panel Menu item Purpose Values Parallel Buffer To configure the size of the parallel input buffer. Disabled Disables job buffering. Any jobs already buffered on the disk are printed before normal processing of incoming jobs resumes. Auto* Printer automatically calculates the Parallel Buffer size (recommended setting). 3K to maximum size allowed User specifies the Parallel Buffer size.
Understanding the operator panel Menu item Purpose Values Protocol To specify the parallel interface protocol. Standard May resolve some parallel interface problems. Fastbytes* Provides compatibility with most existing parallel interface implementations (recommended setting). Network Menu Use the Network Menu to change printer settings affecting jobs sent to the printer through a network port (either Standard Network or Network Opt ).
Understanding the operator panel Menu item Purpose Values NPA Mode To specify whether the printer performs the special processing required for bidirectional communication, following the conventions defined in the Network Printing Alliance (NPA) Protocol. Off Printer does not perform NPA processing. Auto* Printer examines the data to determine the format and then processes it appropriately.
Understanding the operator panel USB Menu Use the USB Menu to change printer settings affecting a Universal Serial Bus (USB) port (USB Option ). Note: Values marked by an asterisk (*) are the factory default settings. Menu item Purpose Values MAC Binary PS To configure the printer to process Macintosh binary PostScript print jobs. Off Printer processes raw binary PostScript print jobs from computers using the Macintosh operating system. Note: This setting often causes Windows print jobs to fail.
Understanding the operator panel Menu item Purpose Values To configure the printer so it PS SmartSwitch automatically switches to PostScript emulation when a print job received through the USB port requires it, regardless of the default printer language. USB Buffer To configure the size of the USB input buffer. Note: Changing the USB Buffer menu item automatically resets the printer.
6 Understanding the printer messages The printer operator panel displays messages describing the current state of the printer and indicates possible printer problems you must resolve. This topic provides a list of all printer messages, explains what they mean, and tells you how to clear the messages. Ready Message What this message means What you can do Activating Menu Changes The printer is activating changes made to the printer settings. Wait for the message to clear.
Understanding the printer messages Message What this message means What you can do Close Door The upper front door is open or the toner cartridge is not installed. • Close the upper front door. • Install the print cartridge. Deactivating PPDS The printer is deactivating PPDS emulation. Wait for the message to clear. Defragmenting DO NOT POWER OFF The printer is defragmenting the flash memory to reclaim storage space occupied by deleted resources. Wait for the message to clear.
Understanding the printer messages Message What this message means What you can do Held Jobs may be lost The printer memory is too full to continue processing print jobs. • Press Go to clear the message and continue printing. The printer frees memory by deleting the oldest held job and continues deleting held jobs until there is enough printer memory to process the job. • Press Stop to clear the message without deleting any held jobs. The current job may not print correctly.
Understanding the printer messages Message What this message means What you can do Load Manual The printer is trying to feed paper from the multipurpose feeder, which it detects is empty. • Load paper of the size and type requested in the second line of the display in the specified tray. The printer automatically clears the message and continues printing the job. • Press Menu to open the Job Menu and cancel the current job. Menus Disabled The printer menus are disabled.
Understanding the printer messages Message What this message means What you can do Printing Quality Test Pages The printer is formatting and printing the Print Quality Test, which consists of 4 pages. Page 1 contains a mixture of graphics and text, pages 2 and 3 contain only graphics, and page 4 is a blank page. If Duplex is turned on, then the pages will be duplexed; otherwise, they are simplexed. Wait for the message to clear.
Understanding the printer messages Message What this message means What you can do Resetting the Printer The printer is resetting to the current default settings. Any active print jobs are canceled. Wait for the message to clear. The printer is restoring the factory default printer settings. When factory default settings are restored: Wait for the message to clear.
Understanding the printer messages Message What this message means What you can do 32 Unsupported Print Cartridge An unsupported print cartridge is installed. Remove the print cartridge and install a new one. See also: Changing the print cartridge 34 Short Paper The printer has determined that the length of the paper in the source specified on the second line of the display is too short to print the formatted data.
Understanding the printer messages Message What this message means What you can do 37 Insufficient Memory The printer memory is full and cannot continue processing current print jobs. • Press Go to clear the message and continue the current print job. The printer frees memory by deleting the oldest held job and continues deleting held jobs until there is enough printer memory to process the job. • Press Stop to clear the message without deleting any held jobs. The current job may not print correctly.
Understanding the printer messages Message What this message means What you can do 50 PPDS Font Error The PPDS interpreter has encountered a font error or the printer has received invalid PPDS download font data. • Press Go to clear the message and continue printing. • Press Menu to open the Job Menu and cancel the job or reset the printer. 51 Defective Flash The printer detects defective flash memory. Press Go to clear the message and continue printing.
Understanding the printer messages Message What this message means What you can do 56 Standard USB Port Disabled Data has been sent to the printer through a USB port, but the USB port is disabled. • Press Go to clear the message. The printer discards any data received through the USB port. • Make sure the USB Buffer menu item in the USB Menu is not set to Disabled. See also: USB Buffer 58 Too Many Flash Options Too many flash memory options are installed on the printer.
7 Software and network tasks Section Page Printing the menu settings and network setup pages 113 Printing the Print Quality Test Pages 114 Printing a directory list 115 Printing a confidential job 115 Using MarkVision to manage the printer 117 Using Hex Trace mode 117 Software and network tasks 112
Software and network tasks Printing the menu settings and network setup pages The menu settings page shows current settings (user default settings) for the menus, a list of installed options, and available printer memory. You can use this page to verify that all printer options are properly installed and the printer settings are correct. See Understanding the operator panel to identify the display and operator panel buttons if you need help. 1 Make sure the printer is on and the Ready message appears.
Software and network tasks Printing the Print Quality Test Pages To help isolate print quality problems, print the Print Quality Test Pages: Note: The test pages must be printed on letter, legal, or A4 paper. 1 Turn off the printer. 2 Press and hold Select and Return as you turn on the printer. Release the buttons once Performing Self Test displays. 3 Select Prt Quality Pgs. The printer posts the Printing Quality Test Pages message as the pages print.
Software and network tasks Printing a directory list A directory listing shows all the resources stored in flash memory or on the hard disk. To print a listing: 1 Make sure the printer is on and the Ready message appears. 2 Press and release Menu until you see Utilities Menu, and then press Select. 3 Press and release Menu until Print Directory appears, and then press Select. The message Printing Directory List appears and remains on the operator panel until the page prints.
Software and network tasks Entering a personal identification number (PIN) When you select Confidential Job from the Job Menu, the following prompt appears on the display after you select your user name: Enter PIN: =____ 1 Use the buttons on the operator panel to enter the four-digit PIN associated with your confidential job. The numbers next to the button names identify which button to press for each digit (1–6). As you enter the PIN, asterisks appear on the display to ensure confidentiality.
Software and network tasks Using MarkVision to manage the printer To understand how MarkVision can help you manage the printer, refer to the drivers CD. Using Hex Trace mode When unexpected characters print or characters are missing, use Hex Trace to help you determine if the language interpreter or the cable has a problem. Hex Trace isolates printing problems by telling you what information your printer is receiving. 1 Make sure the printer is on and the Ready message appears.
8 Supplies and maintenance information Section Page Maintaining the printer 118 Determining the status of supplies 119 Conserving supplies 120 Ordering supplies 121 Storing the print cartridge 122 Changing the print cartridge 123 Replacing the charge roll 127 Removing options 132 Maintaining the printer Periodically, you need to replace the print cartridge and clean the printer to maintain optimum print quality.
Supplies and maintenance information Determining the status of supplies The printer uses the second line of the display to alert you to any supply or maintenance items that need replacing. However, the printer can only display information about one item at a time. If you want to determine the status of consumables installed in your printer, you can print the menu settings page from the Utilities Menu. (Press Menu until you see Utilities Menu, and then press Select.
Supplies and maintenance information Conserving supplies Conserving supplies lowers printing costs. Several settings in your application software or on the display let you conserve toner and paper: For more information, see... Supply Setting What the setting does Toner Toner Darkness in the Quality Menu Lets you adjust the level of toner released on a sheet of print media. The values range from 1 (lightest setting) to 10 (darkest setting).
Supplies and maintenance information Ordering supplies To order supplies, contact the place where you bought your printer for more information. Ordering a print cartridge When the 88 Toner Low message appears, you should order a new print cartridge. You can print a few hundred pages after the 88 Toner Low message comes on. To use the remaining toner, remove the print cartridge, and then shake it gently back and forth.
Supplies and maintenance information Storing the print cartridge Store the print cartridge in the original packaging until you are ready to install it. Do not store the print cartridge in: • • • • • • • Temperatures greater than 40°C (104°F). An environment with extreme changes in humidity or temperature. Direct sunlight. Dusty places. A car for a long period of time. An environment where corrosive gases are present. An environment with salty air.
Supplies and maintenance information Changing the print cartridge Note: The manufacturer does not recommend that you use print cartridges from a thirdparty refiller. Print quality and printer reliability cannot be guaranteed if you do. For best results, use genuine supplies. Removing the used print cartridge 1 Turn the printer off. 2 Open the upper front door. 3 Grasp the print cartridge by the handle and lift it out. Handle 4 Set it aside.
Supplies and maintenance information Cleaning the printer Using a clean, lint-free cloth, gently clean the shaded areas by wiping toward the front of the printer. Warning: Do not touch the transfer roller or the plastic sensors. Plastic sensor Transfer roller Plastic sensor Installing the new print cartridge 1 Remove the cartridge packaging. Remove the red plastic piece and foam. Red plastic piece Foam Packaging Warning: Do not touch the photoconductor drum on the bottom of the print cartridge.
Supplies and maintenance information 2 Hold the print cartridge by the handle and gently shake it side-to-side to distribute the toner.
Supplies and maintenance information 3 Hold the print cartridge by the handle and insert it into the printer: a Align the tabs on each side of the cartridge with the slots on each side of the print cartridge cradle. Tab Cradle b Slide the cartridge in until it snaps into place. 4 Close the upper front door. Make sure the door snaps closed on both sides, or the printer will not function properly. 5 Turn the printer on.
Supplies and maintenance information Replacing the charge roll Order a new charge roll kit when toner fog or background shading appears on printed pages. See Ordering supplies for information on ordering a charge roll. 1 Turn the printer off and unplug the printer power cord. 2 Open the upper front door. 3 Remove the print cartridge. 4 Locate the used charge roll above the area for the print cartridge. 5 Locate the label with an arrow on the right side of the housing. It is attached to the arm-like tab.
Supplies and maintenance information 7 Gently rotate the charge roll between your fingers and pull it to the right to remove it from the left tab. 8 Pull the charge roll straight out of the printer.
Supplies and maintenance information 9 Remove the new charge roll from its packaging. Warning: Do not remove the wrapper from the charge roll until you have installed it. Touching the cylinder part without the wrapper contaminates the charge roll and affects printing. 10 Insert the left side of the charge roll as shown.
Supplies and maintenance information 11 Push the right side of the charge roll up into the tab with the arrow label until it snaps into place. Note: You may need to hold the upper front door still while inserting the charge roll into the right side.
Supplies and maintenance information 12 Remove the charge roll wrapper by pulling it off the roller and out of the printer. 13 Reinstall the print cartridge and close the front door. 14 Plug the printer power cord into a properly grounded electrical outlet.
Supplies and maintenance information Removing options Removing the printer from an optional drawer You can remove the printer from a 250-sheet drawer and/or the 500-sheet drawer using the same method. 1 Turn the printer power off. 2 Unplug the printer power cord. 3 Disconnect all cables from the back of the printer. 4 Use the handholds to lift the printer off of the optional drawer and set the printer aside. CAUTION: Make sure your fingers are not under the printer when you set it down.
Supplies and maintenance information Removing optional printer memory or firmware cards These instructions can help you remove optional printer memory or firmware cards. Note: You will need a #2 Phillips screwdriver for this procedure. Accessing the system board 1 Turn the printer off and unplug the printer power cord. 2 Disconnect all cables from the back of the printer. 3 Open the upper front door and multipurpose feeder door.
Supplies and maintenance information 5 Swing the side cover away from the printer, and then slide the cover toward the back of the printer to remove it. 6 Loosen the five screws on the shield, but do not remove them completely. 7 Slide the shield to the left until the screws fit into the keyholes on the cover. 8 Remove the shield and set it aside.
Supplies and maintenance information Removing an optional memory card Complete the following steps to remove an optional printer memory card. Warning: Optional memory cards are easily damaged by static electricity. Touch something metal on the printer before you touch an optional memory card. 1 Remove the shield. See Accessing the system board. 2 Locate the optional memory card. 3 Push the connector latches on both ends of the memory connector away from the memory card.
Supplies and maintenance information Removing an optional firmware card Warning: Optional firmware cards are easily damaged by static electricity. Touch something metal on the printer before you touch an optional firmware card. 1 Remove the shield. See Accessing the system board. 2 Locate the firmware card you want to remove. 3 Grasp the firmware card gently and pull it straight out in one motion. Do not pull one side and then the other.
Supplies and maintenance information Reinstalling the shield 1 Align the five keyholes with five screws on the system board. 2 Slide the shield to the right, and then tighten the screws.
Supplies and maintenance information Reattaching the side cover 1 Align the three tabs on the back of the side cover with the slots on the printer. 2 Align the tabs on the bottom of the side cover with the slots at bottom of the printer.
Supplies and maintenance information 3 Press the side cover firmly into place, making sure that the two tabs are in place, and that the ridge on top of the side cover aligns with the ridge on the printer. Tabs Ridge 4 Close the upper front door and multipurpose feeder door. 5 Reconnect all cables on the back of the printer. 6 Plug in the printer power cord, and turn the printer on.
9 Administration The following sections are for a network administrator in charge of the printer.
Administration Disabling the operator panel menus Since many people could be using the printer, an administrator may choose to lock the menus to keep others from changing menu settings from the operator panel. To disable the operator panel menus so that changes cannot be made to the printer default settings: 1 Turn the printer off. Note: Disabling the operator panel menus does not prevent access to the Job Menu or to Print and Hold functionality.
Administration Restoring factory default settings When you first enter the printer menus from the operator panel, you may notice an asterisk (*) next to a value in the menus. This asterisk indicates the factory default setting. These settings are the original printer settings. (Factory defaults may vary for different countries.) When you select a new setting from the operator panel, the Saved message appears.
Administration Using the Print and Hold function When sending a job to the printer, you can specify in the driver that you want the printer to hold the job in memory. When you are ready to print the job, you must go to the printer and use the operator panel menus to identify which held job you want to print. (See Understanding the operator panel for information on using the operator panel.
Administration Accessing held jobs from the operator panel 1 To access held jobs from the operator panel: • • If the printer is Busy, press Menu and the Job Menu appears. If the printer is Ready, continue to step 2. 2 Press and release Menu until you see Held Jobs or Confidential Job on the operator panel display, depending on the type of job you want to access. 3 Press Select. User Name appears on the first line of the operator panel.
Administration Repeat Print If you send a Repeat Print job, the printer prints all requested copies of the job and stores the job in memory so you can print additional copies later. You can print additional copies as long as the job remains stored in memory. Note: Repeat Print jobs are automatically deleted from printer memory when the printer requires extra memory to process additional held jobs.
Administration Confidential jobs When you send a job to the printer, you can enter a personal identification number (PIN) from the driver. The PIN must be four digits using the numbers 1–6. The job is then held in printer memory until you enter the same four-digit PIN from the printer operator panel and choose to print or delete the job. This ensures that the job does not print until you are there to retrieve it, and no one else using the printer can print the job.
10 Troubleshooting Section Page Solving basic printer problems 147 Solving display problems 148 Solving printing problems 149 Solving print quality problems 153 Solving option problems 157 Solving network printing problems 158 Solving other problems 158 Contacting service 158 Solving basic printer problems Sometimes printer problems are very easy to solve.
Troubleshooting Solving display problems Problem Action Operator panel displays only diamonds or is blank. • Turn the printer off, wait about 10 seconds, and turn the printer on. • Performing Self Test appears on the operator panel. When the test is completed, Ready is displayed. If the messages do not appear, turn the printer off and contact the place you bought your printer. Menu settings changed from the operator panel have no effect.
Troubleshooting Solving printing problems Problem Solution The printer prints slowly when Best quality is chosen in the printer driver. The higher the quality you select, the slower the print job will print. If speed is necessary, choose Draft or Normal as the quality setting. Using Best slows the printer to about half the speed of Normal. The printer prints slowly when printing on narrow media (less than 182 mm [7.2 in.] wide). Narrow print media causes the printer to feed more slowly.
Troubleshooting Problem Solution Print media misfeeds or multiple feeds occur. • Make sure the print media you are using meets the specifications for your printer. See Print media sources and specifications for more information. • Flex print media before loading it in any of the sources. • Make sure the print media is loaded correctly. • Make sure the paper width and length guides on the print media sources are adjusted correctly and are not too tight. • Do not overfill the print media sources.
Troubleshooting Problem Solution The print media fails to feed from tray 1 (standard tray). • Remove the print media and fan it. • Make sure Tray 1 is selected from the printer driver or on the operator panel. • Do not overfill the tray. • Make sure the width and length guides on the print media sources are adjusted correctly and are not too tight. • Make sure the tray’s media dial is in the correct position for the weight of print media you are using. See Loading print media over 90 g/m2 (24 lb).
Troubleshooting Problem Solution The paper is curled once it exits the printer. • • • • • Use paper that is sealed in its original packaging. Turn the paper over. Rotate the paper 180 degrees. If you are printing a multi-page job, try duplexing it. When printing on heavy media, open the rear exit door for a straightthrough paper path. • Try another kind or brand of paper, such as a xerographic paper for laser printers. • If possible, try printing in a less humid environment.
Troubleshooting Solving print quality problems You may be able to correct many print quality problems by replacing a supply or maintenance item that has reached the end of its intended life. See Determining the status of supplies for information about other ways to identify consumables that need to be replaced. Use the following table to find solutions to print quality problems you encounter. If you cannot fix the problem, contact the place where you bought your printer.
Troubleshooting Problem Solution Vertical or horizontal streaks appear on the page. • The toner may be low. Remove the print cartridge. To utilize the remaining toner, shake the cartridge gently, and then reinstall it. See Changing the print cartridge for an illustration of how to shake the cartridge. • If you are using preprinted forms, make sure the ink can withstand temperatures of 200°C (392°F). The print is light but the Toner Low message is not displayed.
Troubleshooting Problem Solution Faint images or repetitive spots appear on the page. • Try a different type of print media. Print media designed for copiers provides the best quality. • Replace the used print cartridge with a new one. See Changing the print cartridge for instructions. Characters have jagged or uneven edges, or image quality is poor. • Change the Print Resolution setting in the Quality Menu to 600 dpi or 1200 dpi.
Troubleshooting Problem Solution Pages are blank. • The print cartridge may be out of toner or defective. Replace the used cartridge with a new one. See Changing the print cartridge for instructions. • You may have a software error. Try turning the printer off and back on. • Make sure the packaging material is removed from the print cartridge. See Changing the print cartridge for information about removing the packaging. • Check the print cartridge to be sure it is installed correctly.
Troubleshooting Problem Solution Print quality is poor on the second side of a duplex print job. In the Paper Menu, change the Paper Texture to Rough. Print quality is poor when using 24# paper with a high cotton content (rough paper). In the Paper Menu, change the Paper Texture to Rough and the Paper Weight to Heavy. Solving option problems Problem Solution Option does not operate correctly after it is installed, or it quits working.
Troubleshooting Solving network printing problems Problem Solution Job did not print or incorrect characters printed. If you are using a print server, verify that it is set up properly and the network cable is connected. Note: Refer to the documentation that came with your print server for more information. For Novell users: • Make sure the netware.drv file is dated October 24, 1994, or later. • Make sure the NT (no tabs) flag is included in the capture statement.
Notices Section Page Trademarks 159 CG Times Based on Times New Roman under license from The Monotype Corporation plc, is a product of Agfa Corporation Licensing notice 160 Chicago Apple Computer, Inc. Laser notice 160 Clarendon Linotype-Hell AG and/or its subsidiaries Electronic emission notices 160 Eurostile Nebiolo Printer energy consumption 161 Geneva Apple Computer, Inc.
Licensing notice The printer resident software contains: • Software developed and copyrighted by Lexmark • Lexmark modified software licensed under the provisions of the GNU General Public License version 2 and the GNU Lesser General Public License version 2.
The United Kingdom Telecommunications Act 1984 This apparatus is approved under the approval number NS/G/1234/ J/100003 for the indirect connections to the public telecommunications systems in the United Kingdom. Avis de conformité aux normes de l’industrie du Canada Printer energy consumption The following table documents the power consumption characteristics of the printer. Cet appareil numérique de la classe B respecte toutes les exigences du Règlement sur le matériel brouilleur du Canada.
Index A supported source 10 card stock, exiting to rear output bin 40 characteristics, print media letterhead 14 characters jagged 155 charge roll replacing 127 cleaning the printer 124 clearing jams 43 possible jam areas 43 Collation (Finishing Menu) 79 collation, enabling 79 complex page errors 87 Confidential Job (Job Menu) 83 confidential jobs 115 entering a PIN 115 entering user name 143 sending 115 Configure MP (Paper Menu) 73 conserving supplies 120 Copies (Finishing Menu) 79 copies, specifying numb
Index flash memory defragmenting 81 formatting 82 printing downloaded resources 82 setting as download target 87 Font Name (PCL Emul Menu) 90 Font Priority (PostScript Menu) 93 font samples, printing 61 Font Source (PCL Emul Menu) 90 font support PCL emulation 61 PostScript emulation 61 fonts choosing in PCL emulation 90 printing font samples 61 printing sample list 61 printing samples 82 priority 93 resident 61 symbol sets supported 91 Format Flash (Utilities Menu) 82 binding 58, 79 enabling 79 Duplex (F
Index multipurpose feeder 36 standard tray 20 transparencies 37 loading print media multipurpose feeder 34 optional 250-sheet tray 20 optional 500-sheet tray 26 standard tray 20 logo 36 parallel 96 USB 100 J jagged characters 155 Jam Recovery (Setup Menu) 87 jams avoiding 19 clearing 43 clearing, paper path 43 messages 102 preventing 19 See paper jams job 143 canceling 83 confidential 83 held 84 Job Menu 83 Cancel Job 83 Confidential Job 83 Held Jobs 84 Print Buffer 84 Reset Printer 84 job not printing 1
Index Waiting 107 Multipage Border (Finishing Menu) 80 Multipage Order (Finishing Menu) 80 multipage print border settings 80 configuring 80 order settings 80 view settings 80 Multipage Print (Finishing Menu) 80 Multipage View (Finishing Menu) 80 multiple page feeds 150 multipurpose feeder capacities 10 guidelines 31 loading 34 envelopes 37 letterhead 36 paper 36 transparencies 37 location 31 maximum stack height 35 opening 32 paper weights supported 10 print media sizes supported 10 print media supported
Index paper jams clearing 43 paper path 43 preventing 19 reprinting jammed pages 87 paper loading optional 250-sheet tray 20 Paper Loading (Paper Menu) 74 Paper Menu 73 Configure MP 73 Custom Types 73 Paper Loading 74 Paper Size 75 Paper Source 75 Paper Texture 76 Paper Type 77 Paper Weight 78 Substitute Size 78 Universal Setup 78 paper rest, raising 39 Paper Size (Paper Menu) 75 paper sizes A4 12 A5 12 executive 12 folio 12 JIS B5 12 legal 12 letter 12 statement 12 universal 12 Paper Source (Paper Menu) 7
Index PCL SmartSwitch, setting See also printer language network port 99 parallel port 97 USB port 100 PDF Menu (PostScript Menu) 93 personal identification number See PIN PictureGrade (Quality Menu) 85 PIN entering at the printer 116 entering from the driver 115 for confidential jobs 115 Pitch (PCL Emul Menu) 91 Point Size (PCL Emul Menu) 91 ports network 98 parallel 96 USB 100 PostScript emulation font priority 93 font sample print 82 printing PS errors 93 PostScript emulation font support 61 PostScript
Index guidelines 15 loading in multipurpose feeder 37 loading in standard tray 20 type, incorrect 150 print media jams avoiding 19 clearing 43 print media types card stock 11 envelopes 11 labels 11 paper 10, 11 transparencies 11 print media, specifications sizes 12 sources 10 multipurpose feeder 10 optional 250-sheet tray 10 optional 500-sheet tray 10 standard 250-sheet tray 10 weights 10 Print Menus (Utilities Menu) 82 Print Net Setup (Utilities Menu) 82 print options print buffer 84 separator sheets 8
Index printing problems solving missing or damaged parts 150 multiple sheets feed 150 optional 250-sheet tray, paper feed failure 151 optional 500-sheet tray, paper feed failure 151 Paper Jam message displayed, jam is cleared 151 print media buckles 150 print media skews 150 print media sticks 150 printer on, nothing prints 150 standard tray, paper feed failure 151 upper front door will not close 150 problem solving network printing problems incorrect characters 158 job not printing 158 option problems doe
Index using 40 reinstalling shield on system board 137 Remove Held Jobs (Utilities Menu) 82 removing metal shield 134 optional drawer 132 optional firmware cards 136 optional memory cards 135 optional printer memory 135 printer from an optional drawer 132 repeat print 145 replacing charge roll 127 reserve print 145 Reset Printer (Job Menu) 84 resetting printer 84 Resource Save (Setup Menu) 89 Return button 69 unexpected characters print 156 vertical or horizontal streaks 154 white streaks on paper 154 pri
Index transparencies 15 loading 37 tray linking 60 tray dial 25 Tray Renumber (PCL Emul Menu) 92, 95 troubleshooting clearing operator panel error messages 69 display problems 148 network problems incorrect characters printing 158 job not printing 158 option problems does not operate after installation 157 quits working 157 other problems obtaining updated drivers and utilities 158 printer escape codes 158 print quality problems 154, 156 jagged characters 155 print quality problems, solving background shad
Index Print Fonts 82 Print Menus 82 Print Net Setup 82 Remove Held Jobs 82 printing problems, solving incorrect characters 149 incorrect print media type 150 job not printing 149 misfeeds 150 missing or damaged parts 150 multiple feeds 150 multiple sheets feed 150 optional 250-sheet tray, paper feed failure 151 optional 500-sheet tray, paper feed failure 151 Paper Jam message displayed, jam is cleared 151 print media buckles 150 print media skews 150 print media skews or buckles 150 print media stackin
Readers’ Comments — We’d Like to Hear from You Infoprint 1422 User’s Guide Publication No.
G510-2921-00 ___________________________________________________________________________________________________ Readers’ Comments — We’d Like to Hear from You Cut or Fold Along Line _ _ _ _ _ _ _Fold _ _ _and _ _ _Tape _ _ _ _ _ _ _ _ _ _ _ _ _ _ _ _ _ _ _ _ _ _ _ _ _ _ _Please _ _ _ _ _do _ _not _ _ staple _ _ _ _ _ _ _ _ _ _ _ _ _ _ _ _ _ _ _ _ _ _ _ _ _ _ _ _ _Fold _ _ _and _ _ Tape ______ NO POSTAGE NECESSARY IF MAILED IN THE UNITED STATES BUSINESS REPLY MAIL FIRST-CLASS MAIL PERMIT NO.
Part Number: 75P6513 G510-2921-00 (1P) P/N: 75P6513 Printed in USA