
User's Manual
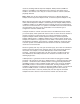
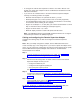

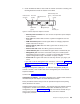
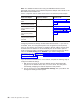
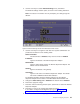
Table Of Contents
- Contents
- Safety
- Chapter 1. Introducing the IBM xSeries 445 server
- Chapter 2. Configuring the server
- Using the Configuration/Setup Utility program
- Using the ServerGuide Setup and Installation CD
- Configuring the Gigabit Ethernet controller
- Using the Integrated System Management Firmware Update Utility program
- Using the LSI Logic Configuration Utility program
- Using ServeRAID Manager
- Remote Supervisor Adapters
- Using the PXE boot agent utility program
- Appendix A. Getting help and technical assistance
- Appendix B. Notices
- Edition notice
- Trademarks
- Important notes
- Product recycling and disposal
- Battery return program
- Electronic emission notices
- Federal Communications Commission (FCC) statement
- Industry Canada Class A emission compliance statement
- Australia and New Zealand Class A statement
- United Kingdom telecommunications safety requirement
- European Union EMC Directive conformance statement
- Taiwanese Class A warning statement
- Chinese Class A warning statement
- Japanese Voluntary Control Council for Interference (VCCI) statement
- Power cords
- Index
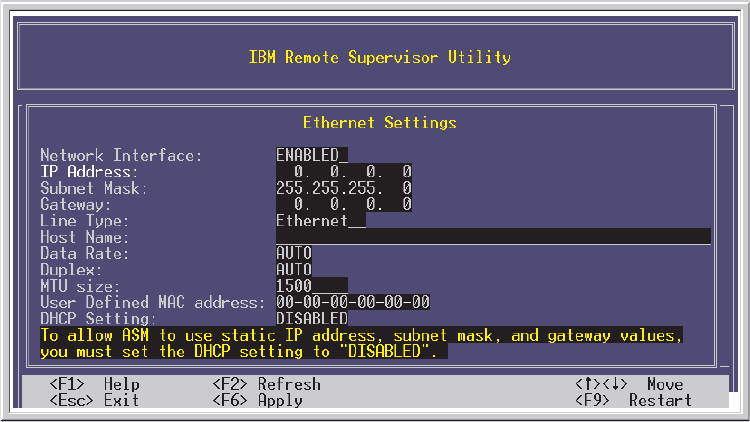
3.
Use
the
arrow
keys
to
select
Ethernet
Settings;
then,
press
Enter.
The
Ethernet
Settings
window
opens,
as
shown
in
the
following
illustration.
Note:
The
values
in
the
window
are
only
examples;
your
settings
might
be
different.
4.
Use
the
arrow
keys
to
navigate
to
each
field.
Your
system
administrator
can
provide
the
information
for
the
following
fields:
Network
Interface
The
default
value
is
Enabled;
verify
that
it
is
still
set
to
Enabled.
IP
Address
Type
the
IP
address
of
the
Remote
Supervisor
Adapter.
Subnet
Mask
Type
the
subnet
mask
used
by
the
Remote
Supervisor
Adapter.
The
default
value
is
255.255.255.0.
Gateway
Type
the
IP
address
of
the
gateway.
Host
Name
Type
the
host
name
of
the
Remote
Supervisor
Adapter.
The
default
host
name
is
ASMA<burned-in
MAC
address>.
For
detailed
information
about
the
Ethernet
settings,
see
the
Remote
Supervisor
Adapter
User’s
Guide
on
the
IBM
xSeries
Documentation
CD.
5.
Change
the
DHCP
Setting
field
to
Disabled.
The
default
value
is
Enabled.
6.
Press
F6
to
apply
the
change.
7.
Press
Esc.
After
the
Warning
window
opens,
press
Enter
to
restart
the
Remote
Supervisor
Adapter.
8.
Press
Esc
to
return
to
the
Configuration
Settings
window.
If
you
need
to
configure
the
management
port,
go
to
“Configuring
the
management
port
for
text-based
remote
access”
on
page
58.
9.
Press
Esc
to
return
to
the
Utility
program
main
window.
Figure
22.
Ethernet
Settings
window
with
Web-based
remote
values
Chapter
2.
Configuring
the
server
57