Color Monitor E54 Operating Instructions English
IBM E54 Color Monitor Users Guide 6331-07N 6331-97N 6331-47N 6331-67N
Edition 1 This publication could contain technical inaccuracies or typographical errors. Changes are made periodically to the information herein; these changes will be made in later editions. IBM may make improvements and/or changes in the product(s) and/or program(s) at any time. It is possible that this publication may contain reference to, or information about, IBM products (machines and programs), programming, or services that are not announced in your country.
Table of Contents Precautions ............................................................... US-1 Installation .......................................................................................... US-1 Maintenance ....................................................................................... US-1 Transportation .................................................................................... US-1 Use of the Tilt-Swivel .......................................................................
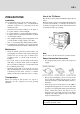
US-1 PRECAUTIONS Installation Do not install the monitor in the following places: • on surface (rugs, blankets, etc.) or near materials (curtains, draperies, etc.) that may block the ventilation holes. • near heat sources such as radiators or air ducts, or in a place subject to direct sunlight. • in a place subject to severe temperature changes. • in a place subject to mechanical vibration or shock • on an unstable surface.
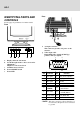
US-2 IDENTIFYING PARTS AND CONTROLS Rear See the pages in parentheses for further detail. Front g f f. AC input connector This connector provides AC power to the monitor. Video input cable Inputs RGB video signals (0.700 Vp-p, positive) and sync signals. 1 5 g. a b c d e a. b. Displays menu & exits menu Scrolls through menu to choose an icon for adjustment / Adjusts level of selected icon c. Confirms menu selection d. Power ON/OFF switch e.
US-3 UNPACKING PROCEDURE À Á SETUP This monitor works with platforms running at horizontal frequencies between 30 and 69 kHz. Step 1: Install the monitor • Â Ã • To connect the tilt/swivel base to the monitor, align hooks with the sockets on bottom side of the monitor, and gently push the base towards the front of the monitor. Put monitor on a flat and stable working bench. Ä REPACKING Save the original box and all packing material for future shipping needs.
US-4 Step 3: Connect the power cord Workplace Preparation With the monitor and computer turned off, first connect the proper power cord for your local supply to the monitor, then connect it to a properly grounded power outlet. Positioning the Monitor Choose a suitable place to position the monitor where it is not near fluorescent desk lighting or any equipment that produces magnetic field that could cause interference. Ensure that the furniture or equipment can support the weight of the monitor.
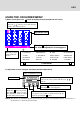
US-5 USING THE ON-SCREEN MENU 1) Menu screen-press the 1 button to display the menu below and exit menus Select mark Press the button to move the selection mark to the desired location. Adjustment icons 1: CO NTRAST The item presently being adjusted is shown. :2 When the 2 button is pressed. The selected adjustment screen appears. CONTRAST BRIGHTNESS H. SIZE H. POSITION V. SIZE V. POSITION PINCUSHION TRAPEZOID ROTATION COLOR LANGUAGE DISP. FREQ. DEGAUSS RECALL H. MOIRE V.
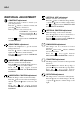
US-6 INDIVIDUAL ADJUSTMENT CONTRAST adjustment Adjust the screen contrast to match your personal preference. Press the button to decrease contrast and press the button to increase it. Direct operation: You can access the CONTRAST adjustment screen by pressing the or before entering the menu screen. Press the 2 key toggles between CONTRAST and BRIGHTNESS. BRIGHTNESS adjustment VERTICAL SIZE adjustment Fills the viewable area vertically.
US-7 COLOR selection The white of the image can be adjusted. 1) Use the button to select: (1)9300 OK, (2)6500O K or (3)User color. 2) If the (3):the user’s color is selected, “2” appears in the lower right of the On-Screen Menu. Press the 2 button to display the USER COLOR adjustment screen. USER COLOR The white of the video image can be adjusted to the user’s preferred color. 1) Use the 2 button to select R (red), G (green) or B (blue). 2) Use the button to adjust the color as desired.
US-8 TECHNICAL FEATURES TROUBLESHOOTING Preset modes Before contacting technical support, refer to this section. Mode Resolution (H x V) V. Freq. (Hz) 1 640 x 480 60 (VESA) 2 640 x 480 75 (VESA) 3 640 x 480 85 (VESA) 4 720 x 400 70 (Ind.
US-9 SELF-DIAGNOSIS FUNCTION This monitor is equipped with a self-diagnosis function. You can easily distinguish if the problem is on the monitor or on the computer by using the monitor’s built-in selftest function. With the monitor power ON, disconnect the signal cable from computer. If you see a “NO SIGNAL” image on the screen, the monitor is functioning properly, and the problem is with the MONITOR side or signal cable. SPECIFICATIONS S cre e n S ize 15 in. visual diagonal Viewa ble scr een size 13.
US-10 90 to 264 V AC 50 - 6 0 Hz Curre nt Rating 1. 5 A Po we r Co ns umption 75 W ( MAX. ) Dime ns io n (W x H x D) 37 0 x 387 x 3 90 mm (1 4.6 x 15. 2 x 15. 4 in.) We ight 12 kg Ope rat ing Te mpe rature 5°C to 40 °C (4 1°F to 104 °F) St ora ge Te mpe rature - 4 0°C to 65° C (- 40°F to 1 49° F) Humidity 20 % to 80 % (non- condensing) Altit ude Up to 100 00ft * Po we r Input Vo lta ge / Fre que nc y TCO version has a different surface treatment.
US-11 SERVICE INFORMATION The following parts are for use by IBM services, or IBM authorized dealers, to support customer warranty. Parts are for service use only.