IBM System Storage DR550 Version 3.0 ------17 March 2006 Page 1 IBM® System StorageTM DR550 V3.
IBM System Storage DR550 Version 3.0 ------17 March 2006 Page 2 Table of Contents INTRODUCTION............................................................................................................. 6 HARDWARE OVERVIEW............................................................................................... 7 IBM System P5 520 ...................................................................................................................................................7 Management Console ..
IBM System Storage DR550 Version 3.0 ------17 March 2006 Page 3 INSTALLATION AND ACTIVATION ............................................................................. 30 Safety Notices..........................................................................................................................................................30 Site Preparation and Planning.............................................................................................................................
IBM System Storage DR550 Version 3.0 ------17 March 2006 Page 4 HACMP Network Considerations........................................................................................................................85 HACMP Configuration in Switched Networks.............................................................................................85 Monitoring the HACMP Cluster ...........................................................................................................................
IBM System Storage DR550 Version 3.0 ------17 March 2006 Page 5 Placing a Service Call ..........................................................................................................................................122 DS4000 Service Alert Notification.....................................................................................................................124 REFERENCES............................................................................................................
IBM System Storage DR550 Version 3.0 ------17 March 2006 Page 6 Introduction IBM® System StorageTM DR550, one of IBM’s Data Retention offerings, is an integrated offering for clients that need to retain and preserve electronic business records. The DR550 packages storage, server and software retention components into a lockable cabinet.
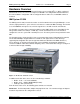
IBM System Storage DR550 Version 3.0 ------17 March 2006 Page 7 Hardware Overview The DR550 includes one or two IBM System P5 520 servers running AIX® 5.3. When configured with two 520 servers, the servers are setup in an HACMP™ 5.3 configuration. Both P5 520s have the same hardware configuration. When configured with one 520 server, no HACMP software is included.
IBM System Storage DR550 Version 3.0 ------17 March 2006 Page 8 The following adapters are installed.
IBM System Storage DR550 Version 3.0 ------17 March 2006 Page 9 Additional features are designed into pSeries servers to provide an extensive set of reliability, availability, and serviceability (RAS) features such as improved fault isolation, recovery from errors without stopping the system, avoidance of recurring failures, and predictive failure analysis. Additional information on the P5 520 server is available at www.ibm.com/redbooks.
IBM System Storage DR550 Version 3.0 ------17 March 2006 Page 10 provide high performance and functionality. Events such as upgrades to support the latest version of DS4000 Storage Manager can also often be executed without stopping operations.
IBM System Storage DR550 Version 3.0 ------17 March 2006 Page 11 on the switch. These cables would also need to be connected to the customer network. You can then access the switch using the IP address. The Userid is ADMIN and the password is PASSWORD. You should change this password to confirm with site security guidelines. If you should need to review the configuration or zoning within the switches, the IP address for switch 1 is 192.168.1.
IBM System Storage DR550 Engine1 Version 3.
IBM System Storage DR550 Version 3.
IBM System Storage DR550 Version 3.0 ------17 March 2006 Page 14 Software Overview High Availability Cluster Multi-Processing (HACMP) for AIX The data retention application can be a business critical application. The DR550 can provide a high availability environment by leveraging the capabilities of AIX and High Availability Cluster Multi-Processing (HACMP) with dual P5 servers and redundant networks. This is referred to as the dual node configuration.
IBM System Storage DR550 • Version 3.0 ------17 March 2006 Page 15 help prevent stored data from being deleted until the hold is released. See “Deletion Hold” for more information. This feature must be enabled via the commands sent by the content management application. Data encryption - 144.8-bit Advanced Encryption Standard (AES) is now available for the Archive API Client. Data can now be encrypted before transmitting to the DR550 and would then be stored on the disk/tape in an encrypted format.
IBM System Storage DR550 Version 3.0 ------17 March 2006 Page 16 Note: only this special version of DS4000 Storage Manager should be used with the DR550. You should not use this version with other DS4000 or FAStT disk systems and should not replace this version with a standard version of DS4000 Storage Manager (even if a newer version is available).
IBM System Storage DR550 Version 3.
IBM System Storage DR550 Version 3.0 ------17 March 2006 Page 18 DR550 Offerings DR550 is available in both single and dual node offerings. Each offering can also be customized to include support for tape, and the appropriate Ethernet connections.
IBM System Storage DR550 1968 1977 1980 1983 1993 5005 5159 6458 6574 7160 7190 7320 7877 8330 9300 Version 3.0 ------17 March 2006 73.4 GB 10,000 RPM Ultra320 SCSI Disk Drive Assembly 2 Gigabit Fibre Channel PCI-X Adapter POWER GXT135P Graphics Accelerator With Digital Support IBM 2-Port 10/100/1000 Base-TX Ethernet PCI-X Adapter IBM 4.
IBM System Storage DR550 7711 Version 3.
IBM System Storage DR550 Version 3.0 ------17 March 2006 Page 21 DR550 Dual Node Components The dual node DR550 offerings are built with the following components: Description Quantity Key Hardware Components 1 or 2 7014 Model T00 RS/6000 System Rack (2nd rack only included in 89.6 TB configuration 2 9131 Model 52A P5 520 1 or 2 1724-100 DS4100 Storage Server (2nd DS4100 included in 89.6 TB configuration) 0-14 1710-10U DS4000 EXP100 Storage Expansion Unit (1 included for 11.
IBM System Storage DR550 1977 1980 1983 1993 5005 5159 6458 6574 7160 7190 7320 7877 8330 9300 Version 3.0 ------17 March 2006 Assembly 2 Gigabit Fibre Channel PCI-X Adapter POWER GXT135P Graphics Accelerator With Digital Support IBM 2-Port 10/100/1000 Base-TX Ethernet PCI-X Adapter IBM 4.
IBM System Storage DR550 0706 1930 1968 1977 1980 1983 1993 5005 5159 6458 6574 7160 7190 7320 7877 8330 9300 Version 3.0 ------17 March 2006 Integrate with DR500 -- IBM TotalStorage Retention Solution single node 1024 MB (2X512MB) DIMMS, 276-PIN, 533 MHZ, DDR-2 SDRAM 73.4 GB 10,000 RPM Ultra320 SCSI Disk Drive Assembly 2 Gigabit Fibre Channel PCI-X Adapter POWER GXT135P Graphics Accelerator With Digital Support IBM 2-Port 10/100/1000 Base-TX Ethernet PCI-X Adapter IBM 4.
IBM System Storage DR550 2210 4603 5605 7711 Version 3.
IBM System Storage DR550 2005-B16 AIX 5.3 HACMP System Storage Archive Manager System Storage Archive Client Version 3.0 ------17 March 2006 Page 25 Firmware 4.4.0e (or later) TL 04, with Atape driver 9.6.0.0 and Atldd 6.3.1.0 5.3 + PTFs 5.3.2.0 5.3.0.0 An integrated console is part of the DR550 offering. As an option, limited function is available via a TTY type terminal (customer provided) such as a VT100 or an IBM 3151.
IBM System Storage DR550 2035 GB 600* GB 2035 GB 2035 GB 600* GB 10 11 11 12 13 Version 3.0 ------17 March 2006 hdisk11 hdisk12 hdisk13 hdisk14 hdisk15 Page 26 tsmstglv7 tsmstglv8 tsmstglv9 tsmstglv10 tsmstglv11 For 44.
IBM System Storage DR550 600* GB 2035 GB 2035 GB 600* GB 2035 GB 2035 GB 600* GB 2035 GB 2035 GB 600* GB 2035 GB 2035 GB 600* GB 2035 GB 2035 GB 600* GB 2035 GB 2035 GB 600* GB 2035 GB 2035 GB 600* GB 2035 GB 2035 GB 600* GB 2035 GB 2035 GB 600* GB 19 20 21 22 23 24 25 26 27 28 29 30 31 32 33 34 35 36 37 38 39 40 41 42 43 44 45 46 Version 3.
IBM System Storage DR550 Version 3.0 ------17 March 2006 Page 28 System Storage Archive Server Configuration The System Storage Archive Manager Server settings on the DR550 are (these settings are different than the default settings. Other parameters use the default settings. ARCHIVERETENTIONPROTECTION ON TCPWINDOWSIZE 63 TCPNODELAY YES BUFFERPOOL 512000 SELFTUNEBUFPOOLSIZE NO TXNGRPMAX 512 COMMTIMEOUT 300 DBPAGE SHADOW YES MAX SESSIONS 100 The following files have been set at the factory: 1.
IBM System Storage DR550 Version 3.0 ------17 March 2006 Page 29 TSM for AIX Administrator’s Guide and Reference manuals for help in modifying the administrative schedules. Examples of schedules that are setup in the DR550 are: Backup of the System Storage Archive Manager database is scheduled to run daily at 8am. Maintain 3 copies of backup and delete older versions (scheduled a job to run daily at 23:59).
IBM System Storage DR550 Version 3.0 ------17 March 2006 Page 30 Installation and Activation Safety Notices A danger notice indicates the presence of a hazard that has the potential of causing death or serious injury. A caution notice indicates the presence of a hazard that has the potential of causing moderate or minor personal injury. Note: For a translation of these notices, see System Unit Safety Information, order number SA232652.
IBM System Storage DR550 Version 3.0 ------17 March 2006 Page 31 Site Preparation and Planning Before you install the IBM System Storage DR550 we recommend that you consider several things to avoid problems during the installation and configuration. The DR550 comes as an almost ready to use system with a complete assembled hardware in a rack (or two) and preconfigured software.
IBM System Storage DR550 Version 3.0 ------17 March 2006 Page 32 Unpacking and Installing the Rack(s) The DR550 comes integrated into one or two 7014 racks (single node configurations and the 5.6, 11.2, 22.4 and 44.8 TB dual node configurations are always shipped in one rack, while the dual node 89.6 TB configuration ships in two racks). Unpack Instructions are located in the transparent sleeve on the exterior of the rack shipping carton.
IBM System Storage DR550 Version 3.0 ------17 March 2006 Page 33 CAUTION: The stabilizer must be firmly attached to the bottom rear of the rack to prevent the rack from turning over when the drawers are pulled out of the rack. Do not pull out or install any drawer or feature if the stabilizer is not attached to the rack. To attach the stabilizers to the bottom of the rack, do the following: 1. Align the slots in the stabilizer with the mounting holes at the bottom front of the rack. 2.
IBM System Storage DR550 Version 3.0 ------17 March 2006 Page 34 d. Spacer 1 1 2 1 Rack Chassis 2 Top Trim Panel 3 Left Side Trim Panel 4 Right Side Trim Panel 5 Spring Clip 3 4 1 T00 Rack Chassis 2 Rack-Mounting Bolt 3 Thin Washer 4 Top Plastic Isolator Bushing 5 Spacer 6 Jam Nut 7 Leveling Foot 2 3 4 667 5 6 7 5 7. Insert a rack-mounting bolt assembly through each of the leveling feet. 8.
IBM System Storage DR550 Version 3.0 ------17 March 2006 Page 35 19. Remove the two rack-mounting plates from the marked areas. 20. At the marked location of the threaded rack-mounting bolt holes, drill four clearance holes into the concrete floor. Each clearance hole should be approximately one inch deep. This allows the rack-mounting bolts enough room to protrude past the thickness of the mounting plate.
IBM System Storage DR550 Version 3.0 ------17 March 2006 Page 36 Attach the Rack to a Concrete Floor Beneath a Raised Floor Obtain the services of a mechanical contractor to attach the rack-mounting plates to the concrete floor. The mechanical contractor needs to determine that the hardware being used to secure the rack-mounting plates to the concrete floor is sufficient to meet the requirements for the installation. To attach the rack to a concrete floor, do the following: 1.
IBM System Storage DR550 Version 3.0 ------17 March 2006 Page 37 11. Mark the floor around the edges of both rack-mounting plates. 12. Mark the plate bolt-down holes that are accessible through the opening in the rear of the rack. 13. Remove the rack-mounting bolt assemblies. 14. If you are installing an ac-powered rack, remove the bottom isolator bushing from each of the leveling feet.
IBM System Storage DR550 Version 3.0 ------17 March 2006 Page 38 30. Using your anchor bolts, secure the rear rack-mounting plate on top of the raised floor and through to the concrete floor. 31. Replace all raised panels that may have been removed when aligning and securing the anchor bolts to the concrete floor. 32. Align the rack over the front and rear-mounting plates. 33. Insert each of the rack-mounting bolts assemblies through a leveling foot. 34.
IBM System Storage DR550 Version 3.0 ------17 March 2006 Page 39 16. If you are bolting down the racks, go to either “Attach the Rack to a Concrete Floor” or “Attach the Rack to a Concrete Floor Beneath a Raised Floor“ as appropriate in the 7014 Series Model T00 and Model T42 System Rack Installation Guide – SA38-0641. 17. If the rack does not have a front door, install the top, left, and right trim panels on all racks.
IBM System Storage DR550 Version 3.0 ------17 March 2006 Page 40 Cabling between the Racks This section is only applicable to the dual node 89.6 TB configuration of the DR550. At 44.8 TBs of raw capacity, the first rack is fully populated. Thus to expand the storage capacity beyond 44.8 TBs, an additional rack is required. Cabling between the racks is accomplished with two LC-LC Fibre Channel Cables provided with the DR550 and two Ethernet crossover cables (also provided with the DR550).
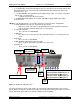
IBM System Storage DR550 Version 3.0 ------17 March 2006 Page 41 The following diagram shows the required Ethernet connections (green solid lines) that must be done by the customer between the racks. 8 9 .
IBM System Storage DR550 Version 3.
IBM System Storage DR550 Version 3.0 ------17 March 2006 Page 43 Dual Node Configurations Boot is used to indicate the primary connection. There is one Ethernet connection from both engine_1 and engine_2. Standby is provided as a backup connection in the event of a network failure to provide an alternate network path. The diagrams below show the connections to be made from each engine (P5 520) to the customer’s pair of 10/100 or gigabit Ethernet switches.
IBM System Storage DR550 Version 3.
IBM System Storage DR550 Version 3.0 ------17 March 2006 Page 45 You may normally press either the Print Screen key or press the Control key twice to access the OSCAR® (On Screen Configuration and Activity Reporting) interface. To modify server names on OSCAR, press Print Screen and then click Setup – Names – Modify to access the screen that displays the old name and prompts you to add a new name. Enter a new server name and click OK in the Modify screen; then click OK again in the Names screen.
IBM System Storage DR550 Version 3.
IBM System Storage DR550 Version 3.0 ------17 March 2006 Page 47 5. Use a 9-pin to 9-pin serial converter cable (customer supplied) when connecting to the rear serial port 1. An ASCII (tty) terminal must be used to configure both P5 520 servers. If you have a single terminal, you may connect it to one P5 520 and configure the server. Then connect it to the other P5 520 server and configure it. Thus only one terminal is needed as the console in setting up the DR550.
IBM System Storage DR550 Version 3.0 ------17 March 2006 Page 48 6. Turn on the branch circuit breaker. Measure for the appropriate voltages between phases. If no voltage is present on the receptacle case or grounded pin, the receptacle is safe to touch. 7. With an appropriate meter, verify that the voltage at the ac outlet is correct. 8. Verify that the grounding impedance is correct by using the ECOS 1020, 1023, B7106, C7106, or an appropriately approved ground-impedance tester.
IBM System Storage DR550 Version 3.0 ------17 March 2006 Page 49 Configuring the P5 520 Servers The P5 520 servers within the IBM TotalStorage Data Retention are shipped with particular AIX security settings. These settings will not allow remote administration tasks initiated via commands like telnet, remote shell (rsh), file transfer protocol (ftp) or similar. Therefore, you should use the integrated console for management activities.
IBM System Storage DR550 Version 3.
IBM System Storage DR550 Version 3.0 ------17 March 2006 Page 51 Single Node - SX adapter IP Addresses 192.168.5.102 192.168.4.101 CtrlA CtrlB DS4100 10/100/1000 (T5) 10/100/1000 (T6) USB0 (T7) 2 Port Gigabit Ethernet SX PCI-X Adapter - Slot 3 2 Gb Fibre channel Adapter Slot 4 (DS4100) 2 Gb Fibre Channel Adapter - Slot 5 (DS4100) HMC1 HMC2 Pwr GXT135p Graphics Adapter - Slot 2 192.168.4.24 192.168.5.26 System board 2 Gb Fibre Channel Adapter - Slot 1 (tape) P5 520 USB1 (T8) 192.168.1.
IBM System Storage DR550 Version 3.0 ------17 March 2006 Page 52 Single Node - TX adapter IP Addresses 192.168.5.102 192.168.4.101 CtrlA CtrlB DS4100 10/100/1000 (T5) 10/100/1000 (T6) USB0 (T7) 2 Gb Fibre Channel Adapter - Slot 5 (DS4100) HMC1 HMC2 Pwr GXT135p Graphics Adapter - Slot 2 2 Port 10/100/1000 Ethernet TX PCI-X Adapter - Slot 3 2 Gb Fibre channel Adapter Slot 4 (DS4100) 192.168.4.24 192.168.5.26 System board 2 Gb Fibre Channel Adapter - Slot 1 (tape) P5 520 USB1 (T8) 192.168.1.
IBM System Storage DR550 Version 3.0 ------17 March 2006 Page 53 Procedure for Changing IP Address To configure the DR550 for use within your network you must change one IP address from its factory setting. The change is made to the P5 520 server. Important: Do not change the factory IP configuration for the DS4100 controllers or any IP address on the IBM TotalStorage SAN Switch B16.
IBM System Storage DR550 Version 3.0 ------17 March 2006 Page 54 1. First of all create a copy of the /etc/hosts file that is shipped from factory (see Preconfigured /etc/hosts file on drs_engine (excerpt)) with the AIX command cp /etc/hosts /etc/hosts.factory. Preconfigured /etc/hosts file on drs_engine (excerpt) 127.0.0.1 192.168.4.24 192.168.5.26 192.168.1.21 loopback localhost # loopback (lo0) name/address drs_engine2_FAStT1_ctrlA drs_engine drs_engine2_FAStT1_ctrlB drs_engine drs_engine 2.
IBM System Storage DR550 Version 3.0 ------17 March 2006 Page 55 Ping xx.xx.xx.xx hit ctrl c to break out of the ping command Step 6 - Edit the IBM System Storage Archive Manager client option file (dsm.sys) You need to adjust the IBM Tivoli Storage Manager (ITSM) client system options file, so that the ITSM API or any ITSM client (dsmadmc) can find the IBM System Storage Archive Manager server. On the p5 520 server, replace the value in the dsm.
IBM System Storage DR550 Version 3.0 ------17 March 2006 Page 56 2. HACMP Reconfiguration – After the four IP addresses have been configured that are consistent with the customer’s IP address schema, HACMP must be reconfigured with these IP addresses specified. 3. Change /usr/tivoli/tsm/client/ba/bin/dsm.sys: SErvername TSM COMMmethod TCPip TCPPort 1500 192.168.1.22 <=== cluster ip TCPServeraddress address or DNS host name The following sections explain how to configure each of the above steps.
IBM System Storage DR550 192.168.4.24 192.168.5.26 192.168.4.101 192.168.5.102 Version 3.0 ------17 March 2006 Page 57 drs_engine2_DS40001_ctrlA AIX Do not change drs_engine2_DS40001_ctrlB AIX Do not change drs_DS40001_ctrlA DS4100 Do not change drs_DS40001_ctrlB DS4100 Do not change Preconfigured TCP/IP addresses for gigabit Ethernet networks Dual Node Gigabit (Fiber Optic) IP Addresses 192.168.5.102 192.168.4.101 192.168.5.104 192.168.4.
IBM System Storage DR550 Version 3.0 ------17 March 2006 Page 58 Connecting to 10/100/1000 Ethernet (Copper) Network The connection to the customer’s 10/100/1000 Mbps Ethernet (copper) network is provided by the IBM Dual Port Base TX Ethernet-PCI-X Adapter, located in PCI slot 1 (on the very left side) of each P5 520 server. This is illustrated in the figure below.
IBM System Storage DR550 192.168.4.103 192.168.5.104 DRS_Engine_2 192.168.1.23 192.168.2.11 192.168.3.11 192.168.4.24 192.168.5.26 192.168.4.101 192.168.5.102 Version 3.
IBM System Storage DR550 Version 3.0 ------17 March 2006 Page 60 Once the DR550 has been physically connected to the customer network, the following IP addresses need to be changed: Using smit or smitty, the Ethernet devices that will be used for the BOOT IP address (i.e. en5 for 10/100, en1 for gigabit) and the STANDBY address (i.e. en3 for 10/100, en2 for gigabit) need to be changed. HACMP also requires changes to the configuration.
IBM System Storage DR550 Version 3.0 ------17 March 2006 Page 61 Step 2 - Connect to drs_engine1 through the management console (Engine1) 1. From the integrated console, use the PRT Scr key to access the IBM eServer p5 520 server drs_engine1. Hit Enter to see the login prompt. Login dr550 Password xxxxxx 2. Once successfully logged on as dr550, issue the AIX command su - root to switch to root. Now you have the necessary AIX system rights to change the network settings and to reconfigure HACMP.
IBM System Storage DR550 Version 3.0 ------17 March 2006 Page 62 Use the F4 key in the Stop Cluster Services on these nodes field when you want to stop the cluster services on both nodes. A pop-up window (Stop Cluster Nodes on these nodes) appears. Select both nodes with the F7 key. Both nodes are marked in front of the line. Press Enter. If you want to change the shutdown mode, press F4 in the appropriate line. A pop-up windows (Shutdown Mode) appears. Select the shutdown mode and press Enter.
IBM System Storage DR550 Version 3.0 ------17 March 2006 Page 63 – forced: Shut down immediately. The node retains control of all its resources. You can use this option to bring down a node while you perform maintenance or make a change to the cluster configuration such as adding a network interface. The node’s applications remain available, except for those that access enhanced concurrent mode volume groups (but without the services of HACMP for AIX daemons).
IBM System Storage DR550 Version 3.0 ------17 March 2006 Page 64 2. Open the /etc/hosts file with an editor of your choice, for instance use vi (AIX command to start vi and open the file is vi /etc/hosts). If you are not familiar with AIX editors, it may be easier to use xedit, an X-window based editor. For the latter, you first need to start an X-session. Start the X-session with the AIX command startx (see startx manpages for details by issuing man startx).
IBM System Storage DR550 Version 3.0 ------17 March 2006 Page 65 address 100.100.51.121. In the Network MASK (hexadecimal or dotted decimal) field, type the network mask 255.255.255.0 of the new network. Press Enter. Check the result of the command at the COMMAND STATUS window of SMIT. The Command field shows OK while the text below says en3 changed. Escape SMIT by pressing F10. Step 6 - Connect to drs_engine2 through the management console (Engine2) 1.
IBM System Storage DR550 Version 3.0 ------17 March 2006 Page 66 Select the second network interface you want to change, for instance en3, until it is highlighted. Press Enter to change. In the INTERNET ADDRESS (dotted decimal) field, type the new IP address 100.100.51.123. In the Network MASK (hexadecimal or dotted decimal) field, type the network mask 255.255.255.0 of the new network. Press Enter. Check the result of the command at the COMMAND STATUS window of SMIT.
IBM System Storage DR550 Version 3.0 ------17 March 2006 Page 67 Step 11 - Define the new HACMP network Still within the HACMP menus of SMIT, configure the new HACMP network for both nodes. 1. Go to Configure HACMP Nodes -> Change/Show a Node in the HACMP Cluster and select node drs_engine1. Highlight the Communication Path to Node field and press F4 to select a new path for this node. From the list, select the new boot IP address drs_engine1_boot (100.100.51.
IBM System Storage DR550 Version 3.0 ------17 March 2006 Page 68 Step 14 - Verify and synchronize the HACMP cluster 1. Use the F3 key (normally four times) to go back to the Extended Configuration window. Go to Extended Verification and Synchronization and press Enter. 2. In the next window use the default settings and press Enter. 3. Check the SMIT result screen for an OK status and quit SMIT with the F10 key.
IBM System Storage DR550 Version 3.0 ------17 March 2006 Page 69 Back on the Start Cluster Services screen, check that both nodes are shown in the appropriate line and press Enter. 5. To start the cluster services may take a few minutes. Do not interrupt this process and wait for the OK message at the end of the process. 6. When command execution completes, and HACMP Cluster Services are started on all nodes specified; SMIT displays a command status window.
IBM System Storage DR550 Version 3.0 ------17 March 2006 Page 70 7. Go to System Management (C-SPOC) -> Manage HACMP Services -> Show Cluster Services and press Enter. 8. Check the SMIT result screen. It should display an OK message in the upper left corner, and three running cluster subsystems and their AIX process id (PID). 9. Quit the SMIT session: Press F10 or ESC+0. Tip: The HACMP cluster will automatically start the IBM System Storage Archive Manager server.
IBM System Storage DR550 Version 3.0 ------17 March 2006 1. On the first IBM eServer p5 520 server drs_engine1, replace the value in the Page 71 /usr/tivoli/tsm/client/ba/bin/dsm.sys file for the tcpserveraddress with your new HACMP cluster service address. We recommend that you do NOT use a dot address, for instance 100.100.51.122 (if you must use an address, you should use the address provided by your network administrator), use the TCP/IP domain name instead, that is drs_service_svc.
IBM System Storage DR550 Version 3.0 ------17 March 2006 Page 72 After successful configuration you should exit all shells on both nodes with the AIX command exit. Depending on the actual shells, you must type the exit command more than once. For example, enter exit one time to close the shell of root and one time to close the shell of dr550. Repeat it until you see the AIX login prompt on both management console sessions. Remember to close all sessions on both engine1 and engine2.
IBM System Storage DR550 Version 3.0 ------17 March 2006 Page 73 Configuration Database data stored in the system default configuration directory (DCD). If cluster services are active on the local node, applying a snapshot triggers a cluster-wide dynamic reconfiguration event. If the apply process fails or you want to go back to the previous configuration for any reason, you can re-apply an automatically saved configuration. To apply a cluster snapshot using SMIT, perform the following steps: 1.
IBM System Storage DR550 Version 3.0 ------17 March 2006 Page 74 Remote Mirroring DR550 now includes the option of replicating archive data from one DR550 to another. This replication is done between the DS4100 controller in the primary DR550 and the DS4100 controller in the secondary DR550. The replication is done synchronously, thus creating a real time copy in the secondary site. A failure in the primary site would allow the users to bring up the secondary site and continue with archiving.
IBM System Storage DR550 Version 3.
IBM System Storage DR550 Version 3.
IBM System Storage DR550 Version 3.0 ------17 March 2006 Page 77 Setting up DR550 for remote mirroring Review the DS4000 redbook for remote mirroring setup. The redbook can be found at http://publibb.boulder.ibm.com/abstracts/sg247010.html?Open. Chapter 9 includes information on enhanced remote mirroring. You will to need to set up remote mirroring for all logical volumes, including the TSM data base, log files and the entire TSM storage pool.
IBM System Storage DR550 Version 3.0 ------17 March 2006 Page 78 Ethernet Connection (for management purposes 2 (only 1 if single node) SAN connections using Fiber-optic cables and extension (DWDM or CWDM technology) Recovery from the primary failure To recover from a failure at the primary site, you will need to do the following steps at the secondary DR550.
IBM System Storage DR550 Version 3.0 ------17 March 2006 Page 79 8. After a few minutes, log in to TSM using the ADMIN userid and check out TSM server and validate all information and data. 9. At the TSM prompt, the TSM administrator can run q lic, q dbvol, q loglov, q db, q log, q stat, q sys. 10. If needed, you will need to change the IP address within the application server (the server running some type of content management application) to point to the remote DR550.
IBM System Storage DR550 Version 3.0 ------17 March 2006 Page 80 7. If needed, you will need to change the IP address within the application server (the server running some type of content management application) to point to the remote DR550. For Dual Node (HACMP) implementation (Assuming AIX servers are not operational): 1 2 3 4 5 6 7 Start the server (power on) in the secondary DR550.
IBM System Storage DR550 Version 3.0 ------17 March 2006 Page 81 Other Installation Topics Changing passwords It is strongly recommended to change the default passwords set at the factory. It is also a good practice to change the passwords on a regular basis. Change passwords for the HMC, AIX operating system, and the IBM System Storage Archive Manager users: HMC For the HMC change the predefined hscroot password to restrict access, change the predefined hscroot password immediately.
IBM System Storage DR550 Version 3.0 ------17 March 2006 Page 82 Change the password of dr550adm with the AIX command passwd. Follow the instructions on the screen. o Exit the shell back to the root environment with the AIX command exit. o Switch to the ibmce user ID and his environment with the AIX command su - ibmce. o Change the password of ibmce with the AIX command passwd. Follow the instructions on the screen. o Exit the shell back to the root environment with the AIX command exit.
IBM System Storage DR550 IBM Storage Systems Version 3.
IBM System Storage DR550 IBM Storage Systems Version 3.
IBM System Storage DR550 Version 3.0 ------17 March 2006 Page 85 HACMP Network Considerations If you are using the dual node configuration, HACMP has been installed and implemented. Should a failure occur in the network, or within the server, HACMP will shift the work to the second server. There are requirements for specific access to the customer network that need to be considered.
IBM System Storage DR550 Version 3.0 ------17 March 2006 Page 86 For example, you could use 10.10.10.1 as the IP Address Offset. If you had a network with 2 NICs on each node, and a subnet mask of 255.255.255.0, you would end up with the following heartbeat IP aliases: Node A: 10.10.10.1 10.10.11.1 Node B: 10.10.10.2 10.10.11.2 These addresses will show up when you run AIX commands such as netstat.
IBM System Storage DR550 Version 3.0 ------17 March 2006 Page 87 Attention: Because the Hardware Management Console of the DR550 is not connected to a local area network, you cannot use all electronic problem reporting methods of a normal HMC. Hence you have to be careful when reading HMC documentation or setting up your HMC.
IBM System Storage DR550 b. Select Remote Support. Version 3.0 ------17 March 2006 Page 88 c. Select Customize Outbound Connectivity. In the Customize Outbound Connectivity window, you must enable the local system as a callhome server. Check Enable local system as a call-home server to allow the local HMC to connect to remote support for call-home requests. In the Agreement for Service Programs window, read the agreement carefully and click Accept to accept the agreement and to proceed.
IBM System Storage DR550 Version 3.0 ------17 March 2006 Page 89 Click Add to save the phone number and to close the Add Phone Number window. You can use the Test button now to test the configured connection, but it is recommended that you test after the entire configuration is done. Finally, in the Customize Outbound Connectivity window, click OK to save the configuration and to close the window.
IBM System Storage DR550 Version 3.0 ------17 March 2006 Page 90 3. Specifying your company’s contact and account information: This topic describes how to specify the contact and account information on the HMC. It is important that you specify contact and account information. This information helps your service provider contact the correct person in your company in the event of a system problem.
IBM System Storage DR550 Version 3.0 ------17 March 2006 Page 91 Connection monitoring enables the monitoring of the communication paths between your HMC and your managed system(s) and creates service events when communication between the HMC and a managed system is disrupted.
IBM System Storage DR550 Version 3.0 ------17 March 2006 Page 92 Click OK to save the configuration and to close the Connection Monitoring Setup window. You can then configure Electronic Service Agent to notify you of these problems. See the next topic, Configuring Electronic Service Agent on your HMC, for the details.
IBM System Storage DR550 Version 3.0 ------17 March 2006 Page 93 Click Update to update the configuration. A new window (Service Agent) opens, read the message and click OK to close the window. h. End the configuration with a click on Cancel. 2. Viewing your system information on the Internet: The information you share through Electronic Service Agent is available for you to view on the Internet. You can view your current information, as well as track trends in performance and usage.
IBM System Storage DR550 Version 3.0 ------17 March 2006 Page 94 When you want to view the server information you have shared with IBM, go to IBM Electronic Services: http://www.ibm.com/support/electronic Testing the connection to your service provider After you have set up the HMC to communicate with your service provider (see above sections), follow the procedure here to test your connection. It is assumed that you are still logged in to the HMC: 1. In the Navigation Area, open Service Applications. 2.
IBM System Storage DR550 Version 3.0 ------17 March 2006 Page 95 Alert notifications are sent to a designated network management station (NMS) using simple network management protocol (SNMP) traps. Alert notifications are sent to a designated e-mail address. See the Enterprise Management window help for specific procedures. To send e-mail to IBM, contact your customer service representative and ask for IBM DS4000 Service Alert (premium feature). The latter is a chargeable service provided by IBM.
IBM System Storage DR550 Version 3.0 ------17 March 2006 Page 96 2. From the DS4000 Storage Manager client Enterprise Management window, go to Edit -> Configure Mail Server... at the upper left side. 3. Enter your mail (SMTP) server address in the first line. This is the name of the mail server that forwards the e-mail to the configured e-mail alert destination. This server must be able to route data to the network of the receiver.
IBM System Storage DR550 Version 3.0 ------17 March 2006 Page 97 3. Click the Add button when ready. The selected e-mail address is now listed in the Configured e- mail addresses: list box. From there you can select this address whenever you want to work with the address, for example, in order to replace or delete the address as well as to validate it.
IBM System Storage DR550 Version 3.0 ------17 March 2006 Page 98 4. To validate the address you must select the address from the list box again and then click the Validate button. A test message is sent to the selected e-mail address. A message box with the results of the validation and any error information is displayed. 5. Click OK on the message box to close it. SNMP Alert destination 1. Select the SNMP tab from the Edit -> Alert Destinations...
IBM System Storage DR550 Version 3.0 ------17 March 2006 Page 99 Testing the alert notification After all previous tasks have been completed; you are ready to test your system for alert notification. A simple test that you can perform is to manually fail one of the power supplies. Turning off the power supply is the preferred test because it allows the testing of the DS4000 Storage Server Event Monitor service.
IBM System Storage DR550 Version 3.0 ------17 March 2006 Page 100 IMPORTANT: The user profile file name must be userdata.txt. The file content must be in the format as described in step 2. In addition, the file must be placed in the appropriate directory in the DS4000 Storage Server management station as indicated in step 4. Perform the following steps to create the user profile: 1. Download the userdata.txt template file from one of the following Web site: http://www.ibm.
IBM System Storage DR550 Version 3.0 ------17 March 2006 Page 101 1. Open the DS4100 Storage Manager client Enterprise Management window. 2. Double click on the storage system that you want to rename. The Subsystem Management window opens. 3. Click Storage Subsystem --> Rename. The Rename Storage Subsystem window opens. 4. Type the new name for the subsystem.
IBM System Storage DR550 Version 3.0 ------17 March 2006 Page 102 Mail server: This is the name of the mail server that forwards the e-mail to the configured IBM e-mail alert destination. This server must be able to route data to the Internet domain. E-mail sender address: This is the sender's e-mail address. This address is displayed on every mail message that is sent to the configured e-mail alert destination. 3. Click OK.
IBM System Storage DR550 Version 3.0 ------17 March 2006 Page 103 A test that you will perform, with the help of the Support Center, is to manually fail a non-configured drive in the DS4100 Storage Server using the DS4000 Storage Manager client. If all of the drives are configured (DR550 has all drives configured), you can turn off a redundant power supply in the DS4100 Storage Server or EXP100 expansion enclosure.
IBM System Storage DR550 Version 3.0 ------17 March 2006 Page 104 # TSM lock file LOCKFILE="/tsm/files/adsmserv.lock" echo "Stopping the TSM server now..." # Check to see if the adsmserv.lock file exists. If not then the server is not running if [[ -f $LOCKFILE ]]; then read J1 J2 J3 PID REST < $LOCKFILE /usr/tivoli/tsm/client/ba/bin/dsmadmc -servername=tsm -id=hacmpadm -password=chang3Me noconfirm << EOF halt EOF echo "Waiting for TSM server running on PID $PID to stop...
IBM System Storage DR550 Version 3.0 ------17 March 2006 If file system is being created: Volume Group for created file system Page 105 [rootvg] (take the default) Advanced Customization Options: Do you want the DVD to be bootable Install bundle file File with list of packages to copy to DVD Location of packages to copy to DVD Customization script User supplied bosinst.data file Debug Output? User supplied image.
IBM System Storage DR550 Version 3.0 ------17 March 2006 Page 106 You can use your own bosinst.data file, rather than the one in the mksysb image, by entering the full path name of your bosinst.data file in the User supplied bosinst.data file field. To enable debugging for the mkdvd command, set Debug output? to yes. The debug output goes to the smit.log. You can use your own image.data file, rather than the image.data file in the mksysb image, by entering the full path name of your image.
IBM System Storage DR550 Version 3.0 ------17 March 2006 Page 107 88 Help ? 99 Previous Menu >>> Choice [1]: 2 Set and Verify Installation Settings 1. In the Installation and Settings screen, verify the installation settings are correct by checking the method of installation (New and Complete Overwrite), the disk or disks you want to install, the primary language environment settings, and the installation options. A summary of selected options displays.
IBM System Storage DR550 77 88 99 Version 3.0 ------17 March 2006 Page 108 Display More Disk Information Help ? Previous Menu >>> Choice [0]: 4. Select the disk or disks you want to install by typing the number that corresponds to the hard disk name and pressing Enter. The disk will now be selected as indicated by >>>. Do this for each disk that you want to be part of the AIX root volume group. To unselect the destination disk, type the number again and press Enter. 5.
IBM System Storage DR550 Version 3.0 ------17 March 2006 Page 109 setup, per the instructions in this chapter. There are several options that can be used to backup the data. Please review this chapter, along with the chapter in the DR550 redbook on appropriate backup strategies. http://publib.boulder.ibm.com/infocenter/tivihelp/index.jsp?toc=/com.ibm.itstorage.doc/toc.
IBM System Storage DR550 Version 3.0 ------17 March 2006 Page 110 Other Information Environmental Specifications The DR550 consists of one or more of each of the following components. Each configuration is installed within a 7014 rack (one or two depending on configuration). Floor space requirements are based on the 7014-T00 rack (.85 square yards or .7 square meters). The 5.6, 11.2, 22.4 and 44.8 TB configurations require a single rack. The 89.6 TB configuration requires 2 racks.
IBM System Storage DR550 Version 3.0 ------17 March 2006 Page 111 Weight: 40 kg (88.0 lb) Operating Environment Temperature: 10-35 degrees C (50-95 degrees F) at 0-914 m (0-3000 ft) 10-32 degrees C (50-90 degrees F) at 914-2,133 m (3,000 – 7,000 ft) Relative humidity: 8% to 80% Electrical Power (per power supply) Voltage Range – nominal (90 - 264 V ac) Operating Current: 1.65-3.9 Amperes Power: 390 Watts Frequency: 50/60 Hz Heat dissipation: 1088 Btu/hour Noise Level (normal operation): 6.
IBM System Storage DR550 Version 3.0 ------17 March 2006 Page 112 Height: 43.7 mm (1.72 in) Weight: 12.9 kg (44.8.4 lb) Operating Environment Temperature: 10-35 degrees C (50-95 degrees F) at 0-914 m (0-3000 ft) 10-32 degrees C (50-90 degrees F) at 914-2,133 m (3,000 – 7,000 ft) Relative humidity: 8% to 80% Electrical Power (per power supply) Voltage Range 100 – 127 (nominal) V ac: 50Hz or 60 Hz, 5.6 A 200 - 240 (nominal) V ac; 50 Hz or 60 Hz, 1.7A Power Source loading: 0.
IBM System Storage DR550 Version 3.0 ------17 March 2006 Page 113 Lost Key Replacement Should you lose the keys (2 keys are included in the initial shipment, please contact the IBM Rochester Hotline for assistance. They can be reached at 1-800-300-8751 (USA only) or 1-507253-2383 (worldwide) and take option 5.
IBM System Storage DR550 Version 3.0 ------17 March 2006 Page 114 Complementary Products IBM Tape Solutions Connecting Tape to the DR550 To connect tape to the DR550, you may need to add components to the server and switch (if you purchased the disk only configuration prior to 11 November 2005). These additional components are standard as of DR550 Express V2.5.
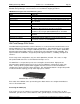
IBM System Storage DR550 Version 3.0 ------17 March 2006 Page 115 7316-TF3 7310-CR3 0 1 2 3 4 5 6 Switch_1 7 A B DRS_Engine_1 1 IN 2 3 4 5 6 OUT IN OUT OUT IN OUT OUT IN OUT EXP100_1,1 IN EXP100_1,1 IN EXP100_1,1 DS4100_1 Dual node tape attachment Attaching tape to the DR550 (single node configuration) can be done with stand alone TS1120, LTO Gen 3, or 3592 drives or with these drives placed within a tape library such as the IBM 3584.
IBM System Storage DR550 Version 3.0 ------17 March 2006 Page 116 In the diagrams above, the orange (dotted) cables represent the connections between the HBAs in the servers and the ports on the SAN switches. The solid lines (orange) represent connections to the tape drives. You will use switch ports 5-7 for tape connections. You can have up to three 3592s attached in this configuration. You will need to make the same connections regardless of the capacity of the disk within DR550.
IBM System Storage DR550 Version 3.0 ------17 March 2006 Page 117 Specifies that the server stops migration when no eligible files remain to be migrated, even before reaching the low migration threshold. The server does not migrate files unless the files satisfy the migration delay time.
IBM System Storage DR550 Version 3.0 ------17 March 2006 Page 118 Problem Determination This section provides guidance for an entry point to perform problem determination on a DR550. Each underlying product that makes up a DR550 provides problem determination information. A DR550 is made up of these products: • One or two P5 520 • One or two TotalStorage SAN Switches (2005-B16) • One or Two TotalStorage DS4100 Fibre Channel Storage Servers • From 0 to 14 DS4000 EXP100 Storage Expansion Units • AIX V5.
IBM System Storage DR550 Version 3.0 ------17 March 2006 Page 119 c. Does the same problem occur elsewhere? Is only one machine experiencing the problem or are multiple machines experiencing the same problem? d. Have any hardware, software, or configuration changes been made recently? e. If a change has been made recently, were all required prerequisites met before the change was made? 4. Gather information from the system. Use the following worksheet as a guide. Questions 1.
IBM System Storage DR550 Problem Area External network communication P5 520 service request number or other server problem indications. P5 520 DR550 SAN; 2005-B16 Switch problems DS4100 Fibre Channel Storage Server EXP100 Storage Expansion Unit AIX or HACMP DS4000 Storage Manager System Storage Archive Manager Version 3.0 ------17 March 2006 Page 120 Start with this information Check that the external network Ethernet cables are correctly connected to the servers.
IBM System Storage DR550 Version 3.0 ------17 March 2006 Page 121 Additional sources of information The next table provides a list of books that contain problem determination information for each product that makes up a DR550. Unless indicated the information shipped with the DR550 either as a printed book or on a documentation CD.
IBM System Storage DR550 Version 3.0 ------17 March 2006 Page 122 Viewing the AIX runtime error log Log on to the system as the ibmce user. Check the system error log by entering the following command at the AIX prompt: Cat /var/log/messages |grep RTAS |more The run-time error messages are logged in the messages file under /var/log. Support Web Site http://www-1.ibm.com/servers/storage/support/disk/dr.html has additional information applicable to the DR550.
IBM System Storage DR550 Version 3.0 ------17 March 2006 Page 123 Legal Notices Copyright © 2006 by International Business Machines Corporation, All rights reserved. No part of this document may be reproduced or transmitted in any form without written permission from IBM. Product data has been reviewed for accuracy as of the date of initial publication. Product data is subject to change without notice. This information could include technical inaccuracies or typographical errors.
IBM System Storage DR550 Version 3.0 ------17 March 2006 Page 124 provide legal advice or represent or warrant that its services or products will ensure that the customer is in compliance with any law.
IBM System Storage DR550 Version 3.0 ------17 March 2006 Page 125 The following paragraph does not apply to the United Kingdom or any other country where such provisions are inconsistent with local law: INTERNATIONAL BUSINESS MACHINES CORPORATION PROVIDES THIS PUBLICATION "AS IS" WITHOUT WARRANTY OF ANY KIND,EITHER EXPRESS OR IMPLIED, INCLUDING, BUT NOT LIMITED TO, THE IMPLIED WARRANTIES OF NON-INFRINGEMENT, MERCHANTABILITY OR FITNESS FOR A PARTICULAR PURPOSE.
IBM System Storage DR550 Version 3.0 ------17 March 2006 Page 126 References 1. DR550 Product home page including updates to this guide: http://www.storage.ibm.com/disk/dr/index.html 2. Understanding the IBM System Storage DR550 Redbook http://www.redbooks.ibm.com/ 3. 7014 Series Model T00 and Model T42 System Rack Installation Guide SA38-0641-00 which can be found on the web at: http://publib16.boulder.ibm.com/pseries/en_US/infocenter/base/hardware_docs/pdf/380641.pdf 4.
IBM System Storage DR550 Version 3.0 ------17 March 2006 19. Reporting a dump (call home) http://publib.boulder.ibm.com/infocenter/eserver/v1r2s/en_US/index.htm Page 127 20. Serial port setup http://publib.boulder.ibm.com/infocenter/eserver/v1r2s/en_US/index.htm 21. Setting up the service processor to connect to your service provider http://publib.boulder.ibm.com/infocenter/eserver/v1r2s/en_US/index.htm 22. Configuring call-home and call-in policy http://publib.boulder.ibm.
IBM System Storage DR550 Version 3.0 ------17 March 2006 Page 128 Updates To This Guide Updates to this guide will be made as warranted and can be downloaded from the web at: HTTP://WWW.STORAGE.IBM.COM/DISK/DR/INDEX.