Color Monitor C190 User’s Guide English
Contents Contents ..........................................................................................................1 Safety: Read first..........................................................................................2 Attaching the stand.......................................................................................3 Connecting your monitor ..............................................................................4 Workplace preparation ..........................................
Safety: Read first 2
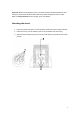
Important: Before connecting the monitor, turn off the computer and attached devices. Also ensure the power at the electrical outlet matches the power requirements of the monitor. Refer to the Specifications section on page 18 for more details. Attaching the stand 1. Place the monitor face down on a soft surface to prevent the screen being scratched. 2. Insert the hook (1) into the matching slots on the underside of the monitor (2). 3.
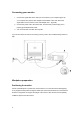
Connecting your monitor 1. Connect the signal cable to the video port on the back of your computer (figure A). Your computer may have a video adapter card installed. In this case, attach the signal cable to the connector on the video adapter card (figure B) 2. Connect the power cord to the monitor first, and then firmly insert the plug into a properly grounded electrical outlet. 3. Turn on the monitor, and then the computer.
Height Position the monitor so that the top of the screen is slightly below your eye level when you sit at your workstation. Orientation Choose a position that gives the least reflection form lights and windows, usually at a right angle to any windows. Position the monitor directly in front of you so that you do not have to twist your body. Tilt the monitor to a comfortable viewing angle. Working Practices Rest Take regular breaks.
Installing the Device Driver Installing the Device Driver for Windows 95 or Windows 98 To install the device driver in Microsoft® Windows®95 or Windows98, do the following: Note: You must download files from the IBM Monitor CD to use the Plug and Play feature in Windows 95 or Windows 98. 1. Turn off the computer and all attached devices. 2. Ensure that the monitor is connected correctly. 3. Turn on the monitor and then the system unit.
Installing the Device Driver for Windows 2000 or Windows Me To install the device driver in Microsoft® Windows®2000 Professional or Microsoft Windows Millennium Edition (Me), do the following: Note: You must download files from the IBM Monitor CD to use the Plug and Play feature in Windows 2000 or Windows Me. 1. Turn off the computer and all attached devices. 2. Ensure that the monitor is connected correctly. 3. Turn on the monitor and then the system unit.
Installing the device driver in Windows XP To install the device driver in Microsoft® Windows XP, do the following: Note: You must download files from the IBM Monitor CD to use the Plug and Play feature in XP. 1. Turn off the computer and all attached devices. 2. Ensure that the monitor is connected correctly. 3. Turn on the monitor and then the system unit. Allow your computer to start the Windows XP operating system. 4.
User Controls The image is already optimised for many display modes. However, the controls can be used to adjust the image to your linking. OSD Key Function Icon Control Description Power switch Switches the monitor on and off. OSD/OK Activates the On-Screen-Display/ Select control icon / Save Adjustment Move right; Brightness adjustment selection Moves the highlight to the icon to the right, or on adjustment screens increases the effect of the adjustment.
On-Screen-Display Activating the On-Screen-Display The monitor controls are accessed by pressing button The main menu will be displayed as follows. to enable OSD (On-Screen-Display). Each Sub-Menu icon is selected by highlighting it via the “ ” “ ” control and pressing ”. button “ ” to select. To exit the main or Sub-Menu then press the exit button “ Main OSD menu controls ICON Control Function instruction Image Quality Adjusts Brightness, Contrast, Moiré, and Degauss.
Image Quality Image Quality Sub menu Icon Control Brightness Contrast Moiré Function Adjusts overall screen brightness. Sub menu function Left Adjusts difference between light and dark areas. Reduces elliptical or wavy interference patterns. Left Right Right Horizontal Vertical / / Save Degauss Demagnetizes screen to reduce image distortion.
Image shape Image Shape Sub menu Icon Control Parallelogram Trapezoid Pincushion Pincushion balance Geometry reset Function Leans image to the left or right. Sub menu function Left Adjusts top or bottom image width. Left Expands or contracts image sides. Moves image center left or right.
Options Options Sub menu Icon Control Information Function Shows resolution, refresh rate, product details. Sub menu function Menu Language Changes language of menu. English, French, Italian, German, Spanish. Accessibility Changes Menu timings Button repeat rate Menu time out Factory Default Resets monitor to original settings Yes / No Option Menu Position Adjusts menu location. Horizontal / Vertical / Off /Default/Slow Option 5/10/15/20/25/30 second options Save Exit.
Further information Display modes The display mode and monitor uses are controlled by the computer. Therefore, refer to your computer documentation for details on how to change display modes. The image size, position and shape may change when the display mode changes. This is normal and the image can be readjusted using the monitor controls.
Troubleshooting If you have a problem setting up or using your monitor, you may be able to solve it yourself. Before calling your retailer or IBM you should try the suggested actions that are appropriate to your problem. Problem Screen is blank and power indicator is off. Possible Cause No power to monitor. Screen is blank and power indicator is steady green. SIGNAL OUT OF RANGE message is displayed. Brightness and Contrast may be too low. Display mode of the computer is outside the range of the monitor.
Problem Possible Cause The monitor may be affected by interference from nearby equipment. Image appears to be discolored. The monitor may be affected by interference form nearby equipment. Magnetization of monitor components has built up. Suggested Action • Move fluorescent desk lighting or any equipment that produces magnetic fields further away from the monitor. • If another monitor is close by, separate the two monitors by at least 300mm (12 in.) for optimal performance.
If possible, stay by your computer system. Your technical support representative might want to go through the problem with you during the call. More help, late- breaking news and details of the latest accessories for these products may be found on the Worldwide Web at: http://www.pc.ibm.
Specifications The C190 (MT6739) color monitor uses a 19-inch FFSM CRT with a viewable image size of 457.3mm (18.0 in.). Dimensions Weight Tilt Swivel Image Power Input Video Input Communications Synchronization Range Power Consumption (Typical) Environment 18 Width: Depth: Height: Packing: Unpacking: Forward tilt: Backward tilt: Swivel: Maximum Height: Maximum Width: Dot Pitch: Supply Voltage: Max Supply Current: Input Signal: Horiz. Addressability: Vert. Addressability: Clock Rate VESA DDC Horiz.
Service Information The following parts are for use by IBM Service, or IBM authorized dealers, to support the customer warranty. Parts are for service use only.
Notices and Trademarks This section contains information on notices and trademarks. Notices IBM may not offer the products, services, or features discussed in this document in all countries. Consult your local IBM representative for information on the products and services currently available in your area. Any reference to an IBM product, program, or service is not intended to state or imply that only that IBM product, program, or service may be used.
Trademarks The following terms, used in this publication, are trademarks or service marks of the IBM Corporation in the United States, other countries, or both: IBM logo, HelpCenter and IBM. ENERGY STAR is a U.S. Govt. registered trademark. Microsoft Windows, and Windows NT are trademarks of Microsoft Corporation in the United States, other countries, or both. Other company, product, and service names may be trademarks or service marks of others. © Copyright International Business Machines Corporation 2003.