ENGLISH gogh15tft_ed.fm Page 1 Thursday, July 26, 2001 6:33 PM This publication could contain technical inaccuracies or typographical errors. Changes are made periodically to the information herein; these changes will be made in later editions. IBM may make improvements and/or changes in the product(s) and/or program(s) at any time.
FRANÇAIS Contents ENGLISH T54A-toc.fm Page 1 Thursday, July 26, 2001 6:30 PM DEUTSCH Setup . . . . . . . . . . . . . . . . . . . . . . . . . . . . . . . . . . . . . . . . . . . . . . . . . . . . . . . . . . . . . . . . . . . . . 2 Hardware Requirements . . . . . . . . . . . . . . . . . . . . . . . . . . . . . . . . . . . . . . . . . . . . . . . . . . 2 Handling Instructions . . . . . . . . . . . . . . . . . . . . . . . . . . . . . . . . . . . . . . . . . . . . . . . . . . . . 2 Workplace Preparation .
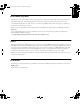
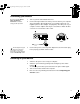
T50_setup.fm Page 2 Thursday, August 9, 2001 11:09 AM Setup Hardware Requirements This monitor requires a computer with a suitable on-board sub-system or Video Adapter card that can support XGA 1024 × 768, SVGA 800 x 600, or VGA 640 x 480 at 60 Hz. Handling Instructions Do not support the monitor within the screen area. The Liquid Crystal Display is glass and can be damaged by rough handling or excessive pressure. 1. Lift the monitor by placing your hands where indicated below. 2.
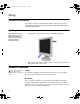
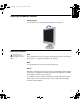
ENGLISH T50_setup.fm Page 3 Thursday, August 9, 2001 11:09 AM FRANÇAIS Adjusting the Monitor Position Viewing Angle ESPAÑOL DEUTSCH You can tilt the screen backward and forward as shown below. Rest Take regular breaks. Vary your posture, stand up and stretch occasionally as prolonged use of computer workstations can be tiring. JAPANESE Back You should sit back in your chair and use the backrest.
T50_setup.fm Page 4 Thursday, August 9, 2001 11:09 AM Eyesight Working with monitors, in common with any prolonged close work, can be visually demanding. Look away from the screen periodically and have your eyesight checked regularly. Screen settings Set the screen brightness and contrast to a comfortable level. You may have to adjust this as the lighting changes during the day. Many application programs let you select color combinations which can help you to view in comfort.
ENGLISH T50_setup.fm Page 5 Thursday, August 9, 2001 11:09 AM 1. Turn off your PC and all attached devices. 2. Connect the signal cable to the video port on the back of your computer. This port might be directly attached to your computer (figure A), or it might be part of a video adapter card (figure B). The video port on your computer or video adapter card may be colored blue to match the blue connector on your monitor’s video cable. The AC adapter and signal cable are connected to your monitor.
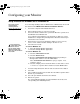
T50_setup.fm Page 6 Thursday, August 9, 2001 11:09 AM Configuring your Monitor Setup Diskette for Windows 95 or Windows 98 This section must be completed before continuing with the Windows 95 or Windows 98 Auto Setup. On LCD monitors, unlike CRTs, a faster refresh rate does not improve display quality. IBM recommends using either 1024 x 768 at a refresh rate of 60Hz.
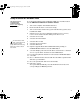
ENGLISH T50_setup.fm Page 7 Thursday, August 9, 2001 11:09 AM Ensure that the monitor is connected correctly. 3. Turn on the monitor and then the system unit. Allow the system to boot into Windows 2000. 4. Open the DISPLAY PROPERTIES window by clicking on START, SETTINGS, CONTROL PANEL and then double clicking on the DISPLAY icon. 5. Select the SETTINGS tab. 6. Select the ADVANCED button. 7. Select the MONITOR tab. 8. Select the PROPERTIFS button. 9. Select the Driver tab. DEUTSCH 2.
T50_setup.fm Page 8 Thursday, August 9, 2001 11:09 AM Auto Setup Auto Setup Before carrying out this section, it is very important that The Setup Diskette for Windows 95 or Windows 98 has been run. The Setup Utility included on the setup diskette is for displaying dot patterns. They do not replace or modify the display dirver. The Auto Setup instructions require the monitor to be warmed up for 15 minutes. This is not required for normal operation.
ENGLISH T50_setup.fm Page 9 Thursday, August 9, 2001 11:09 AM FRANÇAIS Auto Setup for DOS If the monitor is in standby mode (STANDBY ON), it may automatically turn off while you are waiting for it to warm up. If this happens, switch off the monitor and switch it on again after a few seconds. 1. Turn on the monitor first; then the PC. If you are using PC-DOS IV, change to U.S. mode by typing ‘CHEV US’ and pressing ENTER at the command prompt. You must use DOS when you run DOS Auto Setup. 2.
T50_setup.fm Page 10 Thursday, August 9, 2001 11:09 AM Auto Setup for Windows 3.1, Windows 95, Windows 98, Windows NT or Windows 2000 If the monitor is in standby mode (STANDBY ON), it may automatically turn off while you are waiting for it to warm up. The size and diversity of the dot pattern varies with the screen resolution. 1. Turn on the monitor first; then the PC.
ENGLISH T50_setup.fm Page 11 Thursday, August 9, 2001 11:09 AM COMPL & WARR JAPANESE ITALIANO ESPAÑOL DEUTSCH FRANÇAIS You have completed the monitor setup for Windows. If you use other operating systems, perform the appropriate AUTO SETUP for those systems, also: see Auto Setup for DOS.
T50_setup.fm Page 12 Thursday, August 9, 2001 11:09 AM Manual Setup Normally, you can complete the setup procedure using AUTO SETUP, however, if your screen image is still distorted after you perform AUTO SETUP or the setup diskette does not run on your system, perform MANUAL SETUP. If the monitor is in standby mode (STANDBY ON), it might automatically turn off while you are waiting for it to warm up. 1. Have your monitor turned on for about 15 minutes, until the monitor warms up. 2.
ENGLISH T50_setup.fm Page 13 Thursday, August 9, 2001 11:09 AM FRANÇAIS Adjusting Your LCD Monitor DEUTSCH User controls Auto Auto-adjust direct access Exit Displays the OSD main menu Exits from menus and sub-menus Exits the OSD Adjust Button Menu Power Switch ITALIANO Description highlight and adjust items in the menu.
T50_setup.fm Page 14 Thursday, August 9, 2001 11:09 AM The settings are saved after adjustment and when exiting the OSD and will be effective thereafter. • Press the Exit button to move backwards through the sub-menus and exit from the OSD. Note: After making adjustments, the Power indicator LED will briefly turn amber to indicate that the new value has been saved.
ENGLISH T50_setup.fm Page 15 Thursday, August 9, 2001 11:09 AM FRANÇAIS On-screen display (OSD) controls The settings adjustable with the user controls are viewed through the OnScreen Display (OSD). Press any of the OSD buttons to activate the OSD. Initial appearance of OSD MAIN MENU DEUTSCH The LCD monitor needs time to become thermally stable the first time you turn it on each day.
T50_setup.fm Page 16 Thursday, August 9, 2001 11:09 AM OSD Icon Description Sub-menu(s) Manual • • IMAGE LOCK (continued) Moves the screen left and right or up and down. Fine Coarse Controls and Adjustments Use the Adjust buttons to adjust away the interference. If satisfactory results are not obtained using the Fine adjustment, use the Coarse adjustment and then use Fine again. This function may change the width of the display image.
ENGLISH T50_setup.fm Page 17 Thursday, August 9, 2001 11:09 AM Sub-menu(s) Resets the Brightness, Contrast and Color settings. Color Reset Controls and Adjustments NO - Does not make the adjustment RESET YES - Resets the color Resets the Image position settings Geometry Reset NO - Does not make the adjustment The language chosen affects only the language of the OSD. It has no effect on any software running on the computer.
T50_setup.fm Page 18 Thursday, August 9, 2001 11:09 AM Further Information Display modes The display mode the monitor uses is controlled by the computer. Therefore, you should refer to your computer documentation for details on how to change display modes. The image size, position and shape may change when the display mode changes. This is normal and the image can be readjusted using AUTO SETUP and the monitor controls.
ENGLISH T50_setup.fm Page 19 Thursday, August 9, 2001 11:09 AM The power management feature is invoked when the computer recognizes that you have not used your mouse or keyboard for a user-definable period. There are several states as described in the table below. As an ENERGY STAR® Partner, IBM has determined that this product meets the ENERGY STAR® guidelines for energy efficiency.
T50_setup.fm Page 20 Thursday, August 9, 2001 11:09 AM Troubleshooting If you have a problem setting up or using your monitor, you may be able to solve it yourself. Before calling your retailer or IBM, try the suggested actions that are appropriate to your problem.
ENGLISH T50_setup.fm Page 21 Thursday, August 9, 2001 11:09 AM Possible Cause Suggested Action Reference Image appears to be smeared There are noises in the video signal Image appears to be discolored The Color setting may be incorrect DEUTSCH Reconfigure the computer to use a supported display mode. Further information section ! Select IMAGE LOCK menu in the OSD. Then select MANUAL to adjust FINE/COARSE settings. ! Adjust the Color settings.
T50_setup.fm Page 22 Thursday, August 9, 2001 11:09 AM Further Help If you are unable to correct the problem yourself, you may seek further help as follows: Call the IBM HELPCENTER. In the US call 1-800-772-2227 In Canada call 1-800-565-3344 In other countries contact your dealer, retailer, or other IBM authorized Servicer. If possible, stay by your computer. Your Technical Support Representative may wish to go through the problem with you during the call.
Place the monitor panel-side down on a stable, padded, flat work surface. 3. Remove the four mounting plate retaining screws. One screw at each corner. Lift the base up and away from the monitor. ESPAÑOL DEUTSCH FRANÇAIS 2. ENGLISH T50_setup.fm Page 23 Thursday, August 9, 2001 11:09 AM 1. Turn off the monitor and unplug it from the electrical outlet. 2. Place the monitor panel-side down on a stable, padded, flat work surface 3.
T50_setup.fm Page 24 Thursday, August 9, 2001 11:09 AM Specifications This color monitor (Type-model 9511-AxC) uses a 15-inch TFT LCD Power consumption figures are for the monitor and the power supply combined. 24 Dimensions Width: Depth: Height: 364 mm 173 mm 400 mm Weight Unpackaged: packaged: 8.8 lb. (4.0 Kg) 11.5 lb (5.2 Kg) Tilt Forward Tilt: Backward tilt: – 5° + 30° Image Viewable Image Size: Maximum Height: Maximum Width: Pixel Pitch: 15.0” (381 mm) 228.1 mm 304.1 mm 0.297 mm (H) × 0.
Federal Communications Commission (FCC) Statement This equipment has been tested and found to comply with the limits for a Class B digital device, pursuant to Part 15 of the FCC Rules. These limits are designed to provide reasonable protection against harmful interference in a residential installation. This equipment generates, uses, and can radiate radio frequency FRANÇAIS Compliances ENGLISH T50_Compliance.
T50_Compliance.fm Page II Wednesday, August 8, 2001 9:20 AM For units intended to be operated at 230 volts (U.S. use): Use a UL listed and CSA certified cord set consisting of a minimum 18 AWG, type SVT or SJT, three conductor cord, a maximum of 4.5 meters (15 feet) in length and a tandem blade, grounding type attachment plug rated 15 amperes 250 volts. For units intended to be operated at 230 volts (outside the U.S.
FRANÇAIS Service Information The following parts are for use by IBM service, or IBM authorised dealers, to support the customer warranty. Parts are for service use only. ITALIANO ESPAÑOL DEUTSCH 9511 Flat Panel Monitor Flat Panel Monitor - Stealth Black Flat Panel Monitor - Pearl White Stand - Stealth Black Stand - Pearl White Power Supply JAPANESE 9511-AGC 9511-AWC COMPLIANCES 31P6259 31P6260 31P6295 31P6294 04N8984 ENGLISH T50_Svc.