Combined Boot Version 5.
Copyright© 2005 Emulex Corporation. All rights reserved worldwide. No part of this document may be reproduced by any means nor translated to any electronic medium without the written consent of Emulex Corporation. Information furnished by Emulex Corporation is believed to be accurate and reliable. However, no responsibility is assumed by Emulex Corporation for its use; or for any infringements of patents or other rights of third parties which may result from its use.
Introduction.............................................................................................................. 1 Compatibility...................................................................................................... 1 Things to Know Before You Download .............................................................. 1 Known Issues .................................................................................................... 1 Files Included in This Release.......................
Introduction Combined Boot contains two types of boot code: x86 BootBIOS for x86 systems, and OpenBoot for SPARC Peripheral Component Interconnect (PCI) and AIX systems. Combined Boot determines your system platform (x86 or SPARC) and automatically downloads the proper boot code image to the host bus adapter (HBA). x86 BootBIOS works with the existing basic input output system (BIOS) on x86 systems. x86 BootBIOS allows you to designate a Fibre Channel drive as the boot drive.
Loading x86 BootBIOS Before you update x86 BootBIOS, decide which utility to use. Emulex offers a variety of utilities that you can use to update x86 BootBIOS.
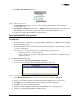
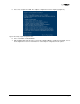
. Click Boot Bios Firmware (Figure 1). Figure 1: lputilnt, Program Type list. 7. If the Disable button appears, the boot code is already enabled; skip to step 9. Otherwise, continue with step 8. 8. Click Enable; the Enable button changes to Disable and the letter W appears to the left of "Boot Bios Firmware" in the Program Type list. This indicates that x86 BootBIOS is in use. 9. Continue by enabling x86 BootBIOS on HBAs (page 6).
Load x86 BootBIOS Using lputil Prerequisites • The Emulex driver for Linux or Solaris is installed and loaded properly. • The x86 BootBIOS file has been downloaded from the Emulex Web site and extracted to a directory on your local hard drive. • lputil is installed properly. To load x86 BootBIOS using lputil: 1. Start lputil by entering the complete path. The path in the example reflects the default installation path. If the installation path was modified, adjust the command appropriately.
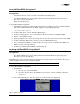
3. Press D. The Download Image window is displayed. Figure 4: lp6dutil, Download Image Window 4. Specify the location of the image file and the adapter to be updated. 5. Specify the Reset After Download setting. • Defaults to Yes. If you are updating a single file to one HBA, keep the default setting. • If you are updating several HBAs or several files to one HBA, select No. 6. Tab to the OK button and press . The screen closes and the load process begins.
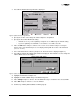
Enable x86 BootBIOS on HBAs Using the BIOS Utility To use any of its features, x86 BootBIOS must be enabled on at least one installed HBA. Prerequisites • x86 BootBIOS is loaded on the HBA. • The BIOS message is enabled. To enable BootBIOS on the HBA: 1. Boot the system. 2. Press immediately (within five seconds) when the x86 BootBIOS message is displayed to start the BIOS utility. A menu displays a list of HBAs (Figure 6). Figure 6: BIOS Utility, HBA Listing 3.
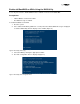
5. Press 2 to configure the HBA. The adapter configuration menu is displayed (Figure 8). Figure 8: BIOS Utility, Adapter Configuration Menu 6. Press 1 to Enable or Disable BIOS. 7. Exit the BIOS utility and reboot the system. After x86 BootBIOS is enabled on the HBAs, refer to the Configuration section for information on other adapter configuration menu options.
Configuring x86 BootBIOS Introduction The BIOS utility allows you to change HBA parameters (such as topology, PLOGI retry timer and auto scan setting) and configure boot devices. • Default settings are acceptable for most installations. • In the BIOS utility, press to reset the selected adapter to default values. • The default topology is auto topology with loop first. For FC-AL, each HBA has a default AL_PA of 01 (Hex). Change this topology setting, if necessary, before configuring boot devices.
4. Select 1 to configure boot devices or 2 to configure the adapter’s parameters. Figure 10: BIOS Utility, Main Configuration Menu 5. If you select to configure the adapter’s parameters, the adapter configuration menu is displayed. Figure 11: Adapter Configuration Menu Adapter Configuration Menu Summaries 1. Enable or Disable BIOS. Enable or disable x86 BootBIOS on the selected adapter. To use any of its features, x86 BootBIOS must be enabled on at least one installed HBA.
6. Auto Scan Setting(+ Advanced Option+). Enable the first device in the boot entry list to issue a Name Server Inquiry. The factory default is disabled. See Set Auto Scan on page 13 for more information. 7. Enable or Disable EDD 3.0(+ Advanced Option+). Enable or disable the Enhanced Disk Driver (EDD) option, which is available on Itanium 64-bit servers only. The factory default is disabled. See Enable/Disable EDD 3.0 on page 14 for more information. 8.
Change the PLOGI Retry Timer This option allows you to set the interval for the PLOGI (port login) retry timer. This option is especially useful for Tachyon-based RAID arrays. Under very rare occasions, a Tachyon-based RAID array will reset itself and the port will go offline temporarily in the loop. When the port comes to life, the PLOGI retry interval scans the loop to discover this device. This default setting is No PLOGI Retry: 0 msec. To set the interval for the PLOGI retry timer: 1.
3. Select 4, Topology Selection (+Advanced Option+). Figure 14: Topology Menu 4. Select the topology for the HBA: • Select 1 for auto topology with loop first. • Select 2 for auto topology with point-to-point first. • Select 3 for FC-AL. • Select 4 for fabric point-to-point. 5. Press to exit the BIOS utility and reboot the system. Enable/Disable the Spinup Delay This option allows you to enable or disable the spinup delay. The factory default setting is disabled.
4. Select 1 to enable the spinup delay, or press 2 to disable it. 5. Press to exit the BIOS utility and reboot the system. Set Auto Scan This option allows you to set auto scan. The factory default setting is disabled. Auto Scan is available only if none of the eight boot entries is configured to boot via DID or WWPN. It is strongly recommended that you use the Configure Boot Devices menu to configure eight boot entries for fabric point-to-point, public loop or private loop configurations.
Enable/Disable EDD 3.0 This option allows you to enable or disable the Enhanced Disk Drive (EDD) option, which is available on Intel Itanium servers only. Enabling EDD 3.0 displays the path to the boot device. The default setting is disabled. Note: An x86 system could hang during Windows 2000 Server installation if EDD 3.0 is enabled. To enable or disable EDD 3.0: 1. Start the BIOS utility and select the adapter for which you want to enable or disable EDD 3.0. 2.
Enable/Disable the Environment Variable This option allows you to set the boot controller order if the system supports the environment variable. The default setting is disabled. To enable or disable the environment variable: 1. Start the BIOS utility and select the adapter for which you want to enable or disable the environment variable. 2. When the main menu opens select 2, Configure This Adapter's Parameters. The adapter configuration menu is displayed (Figure 11). 3.
Configure Boot Devices This option supports FC_AL: (public loop and private loop) and fabric point-to-point. When operating in loop (FC_AL) topology, the system automatically determines whether you are configured for a public or private loop. The BIOS looks for a fabric loop (FL_Port) first. If a fabric loop is not detected, the BIOS looks for a private loop. For the "Configure Boot Devices" option, the 64 boot entries will be zero by default ( key). To configure boot devices: 1.
5. Enter the starting LUN. The starting LUN can be any number between 0 and 255. Figure 23: LUN Listing There are a possible 256 LUNs that can be defined per adapter, but the screen displays up to 16 consecutive LUNs at a time. In front of each entry, B#D or B#W specifies the boot entry number and whether the device boots via DID or WWPN. For example, B1D means that boot entry one will boot via DID. B2W means that boot entry two will boot via WWPN. 6. Select an entry.
5. Press to specify additional drivers. 6. Select Other. 7. Insert the floppy disk onto which you unzipped the Emulex driver in step 2. 8. If you downloaded the port driver, select a topology from the list and press .If you downloaded the miniport driver, select your adapter from the list and press . 9. Follow the instructions to complete the Emulex installation. 10. Remove the floppy disk that contains the driver files. 11. Complete the Windows 2000 Server installation.
Troubleshooting x86 BootBIOS There are circumstances in which your system may operate in an unexpected manner. This Troubleshooting section explains several of these circumstances and offers one or more workarounds for each situation. The x86 BootBIOS Message Does Not Appear on Bootup Situation: You want to access the x86 BootBIOS, but on bootup the x86 BootBIOS message does not appear. Resolution: Make sure that x86 BootBIOS has been loaded and enabled.
Loading OpenBoot You can use one of the following utilities to load the OpenBoot image on the HBA: • lputil: See Load OpenBoot using lputil on page 20. • lp6dutil Utility for DOS: See the lp6dutil utility for DOS manual (click the HBA’s Troubleshooting link). Load OpenBoot using lputil Prerequisites • The Emulex driver for Solaris is installed and loaded properly. • The OpenBoot file has been downloaded from the Emulex Web site and extracted to a directory on your local hard drive.
Configuring OpenBoot Creating a Fibre Channel Remote Boot Disk The procedures in this section explain how to set up your boot disk in a Solaris system. Note: This section pertains only to Solaris systems. If you are using AIX with the IBM driver, refer to the documentation from IBM for instructions on configuring OpenFirmware. From the system monitor prompt: 1. Reset to default value mode. ok set-default-mode Note: Always reset the system before making changes to your boot settings.
To set the topology back to loop (if the HBA is connected to a hub), enter these commands. ok" /pci@1f,4000/lpfc@2" select-dev ok set-fc-al ok unselect-dev ok reset By default, the topology is set to auto-FCAL. To set auto topology with public or private loop first, enter these commands. ok" /pci@1f,4000/lpfc@2" select-dev ok set-auto-fcal ok unselect-dev ok reset-all To set auto topology with point-to-point first, enter these commands.
Table 1: Signature Table (Continued) Signature OpenBoot signature Host_did shows host DID number Enable_flag internal flag for OpenBoot Boot_id shows target ID number Lnk_timer internal use for OpenBoot Plogi_timer internal use for OpenBoot LUN shows boot LUN in use DID shows boot ID in use WWPN shows boot WWPN in use Note: Target ID can be bound to either DID (destination ID) or WWPN (worldwide port name) and saved in an adapter nvram.
9. /dev/fd must be unmounted to copy the root file system. First, kill the volume manger. # ps -ef|grep vold (to obtain the PID or process id) # kill -9 PID (where PID is obtained above) # umount /dev/fd 10. Mount, copy, then unmount the usr2 file system. # # # # mount /dev/dsk/c1t1d0s6 /usr2 cd /usr tar cvf - * | ( cd /usr2; tar xf -) umount /usr2 11. Copy the export/home file system. # mount /dev/dsk/c1t1d0s7 /export2 # cd /export# tar cvf - * | (cd /export2; tar xf -) # umount /export2 12.
# mkdir proc# mkdir tmp # mkdir vol # mkdir usr 18. Repeat for any other mounts unique to your system that were excluded in the copy. 19. Edit /root2/etc/vfstab, changing the controller number, target number and LUN number to point to the new Fibre Channel boot disk. For example, if the Fibre Channel boot disk is c1t1d0, replace all local disk entries of c0t0d0 with c1t1d0.
Viewing OpenBoot Commands Table 2: OpenBoot Commands Command Effect ok .boot - id Displays current boot device id ok .version Displays current version of OpenBoot ok .topology Displays current topology ok .nvram Displays current flags for OpenBoot ok .
Troubleshooting OpenBoot There are circumstances in which your system may operate in an unexpected manner. The Troubleshooting section explains several of these circumstances and offers one or more workarounds for each situation. The System Cannot mount or fsck /etc/vfstab Fibre Channel Boot Disk Situation: During the boot process, the system cannot mount or fsck /etc/vfstab Fibre Channel boot disk. Resolution: Make sure that persistent binding is implemented correctly.