40X-17X Internal IDE CD-ROM Drive User's Guide OPTIONS by IBM
First Edition (April 1999) The following paragraph does not apply to the United Kingdom or any country where such provisions are inconsistent with local law: INTERNATIONAL BUSINESS MACHINES CORPORATION PROVIDES THIS PUBLICATION “AS IS” WITHOUT WARRANTY OF ANY KIND, EITHER EXPRESS OR IMPLIED, INCLUDING, BUT NOT LIMITED TO, THE IMPLIED WARRANTIES OF MERCHANTABILITY OR FITNESS FOR A PARTICULAR PURPOSE.
Contents Registering your option About this book . . . . . . . . . . . . . . . . . . . . . . . . . . . . iv . . . . . . . . . . . . . . . . . . . . . . . . . . . . . . . . v Part 1: Installation guide . . . . . . . . . . . . . . . . . . . . . . . 1-1 Part 2: User's guide . . . . . . . . . . . . . . . . . . . . . . . . . . 2-1 Using the drive . . . . . . Caring for a CD . . . . . . Caring for the CD-ROM drive Loading a CD . . . . . . . Manually ejecting a CD . . Playing an audio CD . . . .
Registering your option Thank you for purchasing OPTIONS by IBM. Please take a few moments to register your product and provide us with information that will help IBM to better serve you in the future. Your feedback is valuable to us in developing products and services that are important to you, as well as in developing better ways to communicate with you. Register your option on the IBM Web site at: http://www.pc.ibm.
About this book This manual contains information on the 40X-17X Internal IDE CD-ROM Drive.
vi 40X-17X Internal IDE CD-ROM Drive
Part 1: Installation guide Product description The IBM 40X-17X Internal IDE CD-ROM Drive can read a compact disc (CD) containing approximately 680 MB1 of information. It is designed for installation in a personal computer that uses the integrated drive electronics (IDE) or the enhanced IDE architecture. The CD-ROM drive delivers data up to 40 times the standard CD-ROM speed, delivering data at up to 6000 KB2 per second.
Before you begin Read the following information before you start your installation. The installer of the drive will have to complete the following steps: 1. Determine which IDE port to use and the corresponding configuration setting 2. Set the configuration jumper on the drive (and possibly make changes to the configuration settings of other devices) 3. Physically install the drive in a drive bay 4. Configure the system 5.
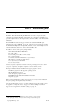
Front view of the drive Refer to the illustration to identify parts which might be referred to in the installation instructions. 1 Headphone jack This jack provides audio output to the headphones. 2 Volume control This controls the audio output volume. 3 CD tray This is where you load and unload a CD. 4 Busy indicator This light comes on when the drive reads a data CD or plays an audio CD. 5 Manual-eject hole This provides access to the manual eject mechanism to remove a CD from the drive.
4 IDE connector Connects the CD-ROM drive to the IDE cable 5 DC power connector Connects the dc power cord to the CD-ROM drive Installing the Drive Follow these steps to install the CD-ROM drive into your computer. Step 1. Opening the computer 1. Turn off the computer and all attached devices. 2. Unplug the power cords for the computer and all attached devices. 3. Remove the cover from the computer. Step 2. Unpacking the drive 1.
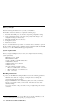
Some non-IBM computers support the cable-select setting, where the position of the device on the cable determines whether a device is master or slave. See the documentation that comes with your computer to determine if your system supports this setting. Step 4. Setting the configuration jumper The illustration above shows the master 1 setting, the slave 2 setting, and the cable-select 3 setting.
2. Align the drive-bay screw holes with the threaded holes in the drive housing or mounting bracket; then thread the screws in loosely to check their positions. Usually two screws are used on each side. 3. Check to make sure the alignment is correct; then tighten the screws to secure the drive. Do not overtighten. Step 6. Attaching the cables to the drive 1. Connect the cables to the CD-ROM drive as follows. a. Attach a 40-pin IDE-cable connector 2 to the IDE connector on the drive.
Step 8. Attaching the faceplates This option package includes two faceplates that conform to the curved design of certain systems. If your computer system has a curved design, you can attach one of the included faceplates so that the front of the CD-ROM drive matches the exterior cabinet. Choose the faceplate that best fits your system, and attach it after you have mounted the CD-ROM drive in the appropriate bay. Step 9.
Installing the device driver for DOS and OS/2 1. Turn on your computer and start your operating system, if you have not already done so. 2. Go to a command line. 3. Insert the 40X-17X Internal IDE CD-ROM Drive Option Diskette into your diskette drive. 4. Type A:CDSETUP in the command line; then press Enter. 5. Using your mouse or the arrow keys, select Setup; then press Enter. 6. Follow the instructions on your screen to properly install the driver. 7. When setup is complete, select Exit. 8.
Installation guide (Translated) Product description The IBM 40X-17X Internal IDE CD-ROM Drive can read a compact disc (CD) containing approximately 680 MB4 of information. It is designed for installation in a personal computer that uses the integrated drive electronics (IDE) or the enhanced IDE architecture. The CD-ROM drive delivers data up to 40 times the standard CD-ROM speed, delivering data at up to 6000 KB5 per second.
Before you begin Read the following information before you start your installation. The installer of the drive will have to complete the following steps: 1. Determine which IDE port to use and the corresponding configuration setting 2. Set the configuration jumper on the drive (and possibly make changes to the configuration settings of other devices) 3. Physically install the drive in a drive bay 4. Configure the system 5.
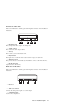
Front view of the drive Refer to the illustration to identify parts which might be referred to in the installation instructions. 1 Headphone jack This jack provides audio output to the headphones. 2 Volume control This controls the audio output volume. 3 CD tray This is where you load and unload a CD. 4 Busy indicator This light comes on when the drive reads a data CD or plays an audio CD. 5 Manual-eject hole This provides access to the manual eject mechanism to remove a CD from the drive.
4 IDE connector Connects the CD-ROM drive to the IDE cable 5 DC power connector Connects the dc power cord to the CD-ROM drive Installing the Drive Follow these steps to install the CD-ROM drive into your computer. Step 1. Opening the computer 1. Turn off the computer and all attached devices. 2. Unplug the power cords for the computer and all attached devices. 3. Remove the cover from the computer. Step 2. Unpacking the drive 1.
Some non-IBM computers support the cable-select setting, where the position of the device on the cable determines whether a device is master or slave. See the documentation that comes with your computer to determine if your system supports this setting. Step 4. Setting the configuration jumper The illustration above shows the master 1 setting, the slave 2 setting, and the cable-select 3 setting.
2. Align the drive-bay screw holes with the threaded holes in the drive housing or mounting bracket; then thread the screws in loosely to check their positions. Usually two screws are used on each side. 3. Check to make sure the alignment is correct; then tighten the screws to secure the drive. Do not overtighten. Step 6. Attaching the cables to the drive 1. Connect the cables to the CD-ROM drive as follows. a. Attach a 40-pin IDE-cable connector 2 to the IDE connector on the drive.
Step 8. Attaching the faceplates This option package includes two faceplates that conform to the curved design of certain systems. If your computer system has a curved design, you can attach one of the included faceplates so that the front of the CD-ROM drive matches the exterior cabinet. Choose the faceplate that best fits your system, and attach it after you have mounted the CD-ROM drive in the appropriate bay. Step 9.
Installing the device driver for DOS and OS/2 1. Turn on your computer and start your operating system, if you have not already done so. 2. Go to a command line. 3. Insert the 40X-17X Internal IDE CD-ROM Drive Option Diskette into your diskette drive. 4. Type A:CDSETUP in the command line; then press Enter. 5. Using your mouse or the arrow keys, select Setup; then press Enter. 6. Follow the instructions on your screen to properly install the driver. 7. When setup is complete, select Exit. 8.
Product Registration Thank you for purchasing OPTIONS by IBM. Please take a few moments to register your product and provide us with information that will help IBM to better serve you in the future. Your feedback is valuable to us in developing products and services that are important to you, as well as in developing better ways to communicate with you. Register your option on the IBM Web site at: http://www.pc.ibm.
1-18 40X-17X Internal IDE CD-ROM Drive
Part 2: User's guide Using the drive This section includes instructions for the proper care of CDs and the care and operation of your CD-ROM drive. Caring for a CD CDs are high-density media that must be handled with care and kept clean to insure that they remain readable. These precautions will help to prolong the life of your CDs. Attention: Wiping a CD using a circular motion might cause loss of data. Handle the CD by the edges or by the center hole. Do not touch the surface of the CD.
Caring for the CD-ROM drive To protect your CD-ROM drive during operation, observe the following precautions. Remove any CD in the drive before moving the drive. Do not insert foreign objects into the drive. Do not stack objects on the drive. Do not remove the drive cover or attempt to service the drive.
1. Press the Eject/Load button. 2. Look at the above illustrations and compare to your loading tray. 3. If your loading tray looks like the left illustration, insert the CD carefully so that the edges of the CD are underneath the tabs on the loading tray. These plastic tabs cover the edges of the CD-ROM or audio CD and hold it in place. The tabs are attached to the tray itself and cannot be moved.
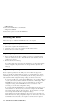
Manually ejecting a CD If you press the Eject/Load button and the tray does not slide out, turn off the computer and straighten a large paper clip to form a tool, as shown in the illustration. The straightened end must extend at least 45 mm (1.8 in.). Insert the extended end into the manual-eject hole on the front of the drive (see “Front view of the drive” on page 1-3). Push the paper clip until the tray opens. Gently pull out the tray until you can remove the CD. 45 mm 1.
DOS The DOS operating system does not have a built-in program for playing audio CDs. In order for you to listen to audio CDs using DOS, you must use the program called IBMCDPLY.EXE which is provided on your Option Diskette. Use the following instructions to use the program. 1. Turn on your computer and start your operating system, if you have not already done so. 2. Make sure that you have correctly installed the device drivers for the 40X-17X Internal IDE CD-ROM Drive.
If you do not see the Media Player or CD Audio icons within the Media Player folder, you must install the Windows CD Audio device driver as follows: 1. Double-click My Computer --> Control Panel --> Multimedia. 2. Click the Advanced tab. 3. Double-click Media Control Devices --> CD Audio Devices. 4. Make sure that the CD device driver is enabled. If the driver is not present or is disabled, install the driver. Using a data CD Data CDs can contain data files, games, or applications.
OS/2 Warp To read a data CD: 1. Turn on your computer and start your operating system, if you have not already done so. 2. Insert a data CD into the CD-ROM drive. 3. Double-click OS/2 System and then Drive. 4. Verify that the CD icon is displayed. 5. Double-click CD. 6. Verify that you can view files on the CD. Windows NT 4.0 To read a data CD: 1. Turn on your computer and start your operating system, if you have not already done so. 2. Insert a data CD into the CD-ROM drive. 3. Click My Computer. 4.
8 40X-17X Internal IDE CD-ROM Drive
Part 3: Appendixes Appendix A. Customizing device driver configuration settings This section contains optional device driver configuration information for DOS with Windows, OS/2, Windows 95, and Windows 98. Use the online help during the installation and refer to the READ.ME file on the 40X-17X Internal IDE CD-ROM Drive Option Diskette for additional information. DOS with Windows 3.
The /P parameter is not needed if your CD-ROM drive is on either of these ports. However, if your computer (or IDE adapter) uses different IDE port addresses or interrupts, you must use this option. Refer to the instructions that come with your computer or IDE adapter to understand how your computer or adapter is configured. xxx is the base address of the IDE port. 1F0 for the primary IDE port (Port 1) 170 for the secondary IDE port (Port 2) yy is the interrupt (IRQ) level.
/I:n Enables interrupt sharing. If n=1, interrupt sharing is enabled. If n=0, interrupt sharing is disabled. The default value is 0. Enable this parameter when the IDE interrupt must be shared with another device. For example, a PS/2 9577 computer with IDE could share interrupt 14 with the IBM SCSI Adapter /A. Using Microsoft CD-ROM Extensions Microsoft CD-ROM Extensions (MSCDEX.EXE) is an executable program that works in conjunction with the device driver (IBMIDECD.
CDSETUP will set this value to 10. The default value for MSCDEX with no /M parameter is 4. The greater this value, the better the CD-ROM drive will perform. However, each buffer uses about 2 KB of memory, and specifying too many buffers might slow down your computer or interfere with other programs that have large memory-usage requirements. Using expanded memory (see the /E option in this section) or loading MSCDEX.
Conserving DOS conventional memory If the CD-ROM support software is loaded in DOS conventional memory (below 640 KB RAM), there might be insufficient memory to run some DOS applications. The CDSETUP program attempts to load the IDE CD-ROM device driver and MSCDEX into upper memory, when possible, to avoid this problem. See the following topics in your DOS user's guide for more information on techniques to conserve conventional memory: DOS=UMB, DOS=HIGH,UMB (CONFIG.
Updating the device driver for a DOS network server If you are using the CD-ROM drive in a DOS network server you need to make the following changes: 1. Add the /S parameter to the MSCDEX line in the AUTOEXEC.BAT file. 2. Verify that the MSCDEX line is located after the line that loads the network services (NET START for IBM PC LAN program). 3. Do one of the following, depending on your operating system: If you are using DOS 3.
/M:n Indicates the maximum number of file sectors to be read at a time. The default is eight sectors. /K Uses Kanji supplementary volume descriptor. /Q Suppresses messages during initialization. IDE adapter device driver The following IDE device driver is available: BASEDEV=IBM1S5 6.ADD This device driver (available for ISA computers) controls IDE hard disk drives and IDE CD-ROM drives.
Appendix B. Problem solving Computer problems can be caused by hardware, software, or user error. Using the information in this section, you might be able to solve problems yourself or gather helpful information you can pass on to a service technician. You might also need to refer to your computer, operating-system, or sound-adapter publications. Problem descriptions Review the following list for any problem descriptions that might fit your situation.
port, attach one end of the cable to the IDE port, and the other end connector to the device; leave the middle connector open. You cannot access the CD-ROM drive (DOS and Windows 3.X) or the CD-ROM icon (Windows 3.X) does not display. Your CD-ROM device driver might not be loaded or cannot be found. Before checking the CONFIG.SYS and AUTOEXEC.BAT files, make a backup copy of these files in a convenient directory. 1. At the DOS prompt: a. Type copy CONFIG.SYS CONFIG.IBM and press Enter. b.
You cannot access the CD-ROM drive or the CD-ROM icon does not display (Windows 95, Windows 98, Windows NT 4.0). When the CD-ROM drive is properly installed, a CD-ROM icon will be found in the My Computer window. To verify that the icon is there: 1. Double-click My Computer. 2. Look for an icon labeled CD-ROM. If a CD-ROM icon is not present in the window that displays: 1. Make sure that the drive has been properly installed. 2. Make sure that the configuration jumper is set properly. See “Step 4.
You cannot access the CD-ROM or the CD-ROM icon does not display (OS/2). Your CD-ROM device driver might not be loaded or cannot be found. Before checking the CONFIG.SYS file, make a backup copy of this file in a convenient directory. 1. At the DOS prompt: a. Type copy CONFIG.SYS CONFIG.IBM, and press Enter. b. Type copy AUTOEXEC.BAT AUTOEXEC.IBM, and press Enter. 2. Use a text editor such as EPM or E from the OS/2 prompt. The following instructions use the EPM editor. Type EPM CONFIG.SYS, and press Enter.
your computer for additional details on selecting IDE performance modes. Many older computers will not have a selection of IDE performance modes. The computer does not recognize the CD-ROM drive after the device drivers are loaded. Check for incompatibilities among the CD-ROM device driver and other device drivers or other hardware in your computer. Create a System Diskette with minimum CONFIG.SYS and AUTOEXEC.BAT system files. 1. Before creating special CONFIG.SYS and AUTOEXEC.
8. 9. 10. 11. 12. 13. 14. If you are unable to access the CD, you might have a hardware problem. If you are unable to read the CD or a drive letter is not assigned by MSCDEX, go to the next step. Turn off the computer, unplug the cables from the power outlets for your computer and all attached devices, and remove the computer cover. Disconnect the IDE and power cable for all IDE devices except the CD-ROM drive.
You receive a common error message. These are actions for some common error messages. CDR-103 The CD in the CD-ROM drive is not a High Sierra or ISO 9660 format. The CD-ROM drive does not support this format. CDR-101 The "not ready reading the drive" situation occurs if you try to access the CD-ROM drive before the drive is ready. The busy indicator comes on when you attempt to access the drive after loading a CD into the CD tray.
Appendix C. Help and service This section contains information on how to obtain online and telephone technical support. Online technical support Online technical support is available during the life of your product. Online assistance can be obtained through the Personal Computing Support Web site, the PSG Electronic Bulletin Board System, and the IBM Automated Fax System. Online technical support IBM Personal Computing Support Web Site http://www.pc.ibm.
For the support telephone number and support hours by country, refer to the following table or to the enclosed technical support insert. If the number is not provided, contact your IBM reseller or IBM marketing representative. Response time may vary depending on the number and nature of the calls received. Support 24 hours a day, 7 days a week Canada 1-800-565-3344 U.S.A./Puerto Rico 1-800-772-2227 Appendix D.
IBM warrants that each Machine 1) is free from defects in materials and workmanship and 2) conforms to IBM's Official Published Specifications. The warranty period for a Machine is a specified, fixed period commencing on its Date of Installation. The date on your sales receipt is the Date of Installation, unless IBM or your reseller informs you otherwise.
When warranty service involves the exchange of a Machine or part, the item IBM or your reseller replaces becomes its property and the replacement becomes yours. You represent that all removed items are genuine and unaltered. The replacement may not be new, but will be in good working order and at least functionally equivalent to the item replaced. The replacement assumes the warranty service status of the replaced item.
UNDER NO CIRCUMSTANCES IS IBM LIABLE FOR ANY OF THE FOLLOWING: 1) THIRD-PARTY CLAIMS AGAINST YOU FOR DAMAGES (OTHER THAN THOSE UNDER THE FIRST ITEM LISTED ABOVE); 2) LOSS OF, OR DAMAGE TO, YOUR RECORDS OR DATA; OR 3) SPECIAL, INCIDENTAL, OR INDIRECT DAMAGES OR FOR ANY ECONOMIC CONSEQUENTIAL DAMAGES (INCLUDING LOST PROFITS OR SAVINGS), EVEN IF IBM, ITS SUPPLIERS OR YOUR RESELLER IS INFORMED OF THEIR POSSIBILITY.
failure caused by a product for which IBM is not responsible. The warranty is voided by removal or alteration of Machine or parts identification labels. THESE WARRANTIES ARE YOUR EXCLUSIVE WARRANTIES AND REPLACE ALL OTHER WARRANTIES OR CONDITIONS, EXPRESS OR IMPLIED, INCLUDING, BUT NOT LIMITED TO, THE IMPLIED WARRANTIES OR CONDITIONS OF MERCHANTABILITY AND FITNESS FOR A PARTICULAR PURPOSE.
2. obtain authorization from the owner to have IBM or your reseller service a Machine that you do not own; and 3. where applicable, before service is provided a. follow the problem determination, problem analysis, and service request procedures that IBM or your reseller provides, b. secure all programs, data, and funds contained in a Machine, c. provide IBM or your reseller with sufficient, free, and safe access to your facilities to permit them to fulfil their obligations, and d.
Part 2 - Worldwide Country-Unique Terms ASIA PACIFIC AUSTRALIA: The IBM Warranty for Machines: The following paragraph is added to this Section: The warranties specified in this Section are in addition to any rights you may have under the Trade Practices Act 1974 or other legislation and are only limited to the extent permitted by the applicable legislation.
If you purchased an IBM Machine in Austria, Belgium, Denmark, Estonia, Finland, France, Germany, Greece, Iceland, Ireland, Italy, Latvia, Lithuania, Luxembourg, Netherlands, Norway, Portugal, Spain, Sweden, Switzerland or United Kingdom, you may obtain warranty service for that Machine in any of those countries from either (1) an IBM reseller approved to perform warranty service or (2) from IBM.
In item 2, replace “U.S. $100,000” with “1.000.000 DEM.” The following sentence is added to the end of the first paragraph of item 2: IBM's liability under this item is limited to the violation of essential contractual terms in cases of ordinary negligence.
The following item is added to this paragraph: 3. breach of IBM's obligations implied by Section 12 of the Sale of Goods Act 1979 or Section 2 of the Supply of Goods and Services Act 1982. Applicability of suppliers and resellers (unchanged). The following is added to the end of this Section: IBM's entire liability and your sole remedy, whether in contract or in tort, in respect of any default will be limited to damages.
Electronic emission notices 40X-17X Internal IDE CD-ROM Drive Federal Communications Commission (FCC) Statement Note: This equipment has been tested and found to comply with the limits for a Class B digital device, pursuant to Part 15 of the FCC Rules. These limits are designed to provide reasonable protection against harmful interference in a residential installation.
European Union - Emission Directive This product is in conformity with the protection requirements of EU Council Directive 89/366/ECC on the approximation of the laws of the Member States relating to electromagnetic compatibility. IBM can not accept responsibility for any failure to satisfy the protection requirements resulting from a non-recommended modification of the product, including the fitting of non-IBM option cards.
3-28 40X-17X Internal IDE CD-ROM Drive
IBM Part Number: 37L1388 Printed in U.S.A.