Infoprint 1585 (MT 4539) User’s Guide S510-4133-00
Infoprint 1585 (MT 4539) User’s Guide S510-4133-00
Edition: March 2005 The following paragraph does not apply to any country where such provisions are inconsistent with local law: LEXMARK INTERNATIONAL, INC., PROVIDES THIS PUBLICATION “AS IS” WITHOUT WARRANTY OF ANY KIND, EITHER EXPRESS OR IMPLIED, INCLUDING, BUT NOT LIMITED TO, THE IMPLIED WARRANTIES OF MERCHANTABILITY OR FITNESS FOR A PARTICULAR PURPOSE. Some states do not allow disclaimer of express or implied warranties in certain transactions; therefore, this statement may not apply to you.
Contents Chapter 1: Learning about the printer .............................................................................. 6 Printer overview ............................................................................................................................................... 6 Understanding the printer operator panel ........................................................................................................ 9 Chapter 2: Installing drivers for local printing .......................
Contents Identifying and linking output bins .................................................................................................................. 60 Sending a job to print ..................................................................................................................................... 61 Printing from a USB flash memory device ..................................................................................................... 62 Canceling a print job .....................
Contents Index ..................................................................................................................................
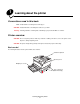
1 Learning about the printer Conventions used in this book Note: A note identifies something that could help you. CAUTION: A caution identifies something that could cause you harm. Warning: A warning identifies something that could damage your product hardware or software. Printer overview CAUTION: Do not set up this product or make any electrical or cabling connections, such as the power cord or telephone, during a lightning storm.
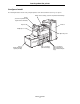
Learning about the printer Configured model The following illustration shows a fully configured printer. Items denoted with an asterisk (*) are options.
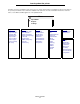
Learning about the printer A number of menus are available to make it easy for you to change printer settings. The diagram shows the menu index on the operator panel and the menus and items available under each menu. For more information about menus and menu items, see the Menus and Messages book on the publications CD.
Learning about the printer Understanding the printer operator panel The operator panel consists of these items: • • • • • A 4-line, back-lit, gray-scale display that can show both graphics and text Eight buttons: Back, Menu, Stop, Select ( ), , , , and Indicator light Numeric pad USB Direct Interface Display Menu Back USB Direct interface Stop Indicator light Navigation buttons Select button Numeric pad The use of the buttons and the layout of the display panel are described in the following table
Learning about the printer Button or operator panel item Indicator light A two-toned LED is used on the operator panel, one color being green and the other being red. The lights indicate whether the printer power is on, the printer is busy, idle, processing a job, or requires operator intervention.
2 Installing drivers for local printing A local printer is a printer attached to the computer using a USB or parallel cable. The local printer is intended to be used by the computer to which it is attached. If attaching a local printer, install the printer driver on the computer before setting up the printer. The printer driver is software that lets the computer communicate with the printer. The procedure to install drivers depends on the operating system used.
Installing drivers for local printing 2 Click Install Printer and Software. Note: Some Windows operating systems require that the user has administrative access to install printer drivers on the computer. 3 Click Agree to accept the license agreement. 4 Select Suggested, and click Next. The Suggested option is the default installation for local and network-attached setup. To install utilities, change settings, or customize device drivers, select Custom, and follow the instructions on the screen.
Installing drivers for local printing Serial printing With serial printing, data is transferred one bit at a time. Although serial printing is usually slower than parallel printing, it is the preferred option when there is a great deal of distance between the printer and computer, or when a parallel interface is not available. Note: A serial interface card is required and can be purchased separately. Before printing, establishing communication between the printer and computer is required.
Installing drivers for local printing 2 Click Install Printer and Software. 3 Click Agree to accept the Printer Software License Agreement. 4 Select Custom, and click Next. 5 Select Components, and click Next. 6 Select Local, and click Next. 7 Select the printer from the list, and click Add Printer. 8 Expand the printer item listed below Selected Components. 9 Click PORT: , and select the communications port (COM1 or COM2) needed for use.
Installing drivers for local printing Macintosh Mac OS 9.x or later is required for USB printing. To print locally to a USB-attached printer, create a desktop printer icon (Mac OS 9) or create a queue in Print Center / Printer Setup Utility (Mac OS X). Creating a queue in Print Center / Printer Setup Utility (Mac OS X) 1 Install a PostScript Printer Description (PPD) file on the computer. a Insert the drivers CD. b Double-click the installer package for the printer.
Installing drivers for local printing 4 Select Printer (USB), and click OK. 5 In the USB Printer Selection section, click Change. If the printer does not appear in the USB Printer Selection list, make sure the USB cable is properly connected, and the printer is turned on. 6 Select the name of the printer, and click OK. The printer appears in the original Printer (USB) window. 7 In the PostScript Printer Description (PPD) File section, click Auto Setup.
3 Installing drivers for network printing Printing a network setup page If the printer is attached to a network, print a network setup page on the printer to verify the network connection. This page also provides important information that helps in configuring for network printing. 1 Make sure the printer is on. 2 Press 3 Press until Reports appears, and then press 4 Press until Network Setup Page appears, and then press on the operator panel. . .
Installing drivers for network printing 9 Using the numeric pad, enter the IP address. Once the address is entered, press . Submitting Selection appears briefly. 10 Press repeatedly until the printer returns to Ready. Verifying the IP settings 1 Print another network setup page. Look under the “TCP/IP” heading, and make sure the IP address, netmask, and gateway are correct. See Printing a network setup page on page 17 if help is needed. 2 Ping the printer, and verify that it responds.
Installing drivers for network printing Follow the steps for the printing configuration and operating system in use to configure the network printer: Printing configuration Operating system Go to page Direct • Printer is connected directly to the network using a network cable, such as Ethernet. • Printer drivers are typically installed on each network computer. Windows 98 SE, Windows NT 4.
Installing drivers for network printing After connecting the printer to a Windows NT 4.0, Windows 2000, Windows XP, or Windows Server 2003 computer (which will act as a server), follow these steps to configure the network printer for shared printing: 1 Server Printer Install a custom printer driver. a Launch the drivers CD. b Click Install Printer and Software. c Click Agree to accept the license agreement. d Select Suggested, and click Next.
Installing drivers for network printing With this method, a subset of driver information is copied from the server to the client computer. This is just enough information to send a print job to the printer. 1 Double-click Network Neighborhood on the Windows desktop of the client computer. 2 Locate the host name of the server computer, and double-click the host name. 3 Right-click the shared printer name, and click Install.
Installing drivers for network printing To print to a network printer, each Macintosh user must install a custom PostScript Printer Description (PPD) file, and either create a desktop printer on the computer (Mac OS 9.x) or create a print queue in Print Center (Mac OS X). Mac OS X Step 1: Install a custom PPD file 1 Install a PostScript Printer Description (PPD) file on the computer. a Insert the drivers CD. b Double-click the installer package for the printer.
Installing drivers for network printing Using IP Printing Follow these steps to create a print queue using IP Printing. To create an AppleTalk print queue, see Step 2: Create a print queue in Print Center or Printer Setup Utility. 1 Open Finder, click Applications, and click Utilities. 2 Double-click Print Center or Printer Setup Utility. 3 Choose Add Printer from the “Printers” menu. 4 Choose IP Printing from the pop-up menu.
Installing drivers for network printing 5 Click Create. 6 Make sure there is an icon next to the printer name in the Chooser. 7 Close the Chooser window. 8 Verify printer installation. a Click the desktop printer icon just added. b Choose Printing Æ Change Setup. – If the PPD file displayed in the PostScript Printer Description (PPD) file portion of the menu is correct for the printer, printer setup is complete.
4 Installing options CAUTION: If you are installing memory or option cards sometime after setting up the printer, turn the printer off and unplug the power cord before continuing. You can customize the printer memory capacity and connectivity by adding optional cards.
Installing options Accessing the printer system board You must access the printer system board to install printer memory, flash memory, a hard disk, or an option card. CAUTION: Turn the printer off, and unplug the power cord before continuing. 1 Loosen the screws on the access panel located on the back side of the printer. 2 Remove the panel from the printer, and set it aside.
Installing options Use the illustration to locate the connector for the option you want to install.
Installing options Installing a printer memory card Complete the following instructions to install a printer memory card. Note: Memory cards designed for other printers may not work with your printer. 1 Remove the system board access panel. (See Accessing the printer system board.) 2 Push open the latches on both ends of the memory card connector. 3 Unpack the memory card. Warning: Printer memory cards are easily damaged by static electricity.
Installing options Installing a flash memory or firmware card Note: Flash memory and firmware cards designed for other printers may not work with your printer. 1 Remove the system board access panel. (See Accessing the printer system board.) 2 Unpack the flash memory or firmware card. Warning: Flash memory and firmware cards are easily damaged by static electricity. Touch something metal such as the printer frame before you touch a card.
Installing options Installing an option card Warning: Option cards are easily damaged by static electricity. Touch something metal such as the printer frame before you touch a memory card. Note: You need a small Phillips screwdriver to attach the option card to the system board. 1 Remove the system board access panel. (See Accessing the printer system board.) 2 Open the system board door. 3 Locate the card connector on the system board. 4 Remove the screws and the cover plate, and save them.
Installing options 6 Align the connection points on the card with the connector on the system board, and push the card firmly into the system board connector. 7 Insert the screws saved from the cover plate (or the extra screws shipped with the card). 8 Tighten the screws to secure the card.
Installing options Installing a hard disk Note: You need a small Phillips screwdriver to attach the hard disk to the mounting plate. 1 Remove the system board access panel. (See Accessing the printer system board.) 2 Remove the mounting plate, hard disk, ribbon cable, and attachment screws from the package. 3 Align the ribbon cable connector with the connector pins on the hard disk. 4 Attach the ribbon cable to the hard disk.
Installing options 7 Press the ribbon cable connector into the connector on the system board. 8 Press the three posts on the mounting plate into the holes on the system board. The hard disk snaps into place.
Installing options Replacing the access panel After you have installed options on the printer system board, follow these steps to reattach the access panel. 1 Align the tabs on the right side of the access panel with the slots on the printer. 2 Slide the panel to the right and towards the printer. 3 Tighten the screws. 4 Plug the printer power cord back into a properly grounded electrical outlet and turn on the printer.
5 Understanding paper and specialty media guidelines Print media is paper, card stock, transparencies, labels, and envelopes. The last four are sometimes referred to as specialty media. The printer provides high quality printing on a variety of media. A number of things must be considered concerning media before printing. This chapter provides information on making media selections and caring for media.
Understanding paper and specialty media guidelines Print media sizes(continued) 500-sheet standard output bin 300-sheet second exit output bin3 ✓ ✓ ✓ ✓ ✓ ✓ ✓ ✓ ✓ ✓ ✓ ✓ ✓ ✓ ✓ ✓ ✓ ✓ ✓ ✓ ✓ ✓ ✓ ✓ ✓ 279 x 432 mm (11.0 x 17.0 in.) ✓ ✓ ✓ ✓ ✓ 98.4 x 89.0 mm to 297.0 x 431.8 mm (3.9 x 3.5 in. to 11.7 x 17.0 in.) ✓ ✓ ✓ ✓ ✓ ✓ ✓ ✓ 104.8 x 241.3 mm (4.12 x 9.5 in.) ✓ ✓ ✓ DL Envelope 110 x 220 mm (4.33 x 8.66 in.) ✓ ✓ ✓ C5 Envelope 162 x 229 mm (6.38 x 9.01 in.
Understanding paper and specialty media guidelines Media sizes supported in the finisher Bin 1 Size Standard* Offset Bin 2 Staple Punch Standard* Offset Staple Punch A3 ✓ ✓ ✓ ✓ ✓ A4 ✓ ✓ ✓ ✓ ✓ A5 ✓ JIS B4 ✓ ✓ ✓ ✓ ✓ JIS B5 ✓ ✓ ✓ ✓ ✓ Letter ✓ ✓ ✓ ✓ ✓ Legal ✓ ✓ ✓ ✓ ✓ Executive ✓ ✓ ✓ ✓ ✓ Folio ✓ ✓ ✓ ✓ ✓ Statement ✓ Tabloid ✓ ✓ ✓ ✓ ✓ Universal 7 ¾ Envelope 10 Envelope DL Envelope C5 Envelope Other Envelope * Paper passes to the finisher bin with
Understanding paper and specialty media guidelines Feed characteristics by print media size Feed orientation1 Print media orientation2 Size supports duplex A3 Portrait Short-edge ✓ A4 Portrait or Landscape Short-edge or Long-edge ✓ A5 Portrait Short-edge ✓ JIS B4 Portrait Short-edge ✓ JIS B5 Landscape Long-edge ✓ Letter Portrait or Landscape Short-edge or Long-edge ✓ Legal Portrait Short-edge ✓ Landscape Long-edge ✓ Folio Portrait Short-edge ✓ Statement Portrait Shor
Understanding paper and specialty media guidelines Paper ✓ ✓ Card stock ✓ Transparencies ✓ ✓ ✓ ✓ ✓ ✓ ✓ ✓ ✓ ✓ ✓ ✓ Paper labels ✓ ✓ ✓ ✓ Bond ✓ ✓ ✓ ✓ ✓ ✓ ✓ ✓ ✓ ✓ Envelope Hole Punch Stapled Offset Standard Finisher ✓ ✓ ✓ Second exit output bin ✓ Standard output bin ✓ Duplex unit 2000-sheet high capacity feeder Print media 2000-sheet dual input trays 500-sheet trays Multipurpose feeder Print media types ✓ ✓ ✓ ✓ ✓ Letterhead ✓ ✓ ✓ ✓ ✓ ✓ ✓ ✓ ✓
Understanding paper and specialty media guidelines Print media weights Paper Xerographic or business paper • Tray 1: 64 to 105 g/m2 grain long (17 to 28 lb bond) • Other 500-sheet trays: 64 to 216 g/m2 grain long (17 to 58 lb bond) 64 to 216 g/m2 grain long (17 to 58 lb bond) Card stock— maximum (grain long)1 Index Bristol 163 g/m2 (90 lb) 120 g/m2 (67 lb) Tag 163 g/m2 (100 lb) 120 g/m2 (74 lb) Cover 176 g/m2 (65 lb) 135 g/m2 (50 lb) Index Bristol 199 g/m2 (110 lb) 163 g/m2 (90 lb) Tag 2
Understanding paper and specialty media guidelines Media weights supported in the finisher Finisher media weight Bin 2 Print media Type Bin 1 Offset g/m2 2 Paper Xerographic or business paper 64 to 105 grain long (17 to 28 lb bond) Card stock— maximum (grain long) Index Bristol 163 g/m2 (90 lb bond) Tag 163 g/m2 (100 lb bond) Cover 176 g/m2 (65 lb bond) Index Bristol 199 g/m2 (110 lb bond) Card stock— maximum (grain short) Transparencies Integrated forms g/m2 (125 64 to 216 g/m grain lon
Understanding paper and specialty media guidelines Selecting print media Selecting the appropriate print media for the printer helps you avoid printing problems. The following sections contain guidelines for choosing the correct print media for the printer. • • • • • Paper Transparencies Envelopes Labels Card stock Paper To ensure the best print quality and feed reliability, use 90 g/m2 (24 lb) xerographic, grain long paper.
Understanding paper and specialty media guidelines Moisture content The amount of moisture in the paper affects both print quality and the ability of the printer to feed the paper properly. Leave the paper in its original wrapper until it is time to use it. This limits the exposure of the paper to moisture changes that can degrade its performance. Condition paper while it is still in the original wrapper.
Understanding paper and specialty media guidelines • • • Make sure the Paper Type, Paper Texture, and Paper Weight settings are correct. (See “Paper Menu” in the Menus and Messages Guide located on the publications CD for detailed information about these settings.) Make sure the paper is properly loaded in the source. Flex paper back and forth. Do not fold or crease the paper. Straighten the edges on a level surface.
Understanding paper and specialty media guidelines Transparencies Feed transparencies from the standard tray or the multipurpose feeder. Try a sample of any transparencies being considered for use with the printer before buying large quantities. When printing on transparencies: • Be sure to set the Paper Type to Transparency from the printer driver or from MarkVision™ Professional to avoid damaging the printer. • Use transparencies designed specifically for laser printers.
Understanding paper and specialty media guidelines • • • • Use envelopes that can withstand temperatures of 230°C (446°F) without sealing, excessive curling, wrinkling, or releasing hazardous emissions. If you have any doubts about the envelopes you are considering using, check with the envelope supplier. Adjust the width guide to fit the width of the envelopes. Load only one size of envelope at a time. A combination of high humidity (over 60%) and the high printing temperatures may seal the envelopes.
Understanding paper and specialty media guidelines Card stock Card stock is single ply, and has a large array of properties, such as the moisture content, thickness, and texture, that can significantly affect print quality. See Supported print media on page 35 for information on the preferred weight and for the grain direction of print media. Try a sample of any card stock you are considering using with the printer before purchasing a large quantity.
Understanding paper and specialty media guidelines Avoiding jams Use appropriate print media (paper, transparencies, labels, and card stock) to help ensure trouble-free printing. See Supported print media on page 35 for more information. Note: Try a limited sample of any print media you are considering using with the printer before purchasing large quantities. By selecting the appropriate print media and loading it properly, you can avoid most jams.
6 Printing This chapter covers information about loading print media, linking output bins, sending a job to print, printing confidential jobs, canceling a print job, printing a menu settings page, a font list, and a directory list. For tips on paper jam prevention and print media storage, see Avoiding jams on page 48 or Storing print media on page 47. Loading standard or optional 500-sheet trays Your printer has two 500-sheet standard trays.
Printing 2 Squeeze the side guide tab, and slide the guide to outside of the tray. 3 Squeeze the front guide tab and slide the guide to the correct position for the size media you are loading. 4 Flex the sheets back and forth to loosen them, then fan them. Do not fold or crease the print media. Straighten the edges on a level surface. 5 Load print media in the tray with the print side up.
Printing 6 Squeeze the side guide tab, and slide the guide until it lightly rests against the edge of the media. 7 Insert the tray.
Printing Loading the multipurpose feeder The multipurpose feeder can hold several sizes and types of print media, such as transparencies, postcards, note cards, and envelopes. It can be used for single-page or manual printing or as an additional tray. The multipurpose feeder can hold approximately: • • • 100 sheets of 75 g/m2 (20 lb) paper 10 envelopes 75 transparencies The multipurpose feeder accepts print media within the following dimensions: • Width—89 mm (3.5 in.) to 297 mm (11.7 in.
Printing 2 Pull the tray extension out. Note: Do not place objects on the multipurpose feeder. Also, avoid pressing down or applying excessive force on it. 3 Slide the width guides to the outside of the feeder. 4 Flex the sheets or envelopes back and forth to loosen them, then fan them. Do not fold or crease the print media. Straighten the edges on a level surface. 5 Load the media in the feeder. Note: Make sure the print media is below the max fill line. Overloading may cause jams.
Printing 6 Slide the width guides until they lightly rest against the edge of the media. 7 Set the Paper Size and Paper Type for the multipurpose feeder (MP Feeder Size and MP Feeder Type) to the correct value for the print media you loaded. a Press on the operator panel. b Press until Paper Menu appears, and then press c Press until Paper Size/Type appears, and then press d Press until MP Feeder Size/Type appears, and then press e Press until the f Press g Press . . .
Printing Loading the 2000-sheet dual input trays The 2000-sheet dual input drawer includes two trays: an 850-sheet tray and an 1150-sheet tray. Although the trays are different in appearance, they both load the same way. 1 Pull out the tray. 2 Squeeze the front guide tab, and slide the guide to the correct position for the size media you are loading.
Printing 3 Flex the sheets back and forth to loosen them, then fan them. Do not fold or crease the print media. Straighten the edges on a level surface. 4 Load print media in the tray with the print side up. Note: Make sure the print media is below the max fill line on the rear guide. Overloading may cause jams. 5 Insert the tray into the printer. Loading the 2000-sheet high capacity feeder The high capacity feeder can hold 2000 sheets of Letter, A4, Executive, and JIS B5 paper (75 g/m2 [20 lb]).
Printing 2 If loading print media with a different width or length, adjust the width and length guides. 3 Flex the sheets back and forth to loosen them, then fan them. Do not fold or crease the print media. Straighten the edges on a level surface. 4 Load print media in the tray with the print side down. • • 5 Place pre-punched paper with the holes toward the left side of the tray. Place letterhead (or the top of the page) toward the front of the tray. Insert the tray into the high capacity feeder.
Printing Loading Letter or A4 size print media in the short-edge feed orientation In order for the printer to recognize letter or A4 size print media loaded in the short-edge feed orientation, Short-edge Printing must be enabled. 1 Make sure the printer is off. 2 Press and hold the 3 Release both buttons when Performing Self Test appears on the display. and buttons while you turn the printer on.
Printing To define a custom name using the Embedded Web Server: 1 Open the printer Embedded Web Server by typing its IP address in the address bar of a browser. For example: http://192.168.0.11 2 Click Configuration. 3 Click PAPER MENU. 4 Click CUSTOM NAMES. 5 Define one or more custom names. For example, you could enter names such as “Short-edge Letter” or “Yellow Glossy.” 6 Click Submit.
Printing Identifying and linking output bins There is one standard output bin on all printer models. If you need additional output capacity, the optional finisher provides up to 3500 sheets of additional output capacity. The following table provides information on output bin capacities.
Printing 3 Press until Bin Setup appears, and then press 4 Press until Configure Bins appears, and then press 5 Press until Link appears, and then press 6 Press repeatedly to return to the Ready state. . . . Sending a job to print A printer driver is software that lets your computer communicate with your printer. When you choose Print from a software application, a window representing the printer driver opens.
Printing Printing from a USB flash memory device A USB Direct interface is located on the operator panel so you can insert a USB flash memory device and print PDF documents. Printing a document from a USB flash memory device is similar to printing a held job. For information regarding tested and approved USB flash memory devices, contact the place where you bought the printer.
Printing 4 To print only one copy, press , or manually input the number of copies with the number pad, then press . Note: Do not remove the USB flash memory device from the USB Direct interface until the document has finished printing. The document will begin printing. If you leave the device in the printer after exiting the USB drive menu, you can still print PDFs on the device as held jobs. See Printing confidential and held jobs on page 65.
Printing 5 Select the job you want to cancel. 6 Press the Delete key on the keyboard. Canceling a job from a Macintosh computer Canceling a job from a Macintosh computer running Mac OS 9.x When you send a job to print, the printer icon for your selected printer appears on the desktop. 1 Double-click the printer icon on your desktop. A list of print jobs appears in the printer window. 2 Select the print job you want to cancel. 3 Click the trash can icon.
Printing 4 Press until 5 Press . until the Print Fonts appears, and then press . appears next to PCL Emul Fonts, PostScript Fonts, or PPDS Fonts, and then press Printing a directory list A directory listing shows the resources stored in flash memory or on the hard disk. To print a listing: 1 Make sure the printer is on and the Ready message appears. 2 Press 3 Press until Reports appears, and then press 4 Press until Print Directory appears, and then press on the operator panel. . .
Printing Windows 1 From a word processor, spreadsheet, browser, or other application, select File Æ Print. 2 Click Properties. (If there is no Properties button, click Setup, and then click Properties.) 3 Depending on the operating system, you may have to click the Other Options tab, and then click Print and Hold. Note: If you have difficulty finding Print and Hold Æ Confidential Print, click Help and see the topic Confidential Print or Print and Hold, and then follow the driver instructions.
Printing Entering a personal identification number (PIN) When you select Confidential Job from the Held job menu, the following prompt appears on the display after you select your user name: Enter PIN * 1 Use the numeric pad to enter the four-digit PIN associated with your confidential job. Note: As you enter the PIN, asterisks appear on the display to ensure confidentiality. If you enter an invalid PIN, the Invalid PIN screen appears.
Printing 3 Depending on the operating system, you may have to click the Other Options tab, and then click Print and Hold. Note: If you have difficulty finding Print and Hold Æ Held Jobs, click Help, and see the topic Held Jobs or Print and Hold, then follow the driver instructions. 4 Select the type of held job you want, and then send your job to the printer. Go to the printer when you are ready to retrieve your confidential print job, and follow the At the printer steps on page 68.
Printing Printing A5/Statement or JIS-B5/Executive sizes When Auto Size Sensing is set to On, the printer cannot distinguish between Statement and A5 or Executive and JIS-B5. Follow these directions to change the Size Sensing setting. Note: This is not necessary when printing from the multipurpose feeder. 1 Make sure the printer is off. 2 Press and hold the 3 Release both buttons when Performing Self Test appears on the display. and buttons while you turn the printer on.
7 Maintaining the printer Periodically, you need to complete certain tasks to maintain optimum print quality. These tasks are covered in this chapter. If several people are using the printer, you may want to designate a key operator to do the setup and maintenance of your printer. Refer printing problems and maintenance tasks to this key operator. Contact the place where you bought the printer for information about authorized supplies dealers in your area.
Maintaining the printer Photoconductor kit end-of-life To ensure print quality and to avoid damage to the printer, the printer stops operating after the photoconductor kit has reached approximately 60,000 pages (Letter/A4). The message 84 Replace PC Unit is displayed when the printer reaches this point.
Maintaining the printer Maintenance kit 80 Scheduled Maintenance appears on the display after 300,000 pages have printed to let you know it is time to replace printer maintenance items. Order a maintenance kit when 80 Scheduled Maintenance first appears on the display. The maintenance kit contains all the items necessary to replace the pick rollers, the fuser, and the transfer roller. For information about maintenance kits available for the printer, contact the place where you bought the printer.
8 Clearing jams By carefully selecting print media and loading it properly, you should be able to avoid most paper jams. For more information on avoiding paper jams, see Avoiding jams on page 48. If jams do occur, follow the steps outlined in this section. To resolve the paper jam messages, you must clear the entire paper path and then press to clear the message and resume printing.
Clearing jams Access doors and trays The following illustrations show the areas where jams may occur.
Clearing jams Understanding jam messages The following table lists the jam messages that can occur and the action necessary to clear the message. The jam message indicates the area where the jam occurred. However, it is best to clear the entire paper path to ensure you have cleared all possible jams. Message What to do 200, 201, and 202 Paper Jam Check Door A Open the side door, and remove the jam. 203 Paper Jam Check Open the side door and the Exit 2 door, and remove the jam.
Clearing jams 24x Paper Jam Check Tray Paper jams in these areas can occur on the incline surface of a tray or across more than one tray. To clear these areas: 1 Open the tray. If necessary, remove the tray from the printer. 2 Remove the media from the printer tray slot. 3 Remove any crumpled paper from the tray. 4 Insert the tray into the printer. 5 Press .
Clearing jams Clearing the 2000-sheet high capacity feeder (Tray 5) 1 If necessary, close the multipurpose feeder. 2 Slide the high capacity feeder away from the printer. 3 Raise the top door, and lift the jam access cover.
Clearing jams 4 Remove the jammed paper. 5 Close the jam access cover and top door.
Clearing jams 6 Slide the feeder firmly against the printer. 7 Press . 200, 201, and 202 Paper Jam Check Door A 1 Open Door A by pushing the release latch and lowering the door. CAUTION: The inside of the printer might be hot.
Clearing jams 2 Pull the print media up and toward you. Warning: If the print media does not move immediately when you pull, stop pulling. Push down and pull the green lever to make it easier to remove the media. Make sure all paper fragments are removed. 3 Close Door A. 4 Press . 203 Paper Jam Check 1 Open Door A by pushing the release latch and lowering the door. CAUTION: The inside of the printer might be hot.
Clearing jams 2 Open Door E by pushing the release latch and lowering the door. 3 Pull the print media up. 4 Close Door E. 5 Close Door A. 6 Press .
Clearing jams 230 Paper Jam Check Door 1 Open Door D by the duplex rear door. 2 Remove the jammed media. 3 Close Door D. 4 Open Door A by pushing the release latch and lowering the door. CAUTION: The inside of the printer might be hot.
Clearing jams 5 Open Door E by pushing the release latch and lowering the door. 6 Pull the print media up. 7 Close Door E. 8 Close Door A. 9 Press .
Clearing jams 231 Paper Jam Check 1 Open Door D by the duplex rear door. 2 Remove the jammed media. 3 Close Door D. 4 Open Door A by pushing the release latch and lowering the door. CAUTION: The inside of the printer might be hot.
Clearing jams 5 Pull the print media up. Warning: If the print media does not move immediately when you pull, stop pulling. Pull the green lever to make it easier to remove the media. Make sure all paper fragments are removed. 6 Close Door A. 7 Press . Clearing Area B 1 If the printer is configured with a 2000-sheet high capacity feeder, slide the feeder away from the printer.
Clearing jams 2 Open Door B. 3 Remove the jammed media. 4 Close Door B.
Clearing jams 5 Slide the feeder firmly against the printer. 6 Press .
Clearing jams Clearing Area C 1 If the printer is configured with a 2000-sheet high capacity feeder, slide the feeder away from the printer. 2 Open Door C.
Clearing jams 3 Remove the jammed media. 4 Close Door C. 5 Slide the feeder firmly against the printer. 6 Press .
Clearing jams 28x Paper Jam Check Finisher There are three areas associated with the finisher. Follow the appropriate instructions to clear a jam in the finisher. Clearing Area F 1 Lift the bridge unit assembly door. 2 Remove the jammed media. 3 Close the door. 4 Press .
Clearing jams Clearing Area G 1 Open the finisher door. 2 Remove the jammed media, as indicated on the operator panel. 3 Close the door. 4 Press . Clearing Area H 1 Lift Door H. 2 Remove the jammed media. 3 Close the door. 4 Press .
Clearing jams Clearing staple jams A Staples Empty or Misfed message indicates staples are jammed in the stapler. This requires removing the staple cartridge holder from the printer. 1 Check that the machine stops operations, and open Door G (front door) of the finisher. 2 Hold the lever on the staple cartridge holder, and move the holder to the right (towards you). 3 Firmly pull the colored tab to remove the staple cartridge.
Clearing jams 4 Use the metal tab to lift the staple guard, and then pull out the sheet of staples. Discard the entire sheet. 5 Remove any loose staples from the staple guard. 6 Look through the clear covering on the bottom of the cartridge holder to make sure no staples are jammed in the entry throat. 7 Press down on the staple guard until it snaps securely into place. 8 Push the cartridge holder firmly into the stapler until the holder clicks into place. 9 Close Door G.
9 Troubleshooting Calling for service When you call for printer service, describe the problem you are experiencing, the message on the display, and the troubleshooting steps you have already taken to find a solution. You need to know your printer model type and serial number. See the label on the printer for this information. The serial number is also listed on the menu settings page. See Printing the menu settings page on page 64 for more information.
Troubleshooting Printing multiple-language PDFs Symptom Cause Solution Some documents do not print. The documents contain unavailable fonts. 1 Open the document you want to print in Adobe Acrobat. 2 Click the printer icon. The Print dialog appears. 3 Check the Print as image box. 4 Click OK. Solving printing problems Symptom Cause Solution The operator panel display is blank or displays only diamonds. The printer self test failed.
Troubleshooting Symptom Cause Solution Held jobs do not print. A formatting error has occurred. • Print the job. (Only part of the job may print.) • Delete the job. • Free up additional printer memory by scrolling through the list of held jobs and deleting others you have sent to the printer. The printer has insufficient memory. The printer has received invalid data. Delete the job. The job is too complex.
Troubleshooting Solving option problems If an option does not operate correctly after it is installed or if it quits working: • Turn the printer off, wait for about 10 seconds, and turn the printer on. If this does not fix the problem, unplug the printer, and check the connection between the option and printer. • Print the menu settings page, and check to see if the option is listed in the Installed Options list. If the option is not listed, reinstall it.
Troubleshooting Solving 2000-sheet drawer problems Problem Solution The elevator tray does not raise when the loading door is closed, or the elevator tray does not lower when the door is opened and the elevator button is pushed. Check the following: • The printer is properly attached to the 2000-sheet drawer. • The printer is powered on. • The power cord is plugged firmly into the back of the 2000-sheet drawer. • The power cord is plugged into an outlet. • The outlet has power.
Troubleshooting Solving paper feed problems Symptom Cause Solution Paper frequently jams. You are using paper that does not meet the printer specifications. Use recommended paper and other specialty media. See Avoiding jams on page 48 for information that can help prevent jams from occurring. You have loaded too much paper or too many envelopes. Make sure the stack of paper you load does not exceed the maximum stack height indicated in the tray or on the multipurpose feeder.
Troubleshooting Solving print quality problems The information in the following table may help you solve print quality problems. If these suggestions still do not correct the problem, call for service. You may have a printer part that requires adjustment or replacement. Problem Action Print is too light. • • • • • ABC DEF Toner smears or print comes off the page. ABC DEF Toner appears on the back of the printed page. The toner may be low. Change the Toner Darkness setting in the Quality menu.
Troubleshooting Problem Action Entire page is white. • Make sure the packaging material is removed from the photoconductor kit. • Check the photoconductor kit to be sure it is installed correctly. • Replace the photoconductor kit. Streaks appear on the page. • If you are using preprinted forms, make sure the ink can withstand temperatures of 230°C (446°F). • Replace the photoconductor kit or toner cartridge. ABC DEF Printing is too dark. ABC DEF Characters have jagged or uneven edges.
Troubleshooting Problem Action Part or all of the page is printed in black. Check the photoconductor kit to see if it is installed correctly. The job prints, but the top and side margins are incorrect. • Make sure the Paper Size setting in the Paper menu is correct. • Make sure the margins are set correctly in your software application. ABC DEF Ghost images appear. • Make sure the Paper Type setting in the Paper menu is correct. • Replace the photoconductor kit. Gray background prints.
Troubleshooting The Quality menu operator panel options can be adjusted to help improve print quality. Menu selection Purpose Values Print Resolution To select printed output resolution 600 dpi 1200 dpi 2400 Image Quality* Toner Darkness Lightens or darkens printed output and conserves toner 1–10 8* is the default setting. Select a lower number to lighten the printed output or save toner. Brightness Adjusts the gray value of printed objects -6 – +6 0* is the default setting.
10 Administrative support Adjusting operator panel brightness and contrast The LCD operator panel contrast and brightness can be adjusted through the Utilities menu. For more information, see the Menus and Messages Guide. The LCD Brightness and LCD Contrast settings are adjusted separately. To change the LCD Brightness or LCD Contrast settings: 1 Make sure your printer is on.
Administrative support Enabling operator panel menus 1 Turn the printer off. 2 Press and hold 3 Release both buttons when Performing Self Test appears on the display. and while turning the printer on. The printer performs its power-on sequence, and then Config Menu appears on the first line of the display. 4 Press until Panel Menus appears, and then press 5 Press until Enable appears, and then press . .
Administrative support Adjusting Power Saver To adjust the Power Saver setting: 1 Make sure the printer is on and Ready appears on the display. 2 Press 3 Press until Settings appears, and then press 4 Press until Setup Menu appears, and then press 5 Press until Power Saver appears, and then press 6 Using the numeric pad or the right and left arrows on the operator panel, enter the number of minutes for the printer to wait before entering Power Saver. on the operator panel. . . .
Administrative support Encrypting the disk Warning: All resources on the hard disk will be deleted. (Resources residing in flash memory or in RAM remain unaffected.) Note: This setting is only available when a hard disk is installed. 1 Turn the printer off. 2 Press and hold 3 Release both buttons when Performing Self Test appears on the display. and while turning the printer on. The printer performs its power-on sequence, and then Config Menu appears on the first line of the display.
Administrative support Setting security using the Embedded Web Server (EWS) You can enhance the security of network communications and device configuration by using the advanced security options. These features are available through the Web page of the device. Setting the system password Setting the system password protects configuration of the Embedded Web Server. A system password is also required for Secure mode and confidential communication with MVP.
Administrative support Supporting IPSec (Internet Protocol Security) IP Security protocol provides authentication and encryption of communications at the network layer allowing all application and network communications over the IP protocol to be secure. IPSec can be set up between the printer and up to five hosts, using both IPv4 and IPv6. To configure IPSec through the Embedded Web Server: 1 Open your Web browser.
Administrative support Using 802.1x Authenticating 802.1x port authentication allows the printer to join networks that require authentication before allowing access. 802.1x port authentication can be used with the WPA (Wi-Fi Protected Access) feature of an optional internal wireless print server to provide WPA-Enterprise security support. Support for 802.1x requires the establishment of credentials for the printer. The printer must be known to the Authentication Server (AS).
Administrative support Printing Lockout Printing Lockout lets you lock or unlock a printer using an assigned PIN. When locked, every job the printer receives will buffer to the hard disk. A user can print jobs only by entering the correct PIN on the operator panel. You can assign a PIN through the Web page of the device. Note: This setting is only available when a hard disk is installed. Note: Back channel data will be processed while the printer is locked.
Notices Licensing notice • Licensing notice • Electronic emission notices • The United Kingdom Telecommunications Act 1984 • Noise emission levels • Waste from Electrical and Electronic Equipment (WEEE) directive • Laser notice • Radio frequency statements • European Community (EC) directives conformity • India emissions notice The printer resident software contains software developed and copyrighted by Lexmark.
Notices unauthorized changes or modifications to this equipment. Unauthorized changes or modifications could void the user's authority to operate this equipment. Note: To assure compliance with FCC regulations on electromagnetic interference for a Class A computing device, use a properly shielded and grounded cable. Use of a substitute cable not properly shielded and grounded may result in a violation of FCC regulations.
Notices LUOKAN 1 LASERLAITE EN 300 330-1 and ETSI EN 300 330-2; and the EMC requirements of EN 55024, ETSI EN 301 489-1 and ETSI EN 301 489-3. VAROITUS! Laitteen käyttäminen muulla kuin tässä käyttoohjeessa mainitulla tavalla saattaa altistaa käyttäjän turvallisuusluokan 1 ylittävälle näkymättömälle lasersäteilylle. KLASS 1 LASER APPARAT English Hereby, Lexmark International Inc.
Notices Spanish Por medio de la presente Lexmark International Inc. declara que el Short Range Device cumple con los requisitos esenciales y cualesquiera otras disposiciones aplicables o exigibles de la Directiva 1999/5/CE Portuguese Lexmark International Inc. declara que este Short Range Device está conforme com os requisitos essenciais e outras provisões da Directiva 1999/5/ CE. Czech Lexmark International Inc.
Index A printing letterhead 44 adjust paper tray 50, 55 adjusting Power Saver 106 authorized supplies dealers 70 automatic size sensing 59 automatic tray linking 59 H held jobs confidential jobs 65 entering a PIN 65 entering user name 65 overview 65 types of 65 B bridge unit assembly 7 I C Identifying printers 6 Indicator light 10 integrated forms 40, 41 Internet Protocol Security 109 card stock guidelines 47 loading 49 characteristics, media letterhead 44 characteristics, print media 42 paper 42 co
Index media guidelines letterhead 44 letterhead, printing 44 letterhead guidelines 44 loading instructions based on source 44 transparencies, guidelines 45 memory Print and Hold function 65 multipurpose feeder guidelines 52 on wrong paper or specialty media 96 large jobs do not collate 96 operator panel 95 blank 95 displays black diamonds 95 paper feed blank pages in output bin 99 frequent jams 99 jammed page does not reprint 99 Paper Jam message remains after clearing jam 99 print time seems long 96 tray
Readers’ Comments — We’d Like to Hear from You Infoprint 1585 (MT 4539) User’s Guide Publication No.
S510-4133-00 ___________________________________________________________________________________________________ Readers’ Comments — We’d Like to Hear from You Cut or Fold Along Line _ _ _ _ _ _ _Fold _ _ _and _ _ _Tape _ _ _ _ _ _ _ _ _ _ _ _ _ _ _ _ _ _ _ _ _ _ _ _ _ _ _Please _ _ _ _ _do _ _not _ _ staple _ _ _ _ _ _ _ _ _ _ _ _ _ _ _ _ _ _ _ _ _ _ _ _ _ _ _ _ _Fold _ _ _and _ _ Tape ______ NO POSTAGE NECESSARY IF MAILED IN THE UNITED STATES BUSINESS REPLY MAIL FIRST-CLASS MAIL PERMIT NO.
Part Number: 75P6998 S510-4133-00 (1P) P/N: 75P6998 Printed in USA