2.
COPYRIGHT Under the copyright laws, neither the documentation nor the software may be copied, photocopied, reproduced, translated, or reduced to any electronic medium or machine-readable form, in whole or in part, without the prior written consent of Lotus Development Corporation, except in the manner described in the documentation. © Copyright 1996, 1997, 1998 Lotus Development Corporation 55 Cambridge Parkway Cambridge, MA 02142 All rights reserved. Printed in the United States of America.
Contents Getting Started with Lotus LearningSpace . . . . . . . . . . . . . . . . . . v 3 Creating a Course with LearningSpace Central . . . . . . . . . . . 13 About this Guide . . . . . . . . . . . . . . . vii Adding the LearningSpace Central database icon to your Notes workspace . . . . . 1 Getting Started . . . . . . . . . . . . . . . . 1 .............. Roles of LearningSpace participants . . . . . About creating a LearningSpace course . . .
Automatically upgrading the course databases . . . . . . .......... Creating new local replicas of the upgraded course databases . . ....... Instructing students to recover their private documents . . . . . . . . ...... Upgrading a Release 2.0 Design Library . . 29 30 30 31 5 Administering a Course with LearningSpace Central . . . . . . . . . . . 33 About using Central to administer a course .............. Deferred creation of course databases . . . . . . Adding database icons to your workspace . .
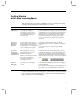
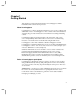
Getting Started with Lotus LearningSpace This chart presents roles and responsibilities for those creating, developing, teaching, and participating in LearningSpace™ courses. LearningSpace Role Responsibilities Lotus Notes® Administrator The Notes™ administrator is responsible for creating new LearningSpace courses and for managing the databases on your server, including student and instructor access. Where to find information . . .
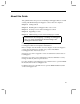
About this Guide This guide describes the process for installing LearningSpace Release 2.5 and creating and administering LearningSpace courses.
Chapter 1 Getting Started This chapter provides general information on LearningSpace and the installation and course creation processes. About LearningSpace LearningSpace is a Notes application that allows you to create, conduct, and administer courses. A LearningSpace course consists of five Notes databases. Together, they provide an interactive environment for teaching and taking courses. LearningSpace Release 2.5 (R2.5) requires a Notes Domino 4.5x or 4.6x server.
Designer – Designs the content, flow, and appearance of the course. Instructor – Conducts the course; interacts with students. Student – Participates in the course. Note The instructor frequently assumes the role of designer. This guide and LearningSpace Help assume that the role of instructor and designer are combined and refer to them both as “instructor.” About creating a LearningSpace course The core LearningSpace application comes in the form of five Notes template databases (.nsf).
Set the LearningSpace Admin group to have “Create new databases” permission on the server on which the LearningSpace files will be installed. Set the LearningSpace Admin group to have “Create new replicas” access to the servers on which replicas of the course databases will be created. For more information about becoming a member of the LearningSpace Admin group in the Name & Address book, see “Assigning access to LearningSpace files” in Chapter 2.
Notes client software Notes Release 4.51 or higher Web browsers Netscape Navigator 3.x, 4.x, Microsoft Internet Explorer 4.x Note Instructor and administrator tasks require that you access a course using a Notes client rather than a Web browser. What’s on the LearningSpace CD? The LearningSpace CD contains the five LearningSpace template databases, a template for course packs, and a number of other Notes databases. The names of the template databases are: schedule.nsf – Schedule mcenter.
customize design aspects of LearningSpace databases. For information about using the customization library databases, see the LearningSpace on-line Instructor Help. install.nsf and upgrade.nsf – These databases allow easy installation of the LearningSpace files. The Install database is used for initial installation of the LearningSpace files. The Upgrade database is used to upgrade existing LearningSpace 2.0 files to Release 2.5. relnotes.
The LearningSpace Instructor Guide and on-line Instructor Help include the following chapters/categories: LearningSpace Instructor Guide Working with a course The LearningSpace Welcome page Designing a Course Schedule Adding Course Materials to the MediaCenter Creating and Maintaining Participant Profiles Using the CourseRoom Creating and Modifying Assessments Grading Changing Course Attributes Managing Course Enrollment Administering a Course Customizing Course Database Design W
Chapter 2 Installing the LearningSpace Files onto a Server This chapter contains information on how to prepare your environment for LearningSpace and how to install LearningSpace files onto a server. If you are upgrading from Release 2.0 to Release 2.5 If you are upgrading to LearningSpace Release 2.5, delete the Release 2.0 template files before installing the Release 2.5 templates on the server hard drive. The files you should delete from the server are: schedule.ntf mcenter.ntf assess.ntf croom.
Shut down and restart the Notes server process Before beginning the installation, shut down the Notes server process and restart it. Perform this step from the server, not from a workstation. 1. At the server console, type exit and press ENTER. The server shuts down. 2. Double-click the Notes Domino icon to restart the server. Open Install.
3. Enter the name of the LearningSpace Installation directory. The LearningSpace Installation directory is the subdirectory of the Notes data directory where LearningSpace Central resides. All courses that are administered through Central and all related files reside in subdirectories of the LearningSpace Installation directory that you name. If you will only be using one LearningSpace Central on this server, it is recommended that you name the Installation directory “lspace.
Later, when creating LearningSpace courses, you will use Central to save each new set of course databases in a separate subdirectory under the LearningSpace Installation directory.
Update server document To enable proper Web client access to the server, you have to update the server document as follows. 1. Open the Name & Address book on the server where you are installing LearningSpace. 2. In the Server\Servers view, open and edit the server document for the server where you are installing LearningSpace 3. Open the Agent Manager section of the server document. 4. In the Run restricted LotusScript™ agents field, enter Lotus Notes Template Development/Lotus Notes 5.
5. In the Description field, enter Access to LearningSpace Central. 6. In the Members field, enter your name and those of any others who will be using Central to create and administer LearningSpace courses. If your site uses hierarchical names, use the person’s full hierarchical name. For example: Sandy Bingham/Acme/Education. 7. Save and close the document.
Chapter 3 Creating a Course with LearningSpace Central This chapter describes the process of using LearningSpace Central to create LearningSpace courses. Note It is recommended that you perform the procedures in this chapter from a workstation connected to the server where LearningSpace is installed rather than from the server itself.
About creating a new course using Central To use Central to create a course, you must: Be a member of the LearningSpace Admin group in the server Name & Address book or be entered in the Access Control List (ACL) for Central as a Manager with the [InstructorStaff] role selected. For more information, see “Assigning access to LearningSpace files” in Chapter 2. (As a member of the LearningSpace Admin group) have “Create new database” access to the server.
If you make a mistake or want to review the options you selected, you can return to previous dialog boxes by choosing “Back” and clicking OK. Creating a new course 1. Open LearningSpace Central. If this is your first time opening Central, a banner appears with information about Central. Press the ESC key to close the banner. 2. Click the Administrator Tools button. 3. Click Create New Course. When asked if you have a valid license, click Yes if you have a valid license to create a LearningSpace course.
New Course Options 1. Select an option for how you want to create the course. Create new blank course – creates a course from the LearningSpace templates. The course is created with whatever options you specify and has no documents. Create from CoursePack – creates a course from a “packed” course. The new course inherits all the settings and documents in the packed course. A CoursePack is a course that was created and saved for distribution.
customization library. The new design library will be based on the existing default design library, so whatever changes you have made to the default library will serve as the starting point for the new library. Note The design of the new course will not be updated with the design library until the template refresh process is run on the server. Usually, this takes place overnight.
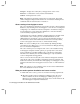
Course Information The following is the Course Information dialog box: 1. In the Name of Course field, enter the full name of the new course. For example: Time Management Skills 2. In the Title for Databases field, enter the name you want to appear on the database icons for the new course. The name is limited to a total of 20 characters, including spaces.
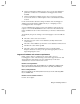
Course Locations The illustration shows the Course Locations dialog box: 1. In the Default directory field, enter the subdirectory where you want the course to be stored. When LearningSpace was installed, a subdirectory was created under the Notes data directory. Typically, the name of this subdirectory is “lspace,” however you could have named it differently. In LearningSpace documentation, this directory is referred to generically as the LearningSpace Installation directory.
3. If this course will not be using assessments, deselect the “Enable Assessment Manager?” option. Otherwise, leave this option selected. Tip If you are not sure whether instructors will want to use the utilities in the Assessment Manager, accept the default setting. Instructors can change this option later. 4. Click OK. Schedule options 1. Choose a Schedule structure option. The word you select is used in the Schedule database to label each unit of the schedule.
MediaCenter option 1. If you want to enable the course designer to allow students to create or join discussions from MediaCenter documents, leave the “Show Start/Join Discussion buttons” option selected. Otherwise, deselect this option. 2. If you want students to be able to create their own annotations to MediaCenter documents, leave the “Show Annotations buttons?” option selected. 3. Click OK.
Course Access 1. In the Administrators Names list, enter the names of administrators for the course. Separate each name with a comma. Click the pop-up list button to select names from the Name & Address books. You can select individual or group names, and then click the Add button. Click the pop-up list button at the top to switch between Name & Address books. Administrators are given access to Central and all the course databases. This access is not available to other users.
To add instructors to a course, they must first be listed in the Name & Address book on the server. You do not have to add instructors to a course now. For more information about adding instructors to a course once a course has been created, see “Managing course enrollment” in Chapter 5. Instructors can see views and access options in course databases that are hidden to students. 3. Click the Instructor Access list to change the default access level for instructors.
Additional options 1. In the “Servers to Install Course on” field, enter the names of each server where the course databases will be replicated. Separate each server name with a comma. If your site uses hierarchical names, make sure you use the full hierarchical name for each server (for example: ServerWest/Acme/Education). Click the pop-up list button to select servers from the Name & Address books.
Summary The Summary dialog box allows you to review the options you selected in the course creation procedure. Click the Course Description button to see the course description (unless you deferred its creation). Click the Names buttons to see the list of administrators, instructors, or students. To create the course, click OK. LearningSpace creates the course based on your specifications. This may take a few minutes.
If you chose not to add the course database icons to your workspace, you can do so at any time (assuming you have created the course databases). For more information, see “Adding database icons to your workspace” in Chapter 5. Once you have created the course databases, course instructors can use the databases to create the contents of their courses.
Chapter 4 Upgrading a Course This chapter describes how to upgrade courses created using LearningSpace Release 2.0. Upgrading a Release 2.0 course These are the steps you must perform to upgrade a Release 2.0 course to Release 2.5: Shut down and restart the Domino server. Install the new versions of the LearningSpace files on the server. Replace the design of your existing Central.
Installing LearningSpace files on the server If you haven’t already done so, install the latest LearningSpace files onto your server. The following procedure works for Notes clients and servers running OS/2, Windows 95, or Windows NT. Note for users installing from a UNIX Notes client: Before you can install the LearningSpace files using a UNIX Notes client, you must perform the procedure described in a text file called install.txt. The text file is included on your LearningSpace CD.
3. Select your server as the template server. This will give you a list of template files to use. Scroll down to the LS Central R2.5 template. 4. From the list of templates, select the LS Central R2.5 template. 5. Click Replace. You will be prompted with a warning that the design will be changed. 6. Click Yes. Replacing the design of the Multimedia Library Make sure you are using the latest version of the LearningSpace Multimedia Library. 1.
4. Choose Actions - Replace with current template. This runs an automatic process that upgrades the design templates of the course databases to Release 2.5. 5. When the warning appears, read it, and then click OK. 6. Click OK when the message appears with a reminder about adding administrators. Creating new local replicas of the upgraded course databases The upgrade process changes the replica ID of the course databases.
3. In the Discussions view, select the private documents you want to copy to the upgraded course. For multiple selections, hold down the SHIFT key as you click on documents. 4. Choose Edit - Copy. 5. Close the database. 6. You can now remove the old database icon from your Notes workspace. Choose Edit - Clear, and then click Yes, to remove the old database icon. 7. Choose File - Database - Open and add the new CourseRoom database icon to your Notes workspace.
Chapter 5 Administering a Course with LearningSpace Central This chapter provides information about using LearningSpace Central to perform a variety of administrative functions. To perform the procedures in this chapter, you must be either an administrator for the course or an instructor with Manager access to the course databases. For more information on assigning roles for a course, see “Assigning instructor and administrator roles” in this chapter.
Set the LearningSpace Admin group to have “Create new database” access to the server. “Create new database” access is set in the server document in the server Name & Address book. For more information, see the Notes Administrator’s Guide. 1. In Notes, open LearningSpace Central. 2. Click the Administrator Tools button. Courses without course databases are labeled with a red “x” in the “Exists on Server” column of the list. 3.
Adding database icons to your workspace If you chose not to add the course database icons to your workspace during the automatic course creation process, you can do so later using Central. Note You can also perform this operation manually. For more information, see Notes Help. 1. In Notes, open LearningSpace Central. 2. Click the Administrator Tools button. 3. Select the course for which you want to add database icons to your workspace. 4. Click the Course Tools button. 5.
3. Set the “Check passwords” option to Enabled. 4. (UNIX servers only) In the HTTP Server section of the document, enter the common name of the server in the Host Name field. Make sure you use the exact case when entering the server name. The “common name” is the server name without the hierarchical parts. For example, if the hierarchical name of the server is ServerOne/ACME/Marketing, the common name would be “ServerOne.” 5. Save and close the document. In the NOTES.
Tip If you are not sure of the scope of a particular instructor’s role in a course, assign Editor access. If it becomes apparent that expanded access is needed, you can change the access level at any time. For more information, see “Assigning instructor and administrator roles” in this chapter. Assigning instructor and administrator roles You assign instructor and administrator roles by placing participant names in the Instructor and Administrator lists in the Course Profile document in Central. 1.
7. If the instructor will be performing administrative or course design tasks in addition to facilitating the course, select Manager from the Instructor Access pop-up list. Otherwise, select Editor. Tip If you are not sure of the scope of a particular instructor’s role in a course, assign Editor access. If it becomes apparent that expanded access is needed, you can change the access level at any time. 8.
Creating an open or closed course environment 1. In Notes, open LearningSpace Central. 2. Click the Administrator Tools button. 3. Select the course you want to modify. 4. Click the Edit Course button. The Course Profile document opens. This document lists the current values of the course attributes. 5. Click the icon to the left of the Additional Options section. 6. Select an option in the Default Access field. Open course environment: Select Author or Reader.
Managing course enrollment In a closed course environment, all course participants must be enrolled in the course. All participants accessing a course in a closed environment, whether they access the course using Notes or a Web browser, must be listed in the Name & Address book. The Name & Address book is the source from which you draw names for the course enrollment.
over the Web are prompted to enter their name (as it appears in the User Name field in the Name & Address book) and their password (as it appears in the HTTP password field). Important Make a written record of all HTTP passwords you assign. When you save the Person document in the Address book, it will be encrypted. You must have a written record to supply participants with their passwords. 8. (Optional) If the information is available, fill out other fields in the document. 9. Click Save. 10. Click Close.
You can also type a participant name into the list. Make sure you enter the participant’s user name as specified in the Name & Address book. Enter one name per line. If your site uses hierarchical names, make sure you enter the participant’s full hierarchical name. 7. Repeat Step 6 until all the names have been added. 8. Click OK. 9. Click the Close button. Removing students from a course 1. Open LearningSpace Central. 2. Click the Administrator Tools button. 3.
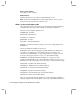
LearningSpace Modules — Access and Uses Course Participant Schedule MediaCenter CourseRoom Profiles Checks and tracks Accesses items in the Participates in course Collaborates on team Edits his or her own Student, employee, trainee Course Instructor Trainer, instructor, professor assignments Receives instructions from instructor Completes assessments and surveys Receives course updates Navigates between databases Navigates through course assignments and activities Chooses