Lotus Learning Management System R1 ® Version 1.0.
Disclaimer THE INFORMATION CONTAINED IN THIS DOCUMENTATION IS PROVIDED FOR INFORMATIONAL PURPOSES ONLY. WHILE EFFORTS WERE MADE TO VERIFY THE COMPLETENESS AND ACCURACY OF THE INFORMATION CONTAINED IN THIS DOCUMENTATION, IT IS PROVIDED “AS IS” WITHOUT WARRANTY OF ANY KIND, EXPRESS OR IMPLIED. IN ADDITION, THIS INFORMATION IS BASED ON IBM’S CURRENT PRODUCT PLANS AND STRATEGY, WHICH ARE SUBJECT TO CHANGE BY IBM WITHOUT NOTICE.
List of Trademarks IBM, the IBM logo, AIX, AS/400, DB2, LearningSpace, LearningSpace Forum, IBM Directory Server, RS/6000, iSeries, xSeries, MQSeries, Cloudscape, Netfinity, OfficeVision, OS/2, OS/390, OS/400, S/390, Tivoli, WebSphere, 12-3, cc:Mail, Domino, Domino Designer, Freelance Graphics, iNotes, Lotus, Lotus Discovery Server, Lotus Enterprise Integrator, Lotus Mobile Notes, Lotus Notes, Lotus Organizer, LotusScript, Notes, QuickPlace, Sametime, SmartSuite, and Word Pro are trademarks or registered tr
Contents Prerequisites for installation .....................................................................................................................1 LMS Installer ...............................................................................................................................................1 Create and Populate Databases ..............................................................................................................14 Configure WAS .....................................
iv IBM Lotus LMS Release 1 Quick Install Guide
IBM Lotus LMS Quick Install Guide This guide provides a summary of the installation process for LMS 1.0.2. For complete information and instructions, see the Installation Guide. Prerequisites for installation • WebSphere Application Server http://www-3.ibm.com/software/webservers/appserv/was/library/index.html The IBM Lotus Learning Management System (LMS) server requires the WebSphere Application Server (WAS) 5.0 core.
1. Allows the user to select which components to install. The user can install any combination of the following: Learning Management Module (LMM) server application, the Delivery Server (DS) application, LMS Authoring Tool, and/or LMS utilities (command-line import and rostering utilities). 2. 3. Prompts the user for the following information, depending upon which components are selected: • LDAP settings (URL, base distinguished name (DN), username and password, provider).
Installer Details The following example illustrates the installation of both the LMM and DS applications on a single Windows 2000 machine. The LDAP directory is an IBM Directory Server 4.1. 1. Language Select language and click on OK. On the Welcome page, click on Next to continue. Read and accept the Software License Agreement. Click on Next to continue. 2. Feature Selection Select desired features of the LMS.
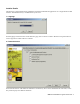
3. LDAP Settings In this example, the LDAP server is on port 389 of tigris-dev1.acme.com. The Base DN is o=acme and the LDAP user name is lmsadmin. The LDAP user name must exist in the LDAP directory within the specified base. This user requires the ability to read the entries of all the users in the base and does not have to be either the LDAP administrator or a WAS administrator. The Test LDAP Connection button will confirm that your LDAP settings are correct. Click on Next to continue.
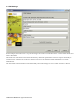
4. LMS Server Settings The LMS Server Settings capture information for the Learning Management Module application. Enter the base URL of the LMM application which includes the base url of the LMM application server and a context root of "lms-lmm" for the LMM application. The context root will always be "lms-lmm" and cannot be changed. Optionally enter a description for the application. Enter a user name and password which will allow the DS server to authenticate with the LMM application.
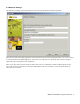
5. Administrator Settings The Administrator Settings capture information about which user or group should receive Administrator access to the LMM application upon installation. Select the Administrator role type and specify a user or group that will receive administrator access to the LMM application. An LMS Administrator has administrative rights to the LMS and can perform tasks such as User and Content Management and Settings. In this example, the user specified in the LDAP settings, lmsadmin, is used.
6. Content Management Settings The Content Management Settings identify where course content is stored when imported into the LMM, the FTP username and password if the content will be deployed via FTP to the Delivery Server and the Notification email format. Note: Set up and configuration of FTP servers is not covered in this guide. If FTP is to be used for content deployment (see Content Deployment Settings), FTP must be set up and configured separately for each content server.
7. Delivery Server Settings The Delivery Server Settings capture information for the Delivery Server application. Enter a string to identify this Delivery Server to the LMM application. Enter the base URL of the DS application which includes the base url of the DS application server and a context root of "lms-ds" for the DS application. The context root cannot be changed. Optionally enter a description for the application.
8. Web Server Settings The Web Server Settings capture information about the location of deployed content and the location of the tracking servlet. Enter the URL of deployed content. This url points to a location on the Content server where course content will be deployed when an offering is created. The Delivery Server looks for the content at this location when launching a course.
9. Content Deployment Settings The Content Deployment Settings allow you to specify the type and location of deployed content. There are two ways in which content is deployed to the content server either via FTP or through a filesystem copy. For FTP, as in the example above, you would select a deployment type of FTP, enter the location relative to the FTP root where content will be placed and the FTP host. The location is a directory that has been setup under the FTP server's root directory.
10. System Administrator E-mail Settings The System Administrator E-mail settings allow you to specify an email address that will receive notifications from the system and an email address that appears as the From email address on these notifications. Enter the system administrator's email address. Enter the email From address. Click on Next to continue.
11. Install path This setting specifies the directory path to where install files will be written. To choose the default installation directory, click on Next to continue. Otherwise, enter the installation destination path or click on Browse to navigate to the install directory. Click on Next to continue.
12. Confirmation Review the summary. Click on Next to proceed with the Installation.
13. Finish Click on Finish to close the LMS Installer. Create and Populate Databases The LMS server uses 3 databases: 1. LMM application database (LMM server only) 2. audit database (LMM server only) 3. DS application database (one on each DS server) The LMS Installer generates database scripts for creating the databases, as well as scripts to create the database schema (tables, views, indices) and to populate the tables in each of the 3 databases.
The database schema and seed data scripts need to be run against the 3 databases as follows: DB2 audit\audit_db2.sql, audit\audit_data.sql ds\ds_db2.sql ds\ settings_init_ds.sql lmm\lmm_db2.sql lmm\permission_data.sql lmm\settings_init.sql MSSQL audit\audit_mssql.sql, audit\audit_data.sql ds\ds_mssql.sql ds\settings_init_ds.sql lmm\lmm_mssql.sql lmm\ permission_data.sql lmm\settings_init.sql Oracle audit\audit_oracle.sql ds\ds_oracle.sql lmm\lmm_oracle.
The LMS Installation Guide provides instructions for update the Web server plug-in. Start LMS Applications After the preceding steps have been performed, the LMS is ready to be started. The Application Servers and Enterprise Applications can be started using the WAS Administrator console. The LMS administrator will typically perform additional LMS configuration, using the LMM UI, before making the LMS available for general use. Configure LMS Log into the LMM as an LMS administrator user.
LMS Content Deployment Step By Step 1. The authoring tool ftp's the content package (.zip) to an ftp server. 2. The authoring tool sends a request to the Content Manager to import the package 3. The Content Manager imports the package from the ftp server and extracts the contents of the package under the "packages" directory. 4. A master and offering are created on the LMM. The LMM sends the offering to the DS. 5. The DS sends a request to the LMM to push the content to the Content/HTTP Server.
• The default Document root for the HTTPServer can be modified in the httpd.conf file under the HTTPServer\conf directory. • For the best performance, you would want your content to live on your content (http) server. Also see the article "Deploying Content in the Lotus Learning Management System" at: http://www10.lotus.com/ldd/today.nsf/a2535b4ba6b4d13f85256c59006bd67d/440c186baa9b2f9a85256cd7004b83a4?OpenDocu ment LDAP Settings Sample WAS LDAP settings for IBM SecureWay 3.2, IBM Directory Server 4.
Printed in USA