
- IBM switch Users and Maintenance Guide
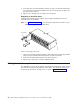


3. If the latch does not automatically lock when you have successfully inserted the
fan unit into the bay, pull back slightly on the fan and then push it in again until
the latch snaps into place.
4. Repeat step 1 through step 3 to replace the second fan.
Replacing a hard disk drive
Complete the following steps to replace the hot-swap hard disk drives that you
removed before the installation.
Note: Use Table 19 on page 119 to verify the proper replacement locations of your
DS4000 1.5 Gbps SATA hard disk drives.
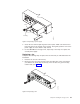
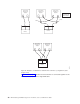
1. Lift up on the handle and gently push the drive CRU into the empty bay until the
hinge of the tray handle latches beneath the storage server bezel.
2. Push the tray handle down until the latch clicks into place.
3. Repeat step 1 and step 2 to replace additional drives.
Setting the interface options
The DS4100 has two server ID switches that identify the DS4100 on a fibre-channel
loop and that assign physical addresses to the drives. The server ID switches are
located on the back of the storage server, as shown in Figure 22 on page 33.
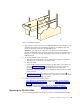
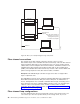
Tray handle
f10ug055
Figure 21. Removing a drive CRU
32 IBM TotalStorage DS4100 Storage Server: Installation, User’s, and Maintenance Guide