
- IBM switch Users and Maintenance Guide
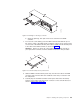
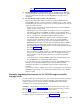


b. Grasp the pull-rings; then pull on the levers and remove the RAID
controller.
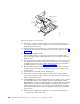
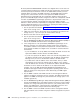
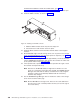
7. To access the cache battery, place the RAID controller CRU bottom up on a
flat surface. Using a #2 Phillips head screwdriver, remove the six screws (three
on each side of the RAID controller) that hold the RAID controller bottom panel
to the sides of the RAID controller, as shown in Figure 75.
Attention: Before you move the cache battery from your old controller to
your replacement controller, read the detailed instructions in this procedure.
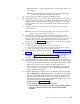
8. Slide the RAID controller bottom panel away from the front side of the RAID
controller (away from the SFP slots and black center latch) to unlatch it from
the side panels.
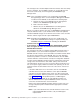
9. Carefully flip over the RAID controller bottom panel. Disconnect the battery
harness on the battery from the two-pin connector on the controller board, as
shown in Figure 76 on page 100.
f10ug033
Figure 74. Pull-rings for removing a controller
f10ug035
Figure 75. Controller battery-access panel screws
Chapter 5. Installing and replacing components 99