
- IBM switch Users and Maintenance Guide

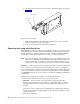
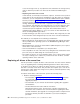


a. Release the latch on the drive CRU by pinching together the blue line on the
tray latch and the finger hole on the tray handle, as shown by the arrow in
Figure 63 on page 82.
b. Pull the tray handle out into the open position.
c. Lift the drive CRU partially out of the bay.
d. To avoid possible damage to the drive, wait at least 70 seconds before fully
removing the drive CRU from the storage server to allow the drive to stop
(spin down).
e. Verify that there is proper identification (such as a label) on the drive CRU,
and then slide it completely out of the storage server.
3.
Install the new drive CRU:
a. Gently push the drive CRU into the empty bay until the hinge of the tray
handle latches beneath the storage server bezel.
b. Push the tray handle down into the closed (latched) position.
4. Check the drive LEDs:
v When a drive is ready for use, the green Activity LED is either on
continuously or rapidly flashing, and the amber Fault LED is off.
v If the amber Fault LED lights and is not flashing, remove the drive from the
unit and wait 10 seconds; then, install the drive again.
5. If the drive is part of a defined RAID array, the array reconstruction (without
hot-spare) or copy-back (with hot-spare) operation automatically starts.
6. Use the DS4000 Storage Manager software GUI to verify that the drive is
shown in the Storage Subsystem Management window.
Upgrading drives
You can upgrade drives in the following two ways:
v By adding drives to empty slots in the storage server (see “Installing hot-swap
hard disk drives” on page 80)
v By replacing existing drives with larger capacity drives
Adding larger-capacity drives
This section provides guidelines for upgrading the drives in the storage server.
Read the software documentation and this entire section to determine if you should
use this procedure, use a modified version of this procedure, or use a different
procedure that is provided by your operating system. Instructions that are provided
with your software should supersede anything stated in this document.
Attention: After you remove a drive CRU, wait at least 70 seconds before
replacing or reseating the drive CRU to allow the drive to properly spin down.
Failure to do so may cause undesired events.
There are two methods for upgrading drives:
v Replacing all the drives at the same time
This method requires that you back up the data on the affected drives and then
turn off the storage server. After replacing all the drives, you must reconfigure the
new drives and restore data from backup. See the procedure in “Replacing all
drives at the same time” on page 84.
This is the safest way to exchange drives without losing data. However, this
method might take a long time to complete because of the backup,
reconfiguration, and restoration processes. In addition, other users are not able
Chapter 5. Installing and replacing components 83