
Owner manual


49
9. Installation
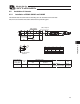
9.4 Installation of the Load
Please attach the load to the device using the tap holes in the slider.
The process for attaching these to the main unit is similar to the installation process of the main
unit. Use of high-tension bolts meeting at least ISO-10.9 standard is recommended for mounting.
The table below shows the recommended tightening torque.
There are two reamed holes on the slider, so if you need to be able to secure and detach the load
multiple times, please use these holes. Also, if you require precision in your attachment, such as a
right angle, use one of the reamed holes to make fine adjustments.
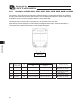
* When using reamed holes, we recommend using an H7 pin. Also, do not force the pin into
the hole. Instead, press it gently in until it fits.
For exact thread depth and reamed hole depth, please see the table below.
Do not tighten the mounting screws to a torque beyond the applicable torque specified in the table
below. Doing so may damage the tapped holes.
Mounting bolt
Model A B C D E
Nominal thread size Tightening torque
SA3 17 11 17
2H7,
depth 5
M3 D6 M3
0.83 N-m
(0.085 kgf-m)
SA4 20 14 21
2.5H7,
depth 5
M3 D6 M3
0.83 N-m
(0.085 kgf-m)
SA5 26 14 22
2.5H7,
depth 5
M4 D8 M4
1.76 N-m
(0.18 kgf-m)
SA6 31 15 25
3H7,
depth5
M5 D10 M5
3.42 N-m
(0.35 kgf-m)
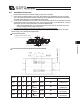
A
reamed pitch: 0.02)
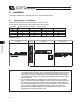
RCA2-SA3C/SA4C/SA5C/SA6C/SA3R/SA4R/SA5R/SA6R
RCA2-SA2AC/SA2AR
15 (
Reamer pitch tolerance
p
0.02)
103
3 3
12
7.5
5
7.5
4-M2, Depth 4
2-
F
2H7, Depth 2