XMP‐6400 (IAD‐16000) Hardware User Manual
Contents Introduction 1 1.1. Package contents 1 1.2. Installation 1 1.3. Physical view 2 1. 2. Technical Data 2.1.
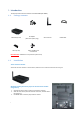
1. Introduction This document describes the hardware of the XMP‐6400 (IAD‐16000). 1.1. Package contents Media Player Unit Velcro (2 sets) AC Adapter (with select power plug) Wi‐Fi Antenna HDMI Cable Power and Micro SD card brackets NOT INCLUDED: A USB mouse is required for system setup 1.2. Installation Attach wireless antenna Attach the wireless antenna as shown below, and then screw antenna clockwise onto the post.
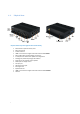
1.3. Physical view Physical features (left to right in above illustration) i Reset button to perform factory reset Micro SD card slot 3.5mm Audio out HDMI 1.
2. Technical Data 2.1.
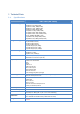
Safety UL/FCC/CE Certifications CE/FCC/RoHS Warranty One‐year limited parts & labor Firmware User Manual Firmware version – 1.
Contents Firmware User Manual 4 1. 1 Introduction 1.1. 2. Features Configuring the Player 1 1 2.1. System connections 1 2.2. Basic settings 2 2.3. Connect the player to your network 3 2.4. Time zone settings 7 2.5. Content settings 8 2.6. Player Information 9 2.7. Content configuration – AppStart 10 2.8. Content configuration – FailSafe 10 2.9. Content configuration – EasyPlay 11 2.10. Display settings 14 2.11. Sound settings 17 2.12.
3. Introduction This document describes the basic operation of the player and frequently asked questions. 3.1. Features This is a Full HD 1080p high definition digital signage player featuring industrial grade mechanical design and versatile open‐standard HTML5 and SMIL programmability. Support for HTML5 widgets for dynamic content (W3C Widgets standard) Industry leading W3C SMIL support for developers Full HD 1080p hardware decoding of MPEG1/2/4, H.
After boot‐up completes, player will stay in Basic settings menu if no content service has been configured (i.e. first boot‐up for brand new unit or after a factory reset).If you have already set content into the player, contents will play back automatically after 15 seconds after boot‐up. 4.2. Basic settings You must attach a USB mouse to the player to configure settings. If the player has touch screen, then the USB mouse is not required, and all the click action can be replaced by tap action. (Fig. 2.2.
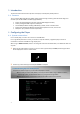
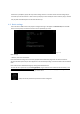
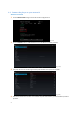
4.3. Connect the player to your network Wireless connection 1 Click the Wireless LAN setting to launch the wireless configuration UI. (Fig. 2.3.1) 2 Click the ON/OFF button as indicated below to turn ON Wireless interface (network). (Fig. 2.3.2) 3 The player will scan for wireless signals nearby and available access points will be listed. (Fig. 2.3.3) 4 3 Click on the network ID to connect. If the network requires authentication, you will be asked to provide a password.
(Fig. 2.3.4) Static IP – manually assign network IP address 1 Check the box that says "Show advanced options" (Fig. 2.3.5) Click down arrow to hide keyboard if needed. You can also scroll down/ swipe to see the rest of the menu. 2 Under IP settings, change DHCP to Static. (Fig. 2.3.6) 3 Fill the form and click Connect to complete the setting. (Scroll down/ swipe to see the rest of the menu if needed ) (Fig. 2.3.
Wired connection To use the wired Ethernet connection, connect an Ethernet cable. Ethernet connection takes higher priority. DHCP – automatically assign network IP address 1 Turn on Ethernet. If using DHCP, no further action is required. (Fig. 2.3.8) Static IP – manually assign network IP address 1 Click Static IP Settings to configure static IP address. (Fig. 2.3.9) Proxy settings 1 In Basic settings, click the Advanced button, advanced configuration menu will be launched. (Fig. 2.3.
(Fig. 2.3.11) 3 Proxy setting menu will be launched, input proxy hostname and port , then click Done to finish configuration. (Fig. 2.3.12) Show IP settings 1 2 In Basic settings, click the Advanced button, advanced configuration menu will be launched. (Fig. 2.3.10) 3 This feature is to control whether the IP address being displayed in Basic settings menu. This is default enabled. When disabled, Basic settings will display “connected” instead of IP address. Click Network, and then click Show IP.
(Fig. 2.3.14) 4.4. Time zone settings 1 Click Time zone. (Fig. 2.4.1) 2 Choose the correct time zone from the available options. (Fig. 2.4.
4.5. Content settings 1 Click the Set content button. (Fig. 2.5.1) 2 Input the SMIL/HTML5 content URL and click Set. It will return to Basic Settings automatically. (Fig. 2.5.2) 3 The player will check the availability of SMIL/HTML5 content URL, with the Play button showing Checking… The checking action can be canceled by clicking Checking… button, it will change back to Play. NOTE: It is highly recommended to let the player check the availability of the content URL.
4 If the SMIL/HTML5 content URL is available, the Play button will change to a 15‐second countdown and the playback will start after the countdown. The countdown can be canceled by clicking the button. If it keeps showing Checking… for a long time, please go back to Set content to check the correctness of the URL. (Fig. 2.5.4) 4.6. Player Information User can check the player’s basic information including the Health status, Firmware version, and Player ID.
(Fig. 2.6.2) 4.7. Content configuration – AppStart User can assign the URL and APP for execution right after the system starts up. 1 2 3 4 Click the Advanced button. (Fig. 2.6.1) Click on Content, and then click on AppStart. Enter the valid URL of HTML/SMIL in AppStart (Fig. 2.7.1). If you already configured SMIL/HTML5 content URL via ”Set content” (Fig. 2.5.2), the URL would be showed here. The Advanced option is used for 3rd‐party App configuration only. (Fig. 2.7.1) 4.8.
(Fig. 2.8.1) 4.9. Content configuration – EasyPlay The feature EasyPlay allows the player to play media content from the USB flash drive (or Micro SD card) directly. Please note media files does not copied to player’s internal storage, so USB flash drive (or Micro SD card) must not be removed. When EasyPlay is enabled, the player will play content only from the USB drive (or Micro SD card). If user wants to play content from the URL server configured via ”Set content”, EasyPlay must be disabled.
(Fig. 2.9.2) Configure Movie Mode 1 Click on Movie. Click on the button as marked in red below, and select the directory for movies from the USB drive. 2 3 Click Set button after the folder is selected. The files in the selected folders will be played after clicking the Play button in the Basic or Advanced settings menu. (Fig. 2.9.3) EasyPlay Schedule configuration 1 2 3 12 Click the Advanced button. (Fig. 2.6.1) Click on Content, and then click on Schedule.
(Fig. 2.9.4) 4 The "On" times assigned in the time slots A‐E are inclusive. For example, a schedule assigned as the example below: (Fig. 2.9.5) The exact playback time will be the time slots marked in blue as shown in figure 2.9.6. The dark blue parts are the overlap time of C/D and D/E. (Fig. 2.9.
4.10. Display settings Resolution settings (for media players) For best quality, set the output resolution to match your display’s native resolution to avoid image scaling and blur. If you are connecting an LCD computer monitor, projector, or plasma display, refer to the device specifications for optimal settings. 1 2 Click the Advanced button, advanced configuration menu will be launched. (Fig. 2.6.1) 3 Click on Resolution, and select suitable resolution from the popup menu.
Resolution and Dual Display (for signboards) The default Output mode is set to "Panel". (Fig. 2.10.4) With Output mode set to “Panel”, the signboard is ONLY displaying image on the panel. (Fig. 2.10.4) Signboards support output to panel and external monitor at the same time, to use this function, please: 1 2 3 Check “Enable dual display” in the Display menu. (Fig. 2.10.5) Connect signboard to a monitor via HDMI port Set the Output mode to a setting which best matches the monitor’s specification. (Fig.
Panel Brightness (for signboards) The default panel brightness is set to maximum, and it can be adjusted in the Display settings. 1 2 Click the Advanced button, advanced configuration menu will be launched. (Fig. 2.6.1) 3 Click on Brightness. 4 Drag the blue dot marked in red below to adjust the brightness. Click on OK to save the configuration. Click the Display/sound button, and then click on Display. The Display Settings page will be launched. (Fig. 2.10.1) (Fig. 2.10.7) (Fig. 2.10.
(Fig. 2.10.9) 4 Click on the preferred angle from the menu. (Fig. 2.10.10) 4.11. Sound settings To control the output sound volumes and touch sounds: 1 2 Click the Advanced button, advanced configuration menu will be launched. (Fig. 2.6.1) Click the Display/sound button, and then click on Sound. The Sound Settings page will be launched. (Fig. 2.11.1) 3 17 Click on Volumes, the Volumes settings page will be launched.
(Fig. 2.11.2) (Fig. 2.11.3) 4.12. System configuration – Player name The player’s name can be specified so the player can be easily recognized in the management software. (Management software support is required) 1 2 3 Click the Advanced button, advanced configuration menu will be launched. (Fig. 2.6.1) Click on System, and click on Player name. Input a name for the field and click Set. (Fig. 2.12.1) 4.13.
1 2 3 Click the Advanced button, advanced configuration menu will be launched. (Fig. 2.6.1) Click on System, and click on Security. Input a password in the field and click Set. (Fig. 2.13.1) 4.14. System configuration – Time Server The feature allows user to synchronize player’s time with the web server where the appStart URL hosted, disabled by default. When disabled, player synchronize it’s time with Android default time server( ntp.pool.org), this requires internet connection.
1 2 3 4 Click the Advanced button, advanced configuration menu will be launched. (Fig. 2.6.1) Click on System, and click on Scheduled Reboot. Click the Enable daily reboot button as marked in red below to enable/disable the daily reboot function. Click on the dialogue box to set the time. The value can be inputted with the pop‐up keyboard or the USB keyboard. Click on Set to save the setting. (Fig. 2.15.1) 4.16.
(Fig. 2.16.2) 4.17. System configuration – Expansion storage User can add extra Micro SD card to replace its internal storage, please note when internal storage being replaced, player use only the extra Micro SD card as main storage, internal storage will not be used. Manual Expansion 11 Power off device. 12 Insert Micro SD card and then plug in power cord to power on. 13 In the Basic settings menu, click the Advanced button, advanced configuration menu will be launched. (Fig. 2.6.
(Fig. 2.17.3) Auto Expansion 16 In the Basic settings menu, click the Advanced button, advanced configuration menu will be launched. (Fig. 2.6.1) 17 Click on System, click on Expansion storage and enable auto‐format. (Fig. 2.17.4) 18 Power off device. 19 Insert Micro SD card and then plug in power cord to power on. 20 After boot up, check player information and new capacity will be displayed.(Fig 2.17.3) 4.18.
Using a USB mouse System reset will re‐initialize the system, clear passwords, and return settings to their default values. Perform the following: 25 2 3 4 CONNECT a USB mouse or using touch screen for input. Click the Advanced button, advanced configuration menu will be launched. (Fig. 2.6.1) Click on System configuration, and choose Factory default. Click on OK button to perform the system reset. (Fig. 2.18.1) 4.19.
5. Content Management The player is designed to work with 3rd party management solutions. Please refer to the printed guide for related set up instructions. 6. Authoring in HTML5 A major advancement in the player is the ability to playback HTML5 content which can contain dynamic information. To find out more about using HTML5 for digital signage, visit http://www.digisignage.com/ 7. Working with SMIL The player uses open communications protocols for content presentation and playback control.
How do I manage the playback of contents? The media appliance is designed to be interoperable with leading 3rd party management software solutions or via SMIL open standard commands. Could the player display Flash or Microsoft PowerPoint presentations? The player features limited PowerPoint support, but not Flash support. While PCs can play many formats with varying degrees of success, RISC‐based media players are designed to reliably play specific video formats (see spec for details).
Federal Communications Commission (FCC) Statement 15.21 You are cautioned that changes or modifications not expressly approved by the part responsible for compliance could void the user’s authority to operate the equipment. 15.105(b) This equipment has been tested and found to comply with the limits for a Class B digital device, pursuant to part 15 of the FCC rules. These limits are designed to provide reasonable protection against harmful interference in a residential installation.
Canadian Notice This device complies with Industry Canada license-exempt RSS standard(s). Operation is subject to The following two conditions: (1) this device may not cause interference, and (2) this device must accept any interference, including interference that may cause undesired operation of the device. This device complies with the Canadian ICES-003 Class B specifications and RSS-247 of Industry Canada.