
Instruction Manual


3
Standard Accessories
¾ PRX-120VP Video/Power Balun for DVR site x 1 pc.
¾ Screws to fix camera housing x 4 pcs.
¾ L-Wrench screwdriver x 1 pc
¾ Bracket sticker label x 1 pc
¾ Menu x 1 pc
¾ OSD controller cable x 1 pc (Optional)
Setup the camera parameters by OSD menu
Plug OSD cable (Option) on the socket cable and there is a button on OSD cable for further configures camera parameters.
For options with
↲, press the button“↲”(Enter)to enter their respective setting pages.
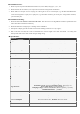
SETUP MENU OPTIONS
LENS AUTO
↲
TYPE DC/VIDEO
MODE OPEN/AUTO/CLOSE
SPEED 0~255
MANUAL
SHUTTER/AGC AUTO
↲
HIGH LUMINANCE MODE SHUT+AUTO IRIS
/ AUTO IRIS
BRIGHTNESS 0~255
LOW LUMINANCE MODE AGC/OFF
BRIGHTNESS ×0.25 / ×0.50 / 0.75 / ×1.00
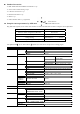
MANUAL
↲
MODE SHUT+AGC
SHUTTER 1/50
AGC 6.00/12.00/18.00/24.00/30.00/36.00/42.00/44.80
WHITE BAL ATW
↲
SPEED 0~255
DELAY CNT 0~255
ATW FRAME ×0.50 / ×1.00 / ×1.50 / ×2.00
ENVIRONMENT INDOOR / OUTDOOR
PUSH
USER1
↲
/
USER2
↲
B-GAIN / R-GAIN 0~255
ANTI CR
MANUAL
↲
LEVEL 015~056
PUSH LOCK
BACKLIGHT OFF/BLC/HLC
PICT ADJUST
↲
MIRROR OFF/ON
BRIGHTNESS / CONTRAST
/SHARPNESS /HUE / GAIN
0~255
ATR OFF
ON
↲
LUMINANCE LOW / MID / HIGH
CONTRAST LOW / MIDLOW / MID / MIDHIGH / HIGH
DAY/NIGHT AUTO
↲
BURST ON/OFF
DELAY CNT /
DAY→NIGHT/NIGHT→DAY
0~255
COLOR
B / W
↲
BURST ON/OFF
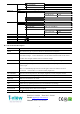
If you want to ……
Press
Enter the camera configuration OSD menu Press button
Move to the sub-menu you want
Push to↑ / ↓direction
Change setting
Push button to ← / → direction
Enter the configuration page of an option Press button
Press button to
enable OSD or Ente
r