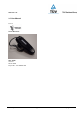
www.tuv.com 1.6 User Manual (Cover) i.Tech Arrow Lite User Guide Version 1 20-Jun-2006 Project No. : C51-A06001-XX Test Report No.
www.tuv.com [Inside Cover] i.Tech Arrow Lite Bluetooth Headset gives you more freedom when moving around. With your Bluetooth-enabled mobile phone, the headset makes it easy for you to carry on with your tasks while making a call. i.Tech Arrow Lite Bluetooth Headset is compliant with Bluetooth Version 1.2 Class 2 specifications, and is compatible with mobile phone supporting Bluetooth Headset or Handsfree Profiles. Test Report No.
www.tuv.com (Page 0) Contents Title i.
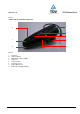
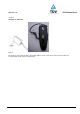
www.tuv.com (Page 1) Jawbone Bluetooth Headset Overview 1 6 2 3 7 4 8 5 - Figure 1 1 2 3 4 5 6 7 8 Ear Hook Status Indicator Multi-function Button (MFB) Earphone Volume Button Charging Socket Built-in Microphone Built-in Rechargeable Battery Test Report No.
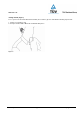
www.tuv.com Getting Started (Page 2) To use your i.Tech Arrow Lite Bluetooth Headset (“the headset”), please start with the following steps below: 1. Charge your headset, and 2. Pair your headset with a Bluetooth-enabled mobile phone. Figure 2 Test Report No.
www.tuv.com (Page 3) Charging Your Headset Figure 3 The headset comes with a built-in rechargeable battery. Prior to using the headset for the first time, it is recommended to fully charge the battery first. Test Report No.
www.tuv.com (Page 4) Insert the charger plug into the headset’s charging socket (refer to Figure 3) and plug the charger to an AC wall outlet. The status indicator will stay red during charging. IMPORTANT: Charging indication will be delayed for a few seconds if the headset has not been used for a long time or the battery is drained. Normal Charging Time It takes about three hours to fully charge the battery. When the battery is fully charged, the status indicator will turn blue and remain on.
www.tuv.com (Page 5) Turning Your Headset On and Off Turning On the Headset Press and hold the MFB for two seconds until you hear a short beep. The status indicator will then flash blue. IMPORTANT: Press the MFB again each time when you want to turn on the headset to re-activate pairing so as to resume the connection between the headset and the mobile phone. For pairing, please refer to “Pairing Your Headset” section.
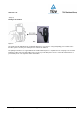
www.tuv.com (Page 6) Pairing Your Headset Figure 4 The headset works with Bluetooth-enabled mobile phones only. Prior to using and pairing your headset for the first time, please check if your mobile phone is Bluetooth-enabled. The pairing instructions for a typical Bluetooth-enabled mobile phone is explained on the next page. The headset pairing procedure may vary depending on the model of your mobile phone. Please contact the manufacturer of your mobile phone or its agent for further information.
www.tuv.com (Page 7) Pairing Your Headset 1. Place the headset and the mobile phone where they are no more than one metre apart. 2. Ensure the headset is off. (The status indicator does not flash.) 3. Press and hold the MFB until the headset’s status indicator flashes blue and red alternately. 4. Activate your mobile phone’s Bluetooth function. Please refer to your mobile phone user guide for details. 5.
www.tuv.com (Page 8) Using Your Headset Answering a Call When there is an incoming call, you will hear the ring through the earphone. Press the MFB once to accept the call or answer the call via your mobile phone in the normal way. Rejecting a Call If you do not wish to answer an incoming call, you can stop the buzzer ringing by pressing the volume key once. If you do not wish to be disturbed at all, you may consider resetting the mobile phone setting to restrict incoming calls.
www.tuv.com (Page 9) Using Your Headset Dialling from Your Mobile Phone Simply make calls on your mobile phone in the normal way. Voice Dialling from Your Headset If your mobile phone is equipped with the voice dialling function, simply press the MFB on your headset, and when you hear a beep say the voice tag. IMPORTANT: For voice dialling, you must record the voice tag (the person’s name) into your mobile phone first before using the voice dialling function.
www.tuv.com (Page 10) Adjusting the Volume Press the volume key repeatedly until you reach the desired volume level. The listening volume may be affected by the volume setting of the caller’s phone as well. Re-adjust the listening volume again when necessary. Resetting or Removing Pairing You may reset the headset to its original settings anytime. To do this you also clear all current pairing settings. 1. 2. 3. 4. 5. Ensure the headset is off.
www.tuv.com (Page 11) Care and Maintenance Headset Turn off your headset before placing it in your pocket or bag. If the MFB is accidentally depressed, your mobile phone may place an unintended call. Do not expose the headset to liquid, moisture or humidity as it is not waterproof. Do not use abrasive cleaners to clean the headset. Do not expose the headset to extremely high or low temperatures. Do not leave your headset under the hot sun for a long time.
www.tuv.com (Page 12) Built-in Battery Do not attempt to replace the headset’s battery as it is in-built and is not changeable. Charge the battery in accordance with the instructions supplied with this user guide. Use only the charger supplied by the headset’s original manufacturer to charge the battery.. Charger Use only the charger supplied by the headset’s original manufacturer to charge the headset. Other chargers may look the same, but they could be dangerous.
www.tuv.com (Page 13) Safety Information Check and observe local laws regarding the use of a mobile phone and headset while driving. If you use the headset while driving, ensure your full attention and focus. It is your responsibility to drive safely. Consider to pull off the road before making or answering a call. Never leave your headset above any air bag deployment area inside your car as serious injury may result when an air bag deploys.
www.tuv.com (Page 14) Troubleshooting If you are unable to connect your headset and mobile phone, please try the following: Ensure your the battery is fully charged. Turn off your headset, and then turn it on again. Ensure the headset is paired with your mobile phone. Ensure your mobile phone’s Bluetooth function is activated. (For some phone models, a headset icon will appear on the phone’s screen.) Please refer to your mobile phone user guide for specific instructions.
www.tuv.com Test Report No.
www.tuv.com (page 15) Declaration of Conformity (DOC) We, i.Tech Dynamic Ltd., declare that the following product: Product Name: i.Tech Arrow Lite Model No.: C51-A06001-XX Is in conformity with the following essential requirements of Council Directive 1999/5/EC (referred to as R&TTE Directive): Article 3.1a, 3.1.b and 3.2. and the product is manufactured in accordance with Annex II of the above directive. A copy of the Declaration of Conformity can be found at: Test Report No.
www.tuv.com (Page 16) Product Specifications Bluetooth Specification: Version 1.2 Class 2 Bluetooth Profile Supported: Headset and Handsfree Profiles Range of Frequency: 2.4GHz spectrum Dimensions: 56 mm (L) x 20 mm (W) x 26mm (H), TBD Nominal Charging Time: Within 3 hours Talk Time*: Up to 3 hours (TBD) Standby Time*: Up to 120 hours (TBD) Weight: 12.5 grams (TBD) *May vary due to the user’s habit, different modes of operation, and mobile phone settings. Test Report No.
www.tuv.com (Back Cover) © 2005 Hutchison Harbour Ring Enterprises Limited All rights in this publication are reserved and no part may be quoted or reproduced without the prior written permission of the company. The contents of this publication are believed to be correct at the time of going to print, but any information, specifications, products or services mentioned may be modified, supplemented or withdrawn without further notice. The Stylized i.
www.tuv.com Dispose of the packaging and this product in accordance with the latest provisions. Notes on Environmental Protection After the implementation of the European Directive 2002/96/EU in the national legal system, the following applies: Electrical and electronic devices must not be disposed of with domestic waste.
www.tuv.com Test Report No.