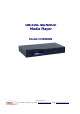
DIGITAL SIGNAGE Media Player Model: CMP2000N i-Tech Company LLC TOLL FREE: (888) 483-2418 • EMAIL: info@i-techcompany.com • WEB: www.i-techcompany.
CMP2000N Network Signage Player Users Guide Table of Contents: I. Introduction II. CMP2000NSpec and Components III. Evaluation Kit IV. Playlist and Operation V. Client Device Setup 1. 2. 3. 4. 5. Client board Installation Client Main Menu Client Setup Screen Remote Control Key Definition Scrolling Text Format VI. CAT Software 1. 2. 3. 4. 5. 6. 7. 8. 9. CAT.exe Tools Tab Account Sever Setup Playlist Editor Description Client Setup Graphics Command ICON: RSS Advantage Software Playlist Editor VII.
I. Introduction CMP2000N is a digital media player with networking capability. Utilizing an Ethernet connection or any other type of file transfer feature, all media content files can be downloaded from host content server to multiple networked players and stored onto a CF card. You can then playback your media files repeatedly according to playlist's file sequence and pre-defined time schedule. II. Board Spec and Components ■ CPU: 32 bits RISC and 64 bits DSP dual processors (ES6425) ■ Network: IEEE 802.
IV. Playlist and Operation 1. Playlist: ■ Playlist is a script text file including command, time schedule, download filename and content server IP address for CMP2000N client to execute line by line. ■ Playlist is created by the administrator using CAT (Client Administration Tool) software. 2. Basic Operation without CAT (Server management software): ■ Pre-configure CMP2000N's network setup and save.
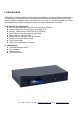
V. Client Device Setup A: Power connector C: S-Video B: VGA D: Composite Video E: Stereo Jack 1. CMP2000N Operating Procedure - High speed CF (Compact Flash) memory card is required.
3. Client Setup Screen - Use remote control to navigate and make necessary changes - Press ENTER from main menu to enter CMP2000N's setup screen - Listed options include Network, Time, AutoStart, Return to Main menu, and Save and reboot - Press ENTER on any item to go to its screen Network Setup Screen a. User Name and Password: Use “Select” or “Goto” key to open virtual keyboard. Move cursor to any letter and press ENTER, or use '0' (zero) to erase letter.
Note-2: You can save as “autoconfig.mib” filename and it will also update into EEPROM except this file will be deleted afterwards. 4.
VI. CAT Software 1. 2. CAT (Client Administration Tool) can be executed on any Windows XP system. Click on the executable CAT.exe file and you will see the display below. Note that Home is the default group. When click Tool tab, it will pull down 4 useful tools (see photo below). “Account and Playlist Editor” are also shown on ICON row for quick access. Note: Version 0928 CAT and firmware will show “Playlist Commander”. TOLL FREE: (888) 483-2418 • EMAIL: info@i-techcompany.com • WEB: www.i-techcompany.
3. Account Management is used to create or manage group and user account names. You can create multiple groups and assign different account names. When any CMP2000N client logs into CAT, it will go under its corresponding group if the account name is matched. Otherwise, it will be listed under default Home group. TOLL FREE: (888) 483-2418 • EMAIL: info@i-techcompany.com • WEB: www.i-techcompany.
4. Server Setup is for administrator to make changes for CAT server. Server port 5021 is used as a port forwarding function for your network router to access CAT. 5. Playlist Editor is for the administrator to create a playlist and save as a new file or open and edit any existing playlist file. A detailed description is given in next chapter. 6. Client Setup is an editor to create or open client‟s autoconfig.mia file which is used to update their setup values. Save autoconfig.
a) IP or Hostname: Type in static IP for local LAN server or hostname for remote internet server. Example: 192.168.1.100 or miatech.blogdns.com b) Port: Default is 5021 but if 5021 is already in use on server side, please reassign a different port. Make sure the port number is the same in CAT and your router c) Client Account Name and Password: Type in user name and password for this client device. After client powers up and logs into CAT server, it will go to its assigned group.
7. Graphics ICON: The command group is highlighted by the left rectangle and the current active group will be highlighted by the cursor. Pressing any button on the command group will result in a command being sent to ALL client devices under the active group. In this example, if we press “Stop”, MP02 84 and MIA02 will both stop their video stream. The rectangle highlight on the right is the client device command which will only send a command to the selected client only.
the CF tab screen of CAT. n) CF Data [Delete]: Click the right mouse button on CF window and 'Delete' will pop up. Check all the files to be deleted before you click 'Delete'. CAT will send delete command to client to remove those checked files and update CF Data screen o) Playlist: Client will report current playlist file. It will display the playlist file order on the playlist tab screen of CAT 8.
TOLL FREE: (888) 483-2418 • EMAIL: info@i-techcompany.com • WEB: www.i-techcompany.
9. Playlist Commander a) Local Directory: Load media files from local PC directory.
o) p) Picture Play Time: control interval time between JPEG files Picture Transition Mode: 3 modes (Full Screen, Random, and Cross Fade) are available for transition settings q) Format CF before download files: Set “Format CF Card” command in the playlist so that all new files in playlist will download into an formatted CF card. r) Mute Sound: All playback content will be silent s) Event Schedule: Download time, Start Time and Stop Time can be scheduled for updates on a daily basis.
11. Remote FTP Server This feature allows the user to access an FTP server and create a FTP playlist. Navigation will be similar to local directory but you need to enter your FTP access information in order to log in. You can click EZ-Play to execute playlist or save for future use. TOLL FREE: (888) 483-2418 • EMAIL: info@i-techcompany.com • WEB: www.i-techcompany.
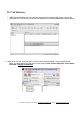
12. Web Server Configuration If an administrator needs to change an CMP2000Nclients network setup values, a new feature introduced on version 0928 is Web Server Configuration via Internet Explorer. This is a tool that allows the administrator to read client devices current status and re-configure server's and client's IP, username and password. a. To use this function, open Microsoft IE and type client's IP address (for example 192.168.1.16) on the address line. b.
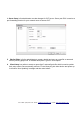
c. d. Internet Explorer will display the screen below if login and password are both correct. By clicking “Client Status”, it will refresh the screen. Click “Client Account Setup” and it will display the setup page. e. The remote server pull down menu has either a Fixed IP or Host Name selection choice. You can enter a new server IP address or a new hostname. In additional, you can also change clients account name and password. f. Click “Apply and Reboot” to save new setup information.
TOLL FREE: (888) 483-2418 • EMAIL: info@i-techcompany.com • WEB: www.i-techcompany.
VII. HTTP Server Setup An alternative to deploy your media files is to use an HTTP server setup, which may increase transfer rates by up to 30%. In order to do this, you need to setup your PC as an HTTP server so that it can become a content server that transfers media files to client devices. Your must use Windows XP Professional due to lack of IIS (Internet Information Services) support on Home edition. (Note: You can download freeware http server software from http://httpd.apache.
Important note: If you encounter an http download error on CAT, it‟s possible that the anonymous access is not checked on the IIS property. Procedure: Go to Control Panel->#1.Administrative Tools->#2.IIS Shortcut-> #3. shared subfolder -> #4 property/Directory Security -> #5. Edit -> #6. Anonymous Access TOLL FREE: (888) 483-2418 • EMAIL: info@i-techcompany.com • WEB: www.i-techcompany.
2. Apache HTTP Server Installation Procedure: 1. Go to http://httpd.apache.org/download.cgi and download apache_2.2.4-win32-x86-no_ssl.msi 2. Follow instructions to install 3. Copy content files to C:\Program Files\Apache Group\Apache\htdoc\ for download TOLL FREE: (888) 483-2418 • EMAIL: info@i-techcompany.com • WEB: www.i-techcompany.
VIII. Firewall and Anti-Virus program Configuration In cases where you have connection issues with your CMP2000Nclients, check your anti-virus and firewall programs. A. Firewall: Set Windows XP firewall to OFF TOLL FREE: (888) 483-2418 • EMAIL: info@i-techcompany.com • WEB: www.i-techcompany.
B. ZoneAlarm: If you use ZoneAlarm, add MIAICS as trusted program and IP range for clients. TOLL FREE: (888) 483-2418 • EMAIL: info@i-techcompany.com • WEB: www.i-techcompany.
C. Norton Anti-Virus: If you are using Norton Anti-Virus program, make sure to add MIAICS as trusted program and also set IP ranges for client devices to go thru. Easiest way is to set Personal Firewall to OFF. TOLL FREE: (888) 483-2418 • EMAIL: info@i-techcompany.com • WEB: www.i-techcompany.
TOLL FREE: (888) 483-2418 • EMAIL: info@i-techcompany.com • WEB: www.i-techcompany.
TOLL FREE: (888) 483-2418 • EMAIL: info@i-techcompany.com • WEB: www.i-techcompany.
TOLL FREE: (888) 483-2418 • EMAIL: info@i-techcompany.com • WEB: www.i-techcompany.
TOLL FREE: (888) 483-2418 • EMAIL: info@i-techcompany.com • WEB: www.i-techcompany.
TOLL FREE: (888) 483-2418 • EMAIL: info@i-techcompany.com • WEB: www.i-techcompany.
TOLL FREE: (888) 483-2418 • EMAIL: info@i-techcompany.com • WEB: www.i-techcompany.
IX. Router Setup 1. Make sure to set DMZ to ON and input the IP address to that of the PC that CAT is installed on. For example, if CAT is on an admin PC whose IP is 192.168.1.10, then turn on DMZ and set IP to 192.168.1.10. This will ensure that data and commands between Client device and CAT server can communicate with each other. 2. Make sure to enable “Port Forwarding” so that data files and be transferred. 3. The CMP2000Nuses port 80 and port 5021 so these two ports must be open.
TOLL FREE: (888) 483-2418 • EMAIL: info@i-techcompany.com • WEB: www.i-techcompany.
- Turn on DMZ server and input your PC server's IP address TOLL FREE: (888) 483-2418 • EMAIL: info@i-techcompany.com • WEB: www.i-techcompany.
Turn on DHCP and set a range (optional) TOLL FREE: (888) 483-2418 • EMAIL: info@i-techcompany.com • WEB: www.i-techcompany.
TOLL FREE: (888) 483-2418 • EMAIL: info@i-techcompany.com • WEB: www.i-techcompany.
IMPORTANT!!! If the admin PC (computer running CAT) is assigned an IP by either a DSL or cable modem, then it will have a dynamic IP and not a static IP. That PC will have a new IP assigned arbitrarily by your modem/internet provider so if you setup an CMP2000Nclient using Static Server IP (see section V, 3b), you will have to manually change your IP every time your PC has its IP reassigned. To combat this, you need to setup a DNS host name - please register your DNS host name at www.dyndns.org.
TOLL FREE: (888) 483-2418 • EMAIL: info@i-techcompany.com • WEB: www.i-techcompany.