
User Manual


English English
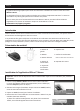
Using the IRIScan™ Mouse
Tip: to access the Help le before scanning, start the IRIScan™ Mouse applicaon. Click the icon in the
top le corner, then click Help.
Step 1: Scan documents
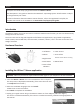
1. Place the mouse on the documents you want to scan.
2. Press the Scan buon once to start IRIScan™ Mouse.
3. Move the mouse over the document to scan the desired area.
4. To stop scanning, press the Scan buon again. This opens the Edit screen.
To cancel the scanning, press Esc on the keyboard.
Notes
• During scanning, IRIScan™ Mouse automacally zooms out and adjusts the view
accordingly. To check whether the image is scanned properly, use the mouse wheel to
zoom in/out the image. You can scan documents of up to A3 size.
• If you move the IRIScan™ Mouse too fast, the scan window turns yellow or red. Slow
down the scanning if needed.
• If the scanned images appears distorted, stop moving the IRIScan™ Mouse briey. The
image will be calibrated automacally.
• When the scanning is done, the scanned image is automacally cut into a rectangular
shape and aligned horizontally to the background.
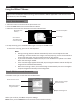
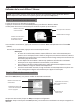
Step 2: Edit the scanned documents
In the Edit screen you can edit the scanned documents.
When you are done, click OK to accept the sengs.
Note: when you click Cancel the scan result will not be saved to memory.
Remaining scan
memory
Scan window
This indicates the
current scan area
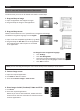
Funcon descripon
Scan image
Rotate the scan result
Resize the scan area
using the handles
Adjust the colors, bright-
ness and contrast
Adjust the background