
Quick Start Instruction Manual
All cards
Display all cards of the database.
New cards
Display the “new” cards. (These cards weren’t indexed yet).
• Check the company name and change the card status to “indexed” with the status button
“Indexed”.
• Check the other data elds and change the card status to “veried” with the status button
“Veried”. You can now export these contacts!
Indexed cards
Display the “indexed” cards. The company name of these contacts was validated. Check the other
database elds and change the card status to “veried” with the status button “Veried”.
Veried cards
Display the “veried” cards. All database elds of these cards were validated. Don’t hesitate to
export these cards!
Select cards
Execute “query by example” searching in the database by lling out one or more data elds in
the search mask.
Search cards
Execute “free text” searching on any data eld; you can nd back any contact even
when you have very little information to go on. (Press Enter to execute the query!)
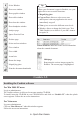
Scan cards
Scan your cards and archive them in the electronic Rolodex®.
Recognize card
Choose the card style before you trigger the card recognition!
Card style
Indicating the card’s country is imperative to execute the recognition and eld
analysis correctly!
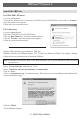
Export, import and synchronize contacts
• Export your contacts to your favorite contact manager, to the electronic address book of your
PDA or save them in a structured text le.
•
Import contacts from contact managers and electronic address books into the Cardiris database.
• Synchronize your Cardiris contacts with your database or the electronic address book of your
PDA.
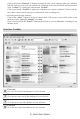
Album view
Display your cards in an album view.
Card view
Display a single card. This view mode displays all data elds, including the personal notes.
You can change the card status here.
Display the cards whose company name starts with a specic letter.
Turn the pages of your electronic Rolodex®First card.
Go to the rst card of the database/of your selection.
9 - Quick Start Guide