
Quick Start Instruction Manual

Quick User Guide Cardiris
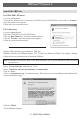
1. Select and congure your IRIScan.
• Run the Cardiris software.
• Select the IRIScan scanner.
• Use the command “Scanner” under the “Settings” menu.
• Click on the button “Scanner model” and select IRIS IRIScan2 (TWAIN), click on “OK”.
• Click on the button “Congure” and select the IRIScan 2.0 TWAIN.
• Open an existing data base (menu “File”> command “Open”) or create a new database (menu
“File”> command “New”).
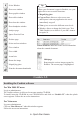
• Place business cards at the right hand side of the IRIScan.
• Click on the “Scan” button to start scanning. Your card images are automatically cropped,
displayed in the album view and archived by the Cardiris software. They have the yellow status
of new cards.
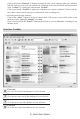
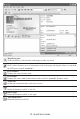
2. Recognizing business cards.
• Select the country of the business card in the “Card Style” dropdown list .
• Click on the “Recognize” button: the card image is OCR’ed and the data gets sent to the various
database elds - company, name, title, e-mail etc.
• Check if the data was correctly recognized and complete it if necessary:
-
The tab “Extra” may contain recognized information that couldn’t be assigned to a specic eld!
You can “cut and paste” and “drag-and-drop” data to the correct eld for quick editing.
- Click on the “Drag-and-drop data” button, draw a frame around a piece of information in the
card image and drag the frame to a database eld. The OCR gets executed “on the y”!
- Click on the status button “Indexed” when at least the company name is recognized or click on
the status button “Veried” when you have validated every database eld - address, web site,
telephone etc.
• The cards are now ready to be exported.
3. Importing, Exporting and synchronizing contacts.
• Importing contacts
Click on the button “Import-Export-Synchronize” go to the tab “Import” and select your
contact manager. Click on “Import” to execute.
• Exporting contacts
Click on the
button “Import-Export-Synchronize” go to the tab “Export” and select your
target database, contact manager or electronic address book. Congure the export if necessary.
Click on “Export
” to execute.
• Synchronizing contacts
Click on the button “Import-Export-Synchronize” go to the tab “Synchronize” and select
your database, contact manager or electronic address book to be synchronized. Congure the
synchronization if necessary. Click on “Synchronize” to execute.
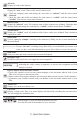
4. Managing your contacts.
• Display your contacts by their status.
Click on the button “All” to display any card in the database.
Click on the button “New” to display the new cards.
These cards have only been scanned; new cards are yellow.
7 - Quick Start Guide