
User Manual


Bluetooth
The Windows 7 setup is illustrated here.
Other versions of Windows may vary.
On first use s
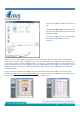
lide the switch on the scanner to the BT position. Open the notification area icons and right click on the
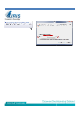
icon and choose Show settings
and set as pictured. Then right click and choose
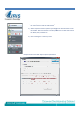
After entering the pairing code, 0000
press the Scan button on the scanner
accepts and establishes the communication.
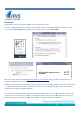
When you press scan button on the scanner again it will upload the current image number on the scann
< > C/BW on the side of the scanner to increment the numbers to the next image and press the Scan button again to
upload the next image to the My Pictures folder.
You do not have to delete the Handy Scan once the pairing has been done.
to the BT position and press the scan button. You will get this balloon message in the notification area. Just click on it
and set a duration and click OK. It should then proceed with the upload to the My Picture
Other versions of Windows may vary.
lide the switch on the scanner to the BT position. Open the notification area icons and right click on the
and set as pictured. Then right click and choose
Add a device
press the Scan button on the scanner
when you see this BT light flashing. This
accepts and establishes the communication.
When you press scan button on the scanner again it will upload the current image number on the scann
< > C/BW on the side of the scanner to increment the numbers to the next image and press the Scan button again to
upload the next image to the My Pictures folder.
You do not have to delete the Handy Scan once the pairing has been done.
On next use slide the switch on the scanner
to the BT position and press the scan button. You will get this balloon message in the notification area. Just click on it
and set a duration and click OK. It should then proceed with the upload to the My Picture
lide the switch on the scanner to the BT position. Open the notification area icons and right click on the
Add a device
.
when you see this BT light flashing. This
When you press scan button on the scanner again it will upload the current image number on the scann
er. Press the DPI
< > C/BW on the side of the scanner to increment the numbers to the next image and press the Scan button again to
On next use slide the switch on the scanner
to the BT position and press the scan button. You will get this balloon message in the notification area. Just click on it
and set a duration and click OK. It should then proceed with the upload to the My Picture
s folder.