
User manual

Connection and Binding
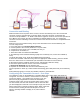
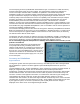
With transmitter off and no power to the receiver, connect the telemetry unit to the receiver bind
connector using the included cable, as shown above. Orient the connector so the black wire
connects to the pin labeled “–” or “GND”. Note that the Hyperion unit does not have the equivalent of
the X-BUS™ port found on the side of a Spektrum™ TM1000 telemetry unit. You should also
connect the receiver satellite(s) if used. Do not connect the external V/I sensor or Temp/RPM sensor
at this time.
Make sure you have a model memory set up in the transmitter for the receiver/telemetry unit.
You are ready to bind:
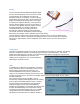
1. Put a bind plug on the telemetry bind connector.
2. Connect power to the receiver (maximum 7.2v) from either:
a. A separate receiver pack (4 or 5 cell NiMH, 2S LiFe); or
b. A separate 5V or 6V BEC; or
c. The throttle cable of an ESC with inbuilt BEC.
3. All red/orange LEDS should be flashing rapidly on the telemetry unit, receiver and satellite (if
used)
to indicate bind mode. If not, locate the problem before proceeding.
4. Move the transmitter 3-6ft/1-2m away, select the appropriate model memory, place the throttle
STi™ck in low and turn on in bind mode (see transmitter instructions for how to do this).
5. Wait until the bind is complete and the receiver and telemetry LEDs are steady.
6. Disconnect power from the receiver. Turn off the transmitter.
7. Remove the bind plug from the telemetry unit.
8. Repower the transmitter and then the receiver/telemetry unit.
Correct operation is shown by a solid red LED and flashing green LED (2x/second) on the telemetry
unit.
Solid red/orange lights on receiver (and satellite) indicate a good radio link.
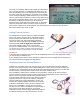
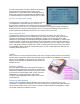
Configuring the Transmitter Screens – first steps
The Telemetry screen on the Spektrum™ transmitter allows you to select which data items are
recognized. You cannot, however, choose where on a telemetry
screen they appear – only whether they are there or not. The
placement is pre-programmed. Access to the transmitter’s
Telemetry setup screen is from the System Setup screen. Select
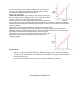
one of the fields, then click and rotate the roller to select the item
you want displayed in that field. In the example at right, the second
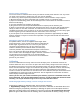
field is selected and configured to display Amps. When a field has
an item selected, clicking on that item will open a screen of
options, generally whether to display or not, alarm values if
relevant