
User Manual


12
TECHNICAL DATA
Voltage 20V Max
Bar length 10” (25cm)
Chain speed 14.8 ft/s (4.5m/s)
Oil tank capacity 2.7 oz (80ml)
Chain pitch 3/8” (9.5mm)
Weight (chain & bar included): 7.2lbs (3.28kg)
Charger model ACG318W1U
Charger input 120V~60Hz, 18W
Charger output 20V
700mA
Charger protective class
/ll
Battery capacity 2.0Ah (ABP118T7)
Charging time 3hrs
Blade Sheath 1
Battery pack (ABP118T7) 1
Charger (ACG318W1U) 1
We recommend that you purchase your accessories from the same store that sold you the tool. Refer to the
accessory packaging for further details. Store personnel can assist you and oer advice.
ACCESSORIES
ASSEMBLY
WARNING! Do not install the battery pack before it has been completely assembled.
Always use gloves when handling the chain.
CHAIN AND GUIDE BAR ASSEMBLY
1. Unpack all parts carefully.
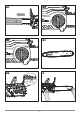
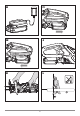
2. Remove the blade sheath. (See Fig. A1)
3. Grip the chain tensioning outer rim and turning it anti-clockwise to loosen the chain. (See Fig. A2)
4. Hold and depress the cover tightening stick, turning it anti-clockwise to remove the chain cover. (See Fig. A3)
5. Place the chain saw on a solid, level surface.
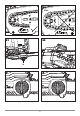
6. Slide the chain in the slot around the guide bar. Ensure the chain is in correct running direction by comparing it
to the chain icon on the Bar pad. Ensure the bar tensioning plate is facing outward. (See Fig. B 1, B2)
7. Fit the Chain onto the Drive Sprocket. (See Fig. C)
8. Assure all parts are seated properly. Make sure the drive links are fully seated in the drive sprocket (See Fig. D1),
avoiding a kink as shown in Fig. D2. If kink occurs, pick up on the chain at the guide bar just ahead of the kink
and then pull the kink out.