
Instruction Manual


26
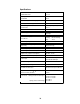
PROBLEM PROBABLE CAUSE REMEDY
1. Dirty check valve 1. Remove and replace or clean off any scale or sediment.
PUMP 2. Ball checks not seating or 2. Check seat and ball checks for chips, clean gently. If
LOSES not sealing properly deformity or deterioration is noted, replace part with
PRIME proper material. Resulting crystals can hold check
valves open, therefore the valves must be disassembled
and cleaned. Be sure to replace all parts as shown in
the Parts Diagram (at the end of the manual).
3. Solution container allowed 3. Refill the tank with solution and prime. (See Start-Up
to run dry and Operation Section).
4. Chemical Outgassing 4. Bleed gas, use flooded suction, maintain chemical at room
temperature (approx. 20
K
F / -6
K
C).
1. Loose fittings 1. Tighten hand tight. Replace gasket if hand tight does
not stop leakage
LEAKAGE
AT FITTING 2. Broken or twisted gasket 2. Check gaskets and replace if broken or damaged.
3. Chemical attack 3. Consult your pump supplier for alternate material.
1. Too much pressure at 1. Turn off all pressure valves, loosen outlet tubing
discharge connection at discharge point. Remove discharge valve
cartridge. Dampen ball check and valve seats with a few
drops of solution. Set pump dial to maximum rate.
When pump is primed, reconnect all tubing connections.
2. Check valves not sealing 2. Disassemble, loosen, clean and check for deterioration
PUMP WILL swelling. Reassemble and wet the valve assembly,
NOT PRIME then prime. See Start-Up and Operating Section.
3. Output dials not set at 3. Always prime pump with output dial set at maximum
maximum rated capacity.
4. Suction lift height too much 4. Decrease suction lift or pull vacuum on pump discharge
until pump is primed.
5. Pump equipped with spring 5. Loosen discharge valve to aid in priming, take necessary
loaded high viscosity valves safety precautions. Or apply vacuum to pump discharge.