
Manual


10
CLEANING, SANITIZING, AND CARTRIDGE REPLACEMENT PROCEDURE
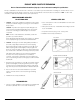
1. Mix mild cleaning solution of dish soap and clean potable water
in plastic bowl.
2. Empty storage tank and relieve system pressure. Verify tank
valve is open. Close feed water supply valve and open product
water faucet.
Icemaker: Transfericecubesfrombin/traytocleanfreezercon-
tainer for storage until procedure is done.
3. CAUTION: Use air hand pump to avoid damaging tank. Verify
product water valve is open before proceeding.
Check product water storage tank air pre charge using a low-
pressure gauge (e.g. 0 -15 or 0 – 30 psi). Air valve is located on
tankbase.Pre-chargeshouldbe55kPa(8psig)withtankempty
and tank valve open.
4. CAUTION:Donotattempttoremovelterhousingsuntilwater
flow stops. This reduces pressure inside the system so housings
may safely be removed.
CAUTION: Additional point-of-use devices (i.e., icemakers) may
useltersalongtheirsupplyline.Removeanylterortreatment
device installed between module and device before proceeding.
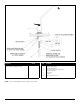
Removeeachlter/membranehousingbyturningitcounter-
clockwise.Removeeachltercartridgeasitshousingisre-
moved.Discardlters.
IFMEMBRANEISPERFORMINGSATISFACTORILY:
Proceed to Step 5.
IF MEMBRANE IS DEPLETED OR FOULED:
DiscarditandgotoStep7.
5. CAUTION: Use sanitary rubber gloves for this procedure to avoid
contaminatingsanitizingsolution,lters,ormembrane.Wear
gloveswhenevercleaning/sanitizingsystemcomponentsor
handlingnewlter/membranecartridges.
Clean membrane outer wrap with washcloth and cleaning
solution. Do not immerse membrane in solution. Do not scrub
membrane wrap with abrasive cleaners. Rinse membrane well
with clean potable water.
6. Place membrane into clean plastic bag, close bag.
7. Removelter/membranehousing“O”ringsandwashthemwith
cleaning solution. Rinse them well with clean potable water.
Inspect them for damage (i.e., nicks, scratches). Replace dam-
aged “O” rings.
8. CAUTION: Do not get Smartap
®
WaterQualityMonitor
electronics, wiring, or connectors wet.
Cleanlterhousingsandmanifoldports,insideandoutside,with
washcloth and cleaning solution. Do not use abrasive materials.
9. Rinsemanifold/housingswithcleanpotablewater.
10.Inspectmanifoldandlterhousing“O”ringgrooveareafor
damage (i.e., nicks or scratches). Replace damaged compo-
nents.
11.Placeasmallamountof“O”ringlubricantoversurfaceoflter/
membranehousing“O”ring.Install“O”ringintolterhousing
groove.
TOSANITIZETHESYSTEM:CompleteSteps12-34.
TO INSTALL FILTERS: Complete Steps 19-34.
WARNING: WEAR SAFETY GLASSES WHILE PERFORMING
THIS PROCEDURE.
READ “WARNINGS” INFORMATION ON BLEACH CONTAINER BEFORE
USING CONTENTS.
HANDLE SANITIZING SOLUTION CAREFULLY. AVOID CONTACT WITH
UNPROTECTED AREAS.
12. CAUTION: Excessive concentrations of bleach will damage plas-
tic and rubber components. Rinse all parts that contact bleach
thoroughly with clean potable water.
Mixsanitizingsolutionof1.5ml(1/3teaspoon)ofhousehold
bleachand3.8L(1gallon)ofclean,potablewaterinthe
bucket. Mix solution well.
13. CAUTION:Tightenlterhousingsbyhandonly.Donotusetools
as they will over-tighten and damage housings. Take care not to
cut or pinch o-rings.
Add236ml(onecupor8oz.)ofsanitizingsolutiontoeachlter
housingandinstallthemontothemanifold(donotinstalllters
ormembraneatthistime).Tighteneachlterhousingbyhand
only.
14. Slowly open source water supply valve.
15. Open product water faucet. Close faucet as soon as water
begins to flow from spout.
16. Wait 5 minutes, then close source water supply valve.
17.Wait25minutes,thenopenproductwaterfaucetandletwater
flow to drain.
18.CAUTION:Donotattempttoremovelterhousingsuntilwater
flow stops. This reduces pressure inside the system so housings
may be removed safely.
Removelterhousingsanddisposeofwater.Rinselterhousings
and manifold ports thoroughly with clean potable water.