
Manual


5
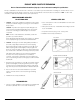
PRODUCT WATER FAUCET SITE PREPARATION
Refer to Faucet Installation Instructions (Page 6) for site location and mounting hole specifications.
Primaryconsiderationsforsiteselectionareconvenienceofuseandanopenareaundersink.Anexisting7/8”SinkHolewillalsoaccom-
modate metal faucets with air-gap connections. Always check underside of selected location for obstructions. NOTE: Location and
orientation of drain outlet assembly is vital to system performance.
PORCELAIN/ENAMEL OVER STEEL
OR CAST IRON SINKS
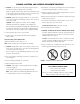
1. CAUTION: A heavy duty, variable speed drill motor with a spring-
loaded porcelain drill set (Figure 6) is strongly recommended for
this procedure.
CAUTION: The plastic sleeve supplied on pilot drill (Figure 6.A)
is to be positioned on drill bit against drill chuck. This prevents
chuck from contacting porcelain after pilot hole has been
completed.
NOTE: Practice on discarded sinks to familiarize yourself with
operation of porcelain cutter kit.
Using carbide tipped bit with plastic sleeve (Figure 6.A.), drill pilot
hole completely through porcelain and metal underneath.
2. CAUTION: Avoid high motor R.P.M. during initial penetration of
porcelain, as high drill speed will cause excessive chipping.
Place spring-loaded porcelain saw (Figure 6.B.) into drill chuck.
Make sure pilot guide is inserted tightly. Insert pilot guide into
pilot hole. Push down gently on drill motor to apply light pressure
to porcelain surface. Start drill motor turning as slowly as possible.
After initial cut has started, motor speed may be gradually
increased.Thecutmayrequirethreetofourminutesto
complete.Goingfastercouldresultinexcessivechipping.Be
sure a complete ring has been cut through porcelain to material
underneath.
3. Placenishholesaw(Figure6.C.)intodrillchuck.Makesurepilot
guide is inserted tightly. Insert pilot guide into pilot hole. Begin
cut using a slow speed and light pressure until porcelain (inside
ring cut in Step 2) has been penetrated to material underneath.
4. Remove saw from hole and clean all debris from porcelain
surface. Re-insert saw into hole and cut through remaining
material.
5. Installation hole is ready, install faucet.
TILE COUNTER TOP
1. Followproceduresdetailedinsectionlabeled“Porcelain/Enamel
Over Steel” (substitute “tile” for “Porcelain” in instructions).
STAINLESS STEEL SINK
1. Use a center punch to make a small indentation to mark center
of desired location.
2. Drillapilotholewitha1/8”metaldrillbit,thenenlargeholewith
a3/8”metaldrillbit.
3. Completeholesizebyusinga11/4”chassispunch.
4. Installation hole is ready, install faucet.
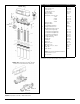
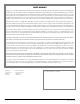
FIGURE 6
A. PILOT DRILL
B. SPRING LOADED PORCELAIN SAW
C. FINISH HOLE SAW