
Installation Sheet

– 4 –
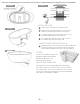
FIGURE 8
FIGURE 6
FIGURE 7
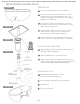
TOWER
A Tower can be added to most of our
Designer Collection Freestanding
Bathtubs allowing you to use
traditional Roman faucets.
WASTE AND OVERFLOW
The
Designer Collection Freestanding Tubs offer integral
waste and overflow on all models because of the the limited
space between the inner and outer tub shells. Use care when
selecting your drain kit. The Designer
Collection Freestanding
Tubs
offer toe tap hardware standard.
Adjust legs to a height of
1
/
8
" max below skirt.
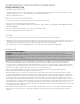
Apply generous bead of adhesive or silicone to the
bottom of the tub supports and feet. (Figure 6).
Carefully set tub into position (Figure 7) and connect
the drain hardware (previously installed).
Then apply a bead of tub and tile caulk or silicone
around the edge of the base (Figure 8).
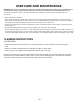
COMPLETE BATHTUB INSTALLATION
Fill tub with water to the overflow and then drain the tub while
inspecting the waste connections below the floor for leaks.
Access from below will be necessary for this step (Figure 9).
INSTALL BATHTUB
FIGURE 9
14
15
16
13
17
Please refer to www.hydrosystem.com for videos on how to install your bathtub and get specific dimensions on your model bathtub