AQUA-LAB SD™ Chemical Dispensing System Installation Manual REV A
Installation Manual Specifications 1. 2. 3. 4. 5. 6. 7. 8. 9. 10. Operating water pressure: 200 psi (Factory set) Pneumatics operating pressure: 60-80 psi (for air valve systems) Maximum water source temperature 140° F Operating ambient temperature: 40-120° F Electrical supply(if pump system purchased from HFI) a. 120 single phase or 208/230 (3-phase) b. 1.5 hp pump 18 amps @ 120 volts single phase or 9 amps @ 230 volts single phase c. 1.5 hp pump 9 amps @ 230 volts three phase or 4.
Installation Manual Table of Contents 5 Easy Steps for Installation ................................................................................................................... - 1 Installation Instructions ........................................................................................................................... - 2 Unpacking ...........................................................................................................................................
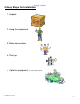
Installation Manual 5 Easy Steps for Installation 1. Unpack 2. Hang the equipment 3. Make connections 4. Start-up 5.
Installation Manual Installation Instructions General Skill Level • Mechanical: Basic - mounting equipment • Electrical: Advanced - three phase power and controls knowledge (local codes knowledge required) • Plumbing: Moderate – principal supply line required • Pneumatic (if needed): Basic- pneumatic utility connection required • Chemical Knowledge: Moderate : Advanced - chemical titrations required Tools and Equipment Needed • Drill with Phillips head • Concrete drill bit 3/8” • Hammer • Tape measure • Le
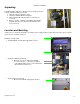
Installation Manual Unpacking The AQUA-LAB is shipped in a wooden crate if a pump system was ordered, otherwise it will come via UPS. 1. Open the crate by cutting the straps 2. Un-bolt the AQUA-LAB from the pallet. 3. Lift the AQUA-LAB from the pallet. Use assistance if necessary. 4.
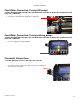
Installation Manual Feed Water Connection (if using HFI pump) **PRIOR TO CONNECTION, ENSURE THAT THE FEED LINES ARE FREE OF DEBRIS BY FLUSHING OUT THE LINES FOR 15 MINUTES • Connect pre-run main water supply line to pump inlet. Feed Water Connection (if using existing pump) **PRIOR TO CONNECTION, ENSURE THAT THE FEED LINES ARE FREE OF DEBRIS BY FLUSHING OUT THE LINES FOR 15 MINUTES • Connect supply from regulated pump. Pneumatic Connections **IF USING AIR PILOT VALVES.
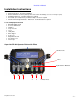
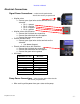
Installation Manual Electrical Connections Signal Power Connections – select from the option below that fits the version you purchased • • • • • Air pilot valves o Connect your signal wires to the terminals on the air solenoids Pin 1 = ground Pin 2 = positive Pin 3 = negative Pin 4 = ground Air pilot valves with field wires o Connect the first black wire to positive o Connect the other black wire to negative o Connect the green wire to ground Electric solenoid valves o Connect your signal wir
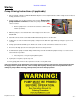
Installation Manual Startup Pump Priming Instructions (if applicable) 1. Pull each pump outlet line at AQUA-LAB manifold quick-connect. Open ball valve until a steady stream of water is flowing, and then reconnect. 2. Start the pumps one at a time using the motor starter. Ensure that pump rotation is correct as indicated on pump and that 200 psi can be reached. o Remove pump motor cover and look at shaft to confirm correct rotation (clockwise) 3.