
User Guide


that were factory installed with the original mounting bolts.
Belt replacement
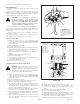
Figures 9-11 and 9-12 show diagrams and descriptions of the unit’s belt
drive systems.
Inspect these belts frequently for wear and serviceability. Replace a belt
that shows signs of severe cuts, tears, separation, weather checking and
cracking, or burns caused by slipping. Slight raveling of belt covering does
not indicate failure, trim ravelings with a sharp knife.
WARNING: If the pump belt fails, loss of control will occur
especially when operating on a slope. If you lose steering
control while operating the machine, place the steering
control levers in the park brake position immediately.
Inspect the machine and involve your Hustler dealer to
resolve the problem before continuing to operate.
Inspect the belt pulley grooves and flanges for wear. A new belt, or one
in good condition, should never run against the bottom of the groove.
Replace the pulley when this is the case, otherwise belt will lose power and
slip excessively.
Never pry a belt to get it on a pulley as this will cut or damage the
fibers of the belt covering.
Keep oil and grease away from belts, and never use belt dressings. Any
of these will destroy the belt composition in a very short time.
Deck belt replacement
1. Park the unit on a flat surface. Stop the engine and remove the
ignition key. Make sure deck clutch switch is in the down (OFF)
position. Place control levers in the park brake position. Disconnect
negative battery cable.
2. Place the deck in the lowest position.
3. Remove the deck belt covers.
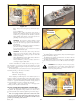
4. Release the deck belt tension by pulling on the belt tension chain and
sliding the chain out of the anchor bracket slot. This will relieve the
tension on the deck belt idler spring. Fig. 9-11
5. Push the idler toward the rear of the deck to provide maximum belt
clearance.
6. Remove the existing belt and replace with a new belt.
7. Route the new belt per Fig. 9-11.
8. Re-tension the deck belt idler per the Deck drive belt adjustment
section found elsewhere in this manual.
9. Re-install the deck belt covers.
10. Re-attach the negative battery cable.
Integrated pump/motor drive belt replacement
WARNING: This procedure will require that the unit to be
raised and blocked up off of the ground. Use only
appropriate vehicle stands, with a minimum weight rating of
2000 pounds to block the unit up. Use in pairs only. Follow
the instructions supplied with the vehicle stands.
1. Park the unit on a flat surface. Stop the engine and remove the
ignition key. Make sure deck clutch switch is in the down (OFF)
position. Place control levers in the park brake position. Disconnect
negative battery cable.
2. Place the deck in the lowest position.
3. Raise the rear of the tractor and block with certified jack stands.
4. Remove the right rear tire and wheel from the tractor.
5. The deck belt must be removed from the clutch pulley first by
releasing the deck belt tension by pulling on the belt tension chain
and sliding the chain out of the anchor bracket slot. This will relieve
the tension on the deck belt idler spring. Fig. 9-11
6. Remove the deck drive belt from the electric clutch pulley. This belt
does not need to be removed from any of the other pulleys.
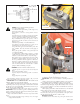
7. Release the tension from the integrated pump/motor belt by pulling
on the belt tension chain and sliding the chain out of the anchor
bracket slot. Fig. 9-14
8. Slide the belt off the engine pulley. The belt will have to be slid
above the engine pulley to allow the belt to be removed from the
other pulleys. Fig. 9-13
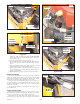
9. Slide the belt over the integrated pump/motor pulleys and fans.
10. The belt can now be removed from above the engine pulley.
11. Install new belt by sliding it up and over the engine pulley. Make
certain it is not in the pulley groove at this time but is above the
pulley.
12. Slide the belt over the integrated pump/motor pulleys.
13. Slide the belt onto the engine pulley.
14. Re-attach the spring and chain to the tensioner pulley arm. Pull
chain and slide the chain into the anchor bracket slot. Fig. 9-14
15. Re-install the deck drive belt on the electric clutch pulley and make
sure it is routed properly on all of the deck pulleys.
16. Re-tension the deck belt idler per the Deck drive belt adjustment
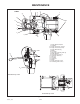
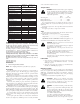
Figure 9-11
1
Deck Belt Drive Layout
1. Spindle drive belt
2. Deck blade spindle pulley
3. Spindle belt tension idler
4. Spindle belt tension idler spring
(7.5" (19.05
CM) at operation)
5. Deck belt idler pulley
6. Idler arm
2
5
4
3
2
6
Figure 9-12
1
3
2, 6
4
5
1. Pump belt
2. Engine pulley
3. Pump idler pulley
4. Pump idler arm
5. Pump pulley
6. Electric deck clutch
7. Pump idler spring
8. Fixed idler pulley
Viewed from
top of unit
5
7
333559_0806
9-10