
Data Sheet


https://husarion.com/ contact@husarion.com
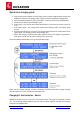
Quick start charging guide
1. Connect the power adapter to the charger and the output cable between charger and
ROSbot (2 connectors on charger side, 1 black connector to ROSbot charging port).
2. Use red and blue buttons to select “LiPo BATT” mode and press green [Start] button.
3. Use arrows to select “LiPo CHARGE” mode.
4. Press [Start] - the current value should start blinking. Use arrows to set the current to
1.5A.
5. Press [Start] again - the voltage value should start blinking. Select “11.1V(3S)” using
arrows.
6. Press and hold [Start] for 2 seconds. The charger should now ask for confirmation. Press
[Start] again. The charging process should begin now.
7. When the charging will be finished (after about 3 hours), the charger will generate a
loud “beep” sound and will finish charging at the same time.
The picture below should help you to go through these steps.
Note: You can change charging current to maximum 3A. Please note that a regular charging
with the maximum current can shorten the battery life.
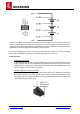
Charging Li-Ion batteries - basics
ROSbot is powered from 3 Li-Ion cells, connected in series. This type of connection is called
“3S”. The schematic below explains how the cells are wired together and with the charging
connector (on ROSbot side).