
User's Manual


18
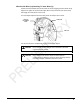
• Compensating Sensors BETA - WS602 Series Wheel Alignment Sensors
Hand-tighten the sensor lock knob.
Rotate the wheel until the sensor is level (as indicated by the spirit level on top of the
sensor).
Press the compensate button. Do not disturb the sensor until the two outer LED’s begin
to blink and the middle LED turns off, indicating that the measurements have been
stored.
Loosen the sensor lock knob and rotate the wheel 120°, left or right, until the middle LED
turns on. Hand tighten the sensor lock knob and rotate the wheel to level the sensor.
NOTE: It is recommended that the front wheels of front wheel drive
vehicles be rotated in the forward direction to keep from
disturbing the sensor on the opposite front wheel.
With the middle compensate LED on, press the compensate button. Do not disturb the
sensor until the two outer LED’s begin to blink faster and the middle compensate LED
turns off to indicate that the measurements have been stored.
Loosen the sensor lock knob and rotate the wheel 120° more, until the middle LED turns
on. Hand tighten the sensor lock knob and rotate the wheel to level the sensor.
With the middle LED on, press the compensate button. Do not disturb the sensor. Wait
for the sensor to save the measurement. The two outer LED’s and the middle LED will
stay on.
Loosen the sensor lock knob.
The sensor is now compensated. Repeat this procedure for the remaining sensor(s).
NOTE: All sensors should be level, but unlocked to minimize tilt of the
sensors. Avoid rapid steering motion that may cause sensors to
swing vertically, which can cause them to come into contact with
the rack, or even dislodge from the wheel.
Remove the lock pins from the turning angle gauges and rear slip plates.
Apply the parking brake and place the transmission in park if applicable.
Lower the vehicle onto the turning angle gauges.
Jounce the vehicle.
Three-Point compensation is complete. The middle LED and two outer LED’s on each
sensor will be on.
After three-point compensation, the wheel may be rotated to any position without
affecting the alignment measurements.
Continue the alignment procedure.