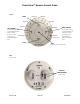
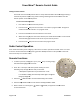
PowerView™ Remote Control Guide FRONT: OPEN Group 3 Group 4 Group 5 Group 2 Group 1 LEFT ARROW Group 6 RIGHT ARROW Sends the middle rail UP on Top-Down/Bottom-Up or Duolite™ products.
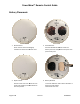
PowerV View™ Remote Control Guide Battery Placement: 1. Remove Cover. 2. Place Batteries. Press notch to move cover slightly clockwise to release and remove cover. Use two CR 2032 3V batteries. Slide one battery into each compartment and press into place to fully seat. 3. Replace Cover. 4. Battery Removal Position cover over slots. Press notch to move cover slightly counterclockwise to lock into position.
PowerView™ Remote Control Guide Groups A GROUP can be a single window covering or multiple window coverings. There are six unique assignable groups to use on each remote. NOTE: It is recommended that only similar window coverings be included in a group because of differences in product features and operation. When a shade is added to a group for the first time, it is also added to a network that links shades and devices together. To join a shade to a GROUP: 1.
PowerView™ Remote Control Guide Resetting Limits – Designer Roller Shades & Designer Screen Shades Only 1. Press and hold the manual control button on the shade for eighteen seconds. Continue to hold the manual control button as the shade jogs at six seconds and twelve seconds. Release it after a third jog at eighteen seconds to clear the bottom limit. 2. Then run the shade fully to Open to set a new upper limit. The shade will run to the top where it will set a new upper limit.
PowerV View™ Remote Control Guide Setting Favorites Position Each shade has one favorite position which is set by default at 50% of the shade height. Setting a new favorite position replaces any previous setting. Resetting shade limits will also reset the favorite position to the default position. To set a new favorite position: 1. Run shade to the desired favorite position. 2. Press and hold Stop for four seconds to put remote in program mode.
PowerView™ Remote Control Guide 6. Selecting the right arrow* will open vanes to 100%. a. OR send the middle rail UP on Top-Down/Bottom-Up or Duolite™ products. b. OR send vanes to fully closed right-facing position on Luminette® Sheers. 7. Select the left arrow* to close vanes. a. OR send the middle rail DOWN on Top-Down/Bottom-Up or Duolite™ products. b. OR send vanes to fully closed left-facing position on Luminette® Sheers. 8. Selecting the STOP button will stop shade movement at current position.
PowerView™ Remote Control Guide Table of Remote Functions by Shade Type: Open Standard Stacking Products TDBU/Duolite Stacking Products TD Stacking Products Roller products Silhouette/Pirouette Products Vertical Products Luminette Products Page 7 of 8 Close shade stacked shade down at top at bottom window uncovered window covered shade stacked Left Arrow Right Arrow Moves shade to preset favorite position* Stops shade Moves shade to preset favorite position* No effect Stops shade Move
PowerV View™ Remote Control Guide U.S. Radio Frequency FCC Compliance This device complies with Part 15 of the FCC Rules. Operation is subject to the following two conditions: (1) This device may not cause harmful interference, and (2) This device must accept any interference received, including interference that may cause undesired operation. This equipment has been tested and found to comply with the limits for a Class B digital device, pursuant to Part 15 of the FCC F Rules.