LGB-26TPVR GB LCD Digital and Analogue TV Digital 2 Tuner PVR Built-in
LCD Digital and Analogue TV
Caution To reduce the risk of electric shock, do not remove cover(or back). No user serviceable parts inside. Refer servicing to qualified service personnel. Indicates a situation which, if not avoided, could damage the equipment or other apparatus. This symbol indicates dangerous voltage inside the LCD-TV that presents a risk of electric shock or personal injury. Indicates a hazardous situation which, if not avoided, could result in serious injury.
Safety Instructions This LCD-TV has been engineered and manufactured to assure your safety. You can prevent serious electrical shock and other hazards by keeping in mind the following: Do not place anything heavy, wet or magnetic on the LCD TV or the power cord. Never cover the ventilation openings with any material and never touch them with metalic or inflammable materials. Avoid operating the LCD-TV in extreme heat, humidity or areas affected by dust.
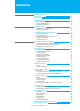
Contents Before Using the TV Setting Up the TV Using the Analogue TV Package Contents Front Panel Rear Panel 07 08 09 Remote Control + Main Remote Control + Simple Remote Control + Inserting the Batteries 10 10 13 14 Mounting Device + Assembling the Stand-Base + Installing on the Wall 15 15 15 Connecting the External Equipment + Connecting the Aerial + Connecting the PC + Connecting the External Devices + Connecting the DVD + Connecting the DVI 16 16 16 17 17 17 Setting the Analogue Channels + S
Contents Recording and Playback (PVR function) Recording + Instant Recording - Setting the Recording Quality - Setting the Clipping Noise Reduction + Recording Reservation - Adding Recording Reservations - Editing Recording Reservations + Time Shifted Recording 31 31 32 32 33 33 34 35 Playback + Programme Playback + Editing Recorded Programmes - Editing Title - Delete File - Copy File to External Device - Connecting the External HDD + Playback Control - Play / Pause - Rewind to Previous Scene - Fast for
Contents Using the Digital TV Appendix Digital TV Channel Setup Basic Operation + Switching Channel + Changing the Subtitle Language + Changing an Audio Language + Programme Information - Information Banner (I-Plate) + MHEG Application 45 46 46 46 46 47 48 Channel List + Displaying and Switching Channel List + Editing Channels + Editing Favourite Channels 49 49 49 52 Programme Guide + Viewing Programme Guide Information + Finding a Programme + Adding Reservations by Guide 53 53 54 55 Setting the Pr
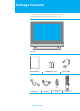
Package Contents + Please check all package contents before using your LCD-TV. + Package Contents may be different according to the area. LCD - TV User's Manual Scart Jack 7.
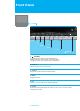
Front Panel TV/AV OK MENU VOL CH TV/AV 6 OK 5 MENU 4 ൖ VOL ൘G 3 ̷GGCH ̵G 2 STANDBY 1 1. : STANDBY Switches between Operation and Standby modes. Displays Red colour when the set is in standby mode. Changes to Green colour when the set is switched on. 2. ̷GGCH ̵ Selects a programme or a menu item. 3. ൖ VOL ൘ Adjusts the volume. Adjusts the menu setting. 4. MENU Displays the menu. 5. OK Selects a menu or confirms the selected operation. 6.
14. COMMON INTERFACE 9. S/PDIF 15. SMARTCARD SLOT 16. MAIN POWER 10. H/P (Headphone) Red3 : AUDIO : R White : AUDIO : L Yellow : VIDEO 12. S-VIDEO 11. AV 4 (RCA) Red2 White Red1 Blue Green 13. COMPONENT : AUDIO : R : AUDIO : L : Pr : Pb :Y 75ⵕ AC INPUT 1 DVI INPUT 2 PC INPUT 3 AUDIO INPUT 4 RS-232C 5 USB MASTER PORT 6 AV1 7 AV2 7 AV3 7 ANT IN 8 1. AC INPUT Connect the supplied AC power cord. 2. DVI INPUT Connect to the digital video output jack of an external device with DVI output. 3.
Remote Control All the functions can be controlled with the Remote Control handset. Some function can also be adjusted with the buttons on the front panel of the set. Both the Main Remote Control to control the all functions and the Simple Remote Control to control the some simple functions are provided. Before you use the Remote Control handset, please install the batteries. Main Remote Control EFFECT +/+ - +/- 25. SUBTITLE 26. SOUNDTRACK/AUDIO 27. PIP and TSR BUTTONS 28.
Remote Control 1. STANDBY Switches between Operation and Standby modes. 15. OK Selects a menu, or confirms the selected operation and displays the channel list whilst watching a programme. 2. SLEEP Sets the sleep time. 16. EXIT Exits the main menu or Guide screen. 3. MUTE Mutes the audio. 4. TV/AV Selects input signal between TV and another signals. 17. MENU Displays the main menu. 5. WIDE Sets the display format. 18. DTV Setup Displays the DTV Setup menu in the Digital TV mode. 6.
Remote Control PIP AND TSR BUTTONS N P K. TSR (TIME SHIFTED RECORDING) Switches the Time Shifted Recording On and Off. O P L. PIP/TWIN Changes PIP/TWIN mode. K L M A B C D E F G H I J M. PIP INPUT Change the PIP input mode. N. PIP POSITION Control the PIP position. O. SWAP Switch between main screen and PIP screen. P. PIP CH +/ Change the PIP channel. TELETEXT BUTTONS PLAYBACK BUTTONS (for PVR) A. TELETEXT ( ) Activate/Deactivate the teletext service. B.
Remote Control Simple Remote Control 1. STANDBY 2. MUTE 3. TV/AV 4. OK 5. CH (Channel) ̵/̷ 6. VOL (Volume) ̵/̷ 7. BACK 8. MENU 9. GUIDE 10. PAUSE / PLAY 11. LIST 1. STANDBY Switches between Operation and Standby modes. 2. MUTE Mutes the audio. 3. TV/AV Selects input signal between TV and another signals. 4. OK Selects a menu, or confirms the selected operation and displays the channel list whilst watching a programme. 5. CH (Channel) +/Changes the Channel. 13. Remote Control 6.
Remote Control Inserting the Batteries You must insert or replace the batteries in the remote control when you: + Purchase the TV. + Find that the remote control is no longer operating correctly. Push Pull Lock Insert 1 2 3 1. Pull the battery cover upward in the arrow direction to remove. 2. Insert the batteries as illustrated in the battery compartment. 3. Put the battery cover back. 4. For Simple Remote Control, insert the batteries in the same way. + Apply two 1.5V . batteries of AAA type.
Mounting Device This describes how to set up the LCD-TV. Select the most appropriate procedure depending on your requirements. If you encounter any problem when setting up the LCD-TV, please contact your local LCD-TV distributor. Assembling the Stand-Base 2 1 1. Attach your LCD-TV with the stand-base. 2. Firmly fix the stand-base and the LCD-TV using the 4 screws. Note : Firmly fix the stand-base for the LCD-TV before moving it, as the stand-base may fall and could cause serious injury.
Connecting the External Equipment You can connect additional equipment, such as VCRs, DVD, etc. to your set. Examples are shown below. Connecting the Aerial To view television channels correctly, a signal must be received by the set from one of following sources : + An outdoor aerial + An indoor aerial ( not recommended ) ANT IN 1. Connect the aerial to the ANT IN on the bottom of the LCD-TV. 2. Press the TV/AV button on the remote control. 3. Select Analog TV or Digital TV.
Connecting the External Equipment Connecting the External Devices 1. Connect video/audio cable as indicated in the diagram. 2. For optimal visual image, use S-VIDEO lead(cable not supplied). 3. If you wish to connect the optical S/PDIF terminal and Dolby Digital decoder to listen digital audio, connect as follows. (cable not supplied) S/PDIF VCR SCART DVD Connecting the DVD Connect AUDIO L/R to AUDIO OUT connector of the DVD. For viewing, use S-Video or Component Video Input (Y, Pb, Pr).
Setting the Analogue Channels Setting the Analogue Channels Automatically You can scan for the frequency ranges available to you (and availability depends on your country.) Automatically allocated programme numbers may not correspond to actual or desired programme numbers. However you can sort numbers manually and clear any channels you do not wish to watch. It˅s only for analogue TV mode. 1. Press the MENU button. 2. Select Channel using the ̵/̷ button, and press the OK or ൘Gbutton. 3.
Setting the Analogue Channels Setting the Analogue Channels Manually The Manual Programme allows you to manually tune and arrange the channels in the order you desire. You can also assign a channel name with characters to each channel number. It's only for analogue TV mode. 1. Press the MENU button. 2. Select Channel using the ̵/̷ button, and press the OK or ൘ button. 3. Select Manual Programme using the ̵/̷ button, and press the OK or ൘ button. 4.
Setting the Analogue Channels Editing the Analogue Channls This function enables you to delete, copy, move, or skip the stored channel. It˅s only for analogue TV mode. 1. Press the MENU button. 2. Select Channel using the ̵/̷ button, and press the OK or ൘ button. 3. Select Edit Programme using the ̵/̷ button, and press the OK or ൘Gbutton. The programme list is displayed in the main screen. 4.
Basic Operation Powering the TV On/Off 1. Connect the plug to the wall outlet. 2. Press the MAIN POWER button on the rear of the LCD-TV to turn the TV power on. 3. Press the STANDBY, TV/AV or CH +/- button on the front of the LCD-TV or press the STANDBY, TV/AV, CH +/- or NUMERICAL (0~9) buttons on the remote control to switch the TV on. Note : To place the TV in standby mode, press the STANDBY button again on the remote control or on the front of the LCD-TV.
Basic Operation Listing Channels You can watch the programme list while watching analogue TV. 1. Press the LIST button. 2. Select a channel using the ̵/̷ button, and press the OK button to switch to the selected channel. You can also move to the next or previous list page using the PAGE +/- button.
Setting the Picture Mode You can select the picture type you prefer. 1. Press the MENU button. 2. Select Picture using the ̵/̷Gbutton, and press the OK or ൘Gbutton. 3. Select Mode using the ̵/̷Gbutton and press the ൖGor ൘ button to select a particular mode. If you select User, you can control the value manually. Standard : Dynamic : Movie : Mild : User 4. On the Standard, Dynamic, Movie, or Mild, the value of the Brightness, Contrast, Sharpness and Colour is changed automatically.
Setting the PIP/TWIN PIP/TWIN With PIP, Picture in Picture, you can call up a small screen within the main screen. This enables you to watch two different input sources at the same time. In this way, you can watch TV programme or monitor the video input from any connected devices while watching TV or other video input. 1. Press the MENU button. 2. Select Picture using the ̵/̷Gbutton, and press the OK or ൘Gbutton. 3. Select PIP/TWIN using the ̵/̷ button, and press the OK or ൘Gbutton. 4.
Setting the PIP/TWIN 8. Select Swap using the ̵/̷ button, and press the ൘ button to exchange the picture in the main screen and small screen. Not available in PC Mode. In case of PIP 1 2 2 1 In case of TWIN1 or TWIN2 1 2 2 1 Using the PIP Buttons in the Remote Control You can use the PIP buttons on the remote control. Press PIP/TWIN button repeatedly during watching TV channel to switch into PIP or TWIN mode. Press PIP INPUT button repeatedly to change the input mode in the small screen.
Changing the Sound You can select the preferred sound settings which corresponds with the personal sound settings. 1. Press the MENU button. 2. Select Sound using the ̵/̷ button, and press the OK or ൘ button. Effect 3. Select Effect using the ̵/̷ button and press the ൖGor ൘button to select a particular thing. If you select User, you can control the value manually. Flat : Speech : Movie : Music : User 4.
Setting the Time Setting the Current Time You can set the current time. If you wish to use the Power On or Off Time, you must also set the Local Time. 1. Press the MENU button. 2. Select System using the ̵/̷ button, and press the OK or ൘ button. 3. Select Time Setting using the ̵/̷ button, and press the OK or ൘Gbutton. 4. Select Date using the ̵/̷Gbutton, and press the OK or ൘Gbutton. 5. Press the ̵/̷/ൖ/൘Gbutton to set the current date. 6.
Language 1. Press the MENU button. 2. Select System using the ̵/̷ button, and press the OK or ൘ button. 3. Select Language using the ̵/̷ button, and press the ൖ or ൘ button to select a particular language. OSD Transparency 1. Press the MENU button. 2. Select System using the ̵/̷ button, and press the OK or ൘ button. 3. Select OSD Transparency using the ̵/̷ button, and press the ൖ or ൘ button to set the transparency. High : Medium : Low AV2 Output 1. Press the MENU button. 2.
Displaying the Teletext Information You can display Teletext information at any time on your TV. Most TV channels broadcast information via teletext. Each channel which broadcasts teletext transmits a page with information on how to use its teletext system. Depending on the TV channel, teletext is transmitted in different systems. The colours used in the options line correspond with the colour buttons of your remote control.
Setting the PC Input PC INPUT 1. Press the TV/AV button to switch to PC mode. 2. Select PC using the ̵/̷ button, and press the OK button. 3. Press the MENU button. 4. Select PC Input Setting using the ̵/̷ button, and press the OK or ൘ button. 5. Select the following item using the ̵/̷ button, and press the OK orG൘ button. _ Auto Configure : Automatically optimizes the status of screen. This is recommended when connecting a new PC. _ Position : Move the screen to the right, left, bottom or Up.
Recording Instant Recording Since the LCD-TV has a hard disk drive inside, you can record a programme with out an external media device such as a VCR. 1. Press the RECORD ( ) button on the remote control to record the current programme instantly. 2. You can change the recording duration time by pressing the RECORD ( button repeatedly. ) 30min -> 60min -> 90min -> 120min -> 240min -> 24hr Max 3. To stop the recording, press the STOP ( ) button.
Recording Setting the Recording Quality 1. Press the MENU button. 2. Select Recording using the ̵/̷Gbutton, and press the OK or ൘ button. 3. Select Recording Quality using the ̵/̷Gbutton, and press the ൖGor ൘ button to select a particular thing. HQ (High Quality) : SP (Standard Play) : LP (Long Play) Decreasing the record quality decreases the amount of disk space required to store the images, due to a higher compression scheme.
Recording Recording Reservation You can reserve recording to record your desired programme automatically. You can reserve recording of a programme using Menu - Recording - Recording Schedule. Adding Recording Reservations 1. Press the MENU button. 2. Select Recording using the ̵/̷ button, and press the OK or ൘ button. 3. Select Recording Schedule using the ̵/̷ button, and press the OK or ൘ button. 4. Select a blank list using the ̵/̷ button, and press the OK button to add a new recording schedule. 5.
Recording Editing Recording Reservations 1. Press the MENU button. 2. Select Recording using the ̵/̷ button, and press the OK or ൘ button. 3. Select Recording Schedule using the ̵/̷ button, and press the OK or ൘ button. 4. Select a reserved item which you want to edit using the ̵/̷Gbutton, and press the OK button. 5. The next editing procedure is the same as Adding recording reservations.
Recording Time Shifted Recording This LCD-TV automatically saves the programme on air in the installed hard disk drive temporarily, so that users can watch programmes as they watch a video tape using functions such as rewind, fast forward, instant replay and pause. 1. On watching TV, press the TSR on the remote control until when Time Shift On message appears, and the time shifted recording will be started.
Recording 4. If you press the STOP ( ) button, the TSR time bar will disappear and the playback will be stopped. 5. To stop the time shifted recording, press the TSR button until when Time Shift Off message appears. Note : _ It is possible that you may not record the scrambled programme or data programme normally. _ Total TSR buffer is limited. _ During the TSR playback or Programme Playback, the TruSurround XT and Auto Volume Level menus are disabled. 36 .
Playback Programme Playback You can watch the recorded programme by selecting a desired programme in the Menu - Recording - Recorded Programmes and pressing the OK or PLAY/PAUSE ( ) button. 1. Press the MENU button. 2. Select Recording using the ̵/̷ button, and press the OK or ൘ button. 3. Select Recorded Programmes using the ̵/̷ button, and press the OK or ൘ button to display the recorded programme list. 4.
currently on recording. _ During the TSR playback or Programme Playback, the TruSurround XT and Auto Volume Level menus are disabled. 38.
Playback Editing Recorded Programmes Select Menu - Recording - Recorded Programmes, and then select the desired recorded programme to edit the information of the programme. Editing Title You can edit the title of a recorded programme. 1. Select your desired programme in the list using the ൖV൘Gbutton. 2. Select Edit Title using the ̵/̷ button, and press the OK button to display a keyboard on the screen. 3. Enter the desired programme title on the screen keyboard using the GGGG̵/̷/ൖ/൘ button. 4.
Playback Connecting the External HDD You can also save/backup the recorded data to external storage device via USB port located on the rear of the LCD-TV. Connect a USB cable between an external storage device and USB port of the LCD-TV. Then, the External menu will be enabled. USB HDD Note : It may not be compatible with the TV according to the sort of external HDD or its case. 40.
Playback Playback Control You can perform playback control using playback buttons of the remote controller. You can use trick play functions during instant recording, time shifted recording or playing recorded programme. PLAY/PAUSE If you press PLAY/PAUSE ( ) button on the remote controller on playing, the playing is paused. If you press PLAY/PAUSE ( ) button on pausing, the playing is resumed from paused point.
Playback Instant Replay If you press the INSTANT REPLAY ( is played from the 10 seconds before. ) button, the current programme Repeat between A and B You can play special section repeatedly. You can set the section by pressing the A-B ( ) button twice. Press the A-B ( ) button once at the desired starting point, and press again at the desired ending point. Then, a mark for the A-B section repetition will be displayed and the section is played repeatedly.
HDD Control Checking the Hard Disk Drive You can check the free space of the hard disk drive, and can format the disk drive if necessary. 1. Press the MENU button. 2. Select Recording using the ̵/̷ button, and press the OK or ൘ button. 3. Select HDD Control using the ̵/̷Gbutton, and press the OK orG൘ button. 4. Select Internal Device or External Device (if connected) using the GGGGൖ/൘Gbutton. 5. You can check the total, TSR buffer, recorded and free space of each HDD. 6.
HDD Control Connecting the External HDD You can also save/backup the recorded data to external storage device via USB port located on the rear of the LCD-TV. Connect a USB cable between an external storage device and USB port of the LCD-TV. Then, the External menu will be enabled. USB HDD Note : It may not be compatible with the TV according to the sort of external HDD or its case. 44.
Digital TV Channel Setup When you purchase your LCD-TV, you can run the Automatic Search. It immediately performs Channel Search.(You can also run the digital TV channel setup in Default Setting.) 1. Turns on the TV in the Digital TV mode. 2. Starts the Automatic Search immediately. Please wait for finishing the Channel Search. If you want to stop the Channel Search, select the OK button. If the Channel Search is stopped or finished, press the OK button to save the result of the channel search.
Basic Operation This chapter describes functions such as switching channel, changing language, and basic features for watching programmes. Switching Channel You can switch the current channel using one of the following methods. 1. Press the CH +/- button. 2. Enter your desired channel number using the NUMERICAL (0~9) button to move to the channel directly. 3. Press the DTV CH or RADIO CH button to switch between TV channel and Radio channel.
Basic Operation Note : _ you can select your desired default audio language by selecting DTV SETUP- Preferences - Local Setting - Audio Language menu. _ If the programme is broadcast in Dolby Digital one, you cannot set the audio preference such as left, right, and stereo. _ If you select Dolby Digital by selecting DTV SETUP - Preferences Local Setting - Audio Priority menu, Dolby Digital soundtrack is automatically used in preference to the default audio language.
Basic Operation Detailed Programme Information You can see detailed information about the current programme. Press the INFO button. Note : _ Press the INFO button again to hide the information box. _ If the detailed programme information is more than one page, use ̵/̷ button to move to the previous or next page. Icons Represents the recommended minimum age for the current programme. Displayed only when the channel is a locked channel. Displayed only when the channel is a scrambled channel.
Channel List Displaying and Switching Channel List You can display channel list using LIST button and switch to other channels on the channel list. 1. Press the LIST button while watching a channel to display the channel list. 2. Select your desired channel using the ̵/̷ button and press the OK button to change the channel. 3. Enter the channel number directly using NUMERICAL (0~9) button to move cursor on to your desired channel. And then press the OK button to change to the selected channel.
Channel List Select a Channel Group You can select the channel list group to edit TV or Radio. 1. Press the OK or ൘Gbutton in Group to display channel list group. 2. Select your desired channel list group using the ̵/̷ button, and press the OK button. Note : _ Press the DTV CH or RADIO CH button to move to TV or RADIO channel list directly. _ For editing Favourite channel list, move to DTV SETUP - Edit Channels Edit Favourite Channels menu. Delete Channels You can delete one or more channels. 1.
Channel List Lock/Unlock Channels You can lock or unlock one or more channels. 1. Move the cursor to the channel list using the ൖ/൘ button. 2. Select your desired channel, and then press the OK button. You can select multiple channels. 3. Select Lock in the right using the ൘ button, and press the OK button. Select/Unselect All Channels You can select/unselect all channels at a time. 1. Select Select All in the right and press the OK button to select all channels. 2.
Channel List Editing Favourite Channels You can edit Favourite channel or Favourite channel list. 1. Press the DTV SETUP button. 2. Select Edit Channels using the ̵/̷ button, and press the OK button. 3. Select Edit Favourite Channels using the ̵/̷Gbutton, and press the OK or ൘ button. 4. Select a channel using the GGGG̵/̷ button, and press the OK button. The selected channel is moved into the Favourite. 5. Move between TV and Favourite using the ൖ/൘Gbutton. In this way, you can return the channel.
Programme Guide The Programme Guide displays programme information about each channel, based on the date and time. You can also schedule your recording using the information given. Note : Press the GUIDE button to exit the Guide screen. Viewing Programme Guide Information You can view programme information for all channels. 1. Press the GUIDE button. 2. Move to previous or next programme within the same channel using the ൖ/൘ button. 3. Move to other desired channel using GGGG̵/̷ button.
Programme Guide Viewing Programme Information Using Time Bar You can quickly search for your desired time slot using the Time bar. 1. Press the GUIDE button. 2. Press the GREEN button to display G the Time Bar. 3. Select the each button using the GGGGൖ/൘ button, and press the OK button to move as your desired amount of time. If you press the button repeatedly, the same operation is repeated. 4. Each button functions as follows. Now : Moves to the current programme where the cursor is located.
Programme Guide Finding a Programme by Programme Genre 1. Press the GUIDE button. B 2. Press the BLUE button to display Genre screen. 3. Select By Genre and press the OK button to search programme by genre. 4. Select your desired genre using GGGG̵/̷/ൖ/൘ button and press the OK button. 5. If you select your desired programme from the Found Programme List screen and press the OK button, you can watch the programme if it is on air.
Setting the Preferences You can set censorship classification, password, time and other options to enhance your viewing pleasure. Note : _ Press the BACK or ൖ button to save the changes and return to the previous menu. Press the EXIT button to exit the Menu screen. _ You can easily select all menu items using the assigned numerical button for each menu. Parental Control You can set parental control for each programme. You can also change your password. 1. Press the DTV SETUP button. 2.
Setting the Preferences Changing Password You can change the current password into a new one. 1. Select Change Password using the ̵/̷ button, and press the OK or ൘ button. 2. Enter New Password using the NUMERICAL (0~9) button, and select OK and press OK button. 3. Enter the New Password again to confirm the Verify Password, and select OK and press the OK button. Note : The Default Password is 0000. If you have forgotten your Password, please contact your local LCD-TV distributor.
Setting the Preferences Audio/Subtitle Language You can set the language for Audio and Subtitles. The default language is English. 1. Select Audio / Subtitle Language using the ̵/̷ button. 2. Press the OK or ൘ button to display the available Language List. 3. Select your desired language using the ̵/̷ button, and press the OK button. Audio Priority You can select the audio priority between language and Dolby Digital. 1. Select Audio Priority using the ̵/̷ button. 2.
Setting the Preferences Miscellaneous Settings 1. Press the DTV SETUP button. 2. Select Preferences using the ̵/̷ button, and press the OK or ൘Gbutton. 3. Select Miscellaneous Settings using the ̵/̷ button, and press the OK or ൘Gbutton. i-Plate Display Time You can set the duration during which the Information box is to be automatically displayed when you switch the channel. 1. Select i-Plate Display Time using the ̵/̷ button, and press the OK or ൘ button. 2.
Installation Automatic Search If your LCD-TV is connected to a suitable aerial(outdoor aerial recommended) you can automatically search channels without entering any other information. 1. Press the DTV SETUP button. 2. Select Installation using the GGGG̵/̷ button, and press the OK or ൘ button. 3. Select Automatic Search from Installation menu using the GGGG̵/̷ button, and press the OK or ൘ button. Search Please wait while the LCD-TV searches for the channels, this may take a few minutes. 1.
Installation Manual Search You can search channels manually by searching parameters, if you know the multiplex-parameters(check with your local broadcaster). 1. Press the DTV SETUP button. 2. Select Installation using the GGGG̵/̷ button, and press the OK or ൘ button. 3. Select Manual Search from Installation menu using the GGGG̵/̷ button, and press the OK or ൘ button. 4. Select Channel, Frequency, Mode, Guard Interval, or Network Search using the ̵/̷ button, and press the OK or ൘ button.
Installation Default Setting Default Setting restores the LCD-TV to the default settings Warning : Please Note that once you perform Default Setting, all data such as Aerial Setting information Channel List, and User Configured data are deleted. To perform Factory Default: 1. Press the DTV SETUP button. 2. Select Installation using the ̵/̷ button, and press the OK or ൘ button. 3. Select Default Setting using the ̵/̷Gbutton, press the OK or ൘ button. 4.
Software Upgrade In order to maintain proper performance of this LCD-TV, it is essential to have the most up-to-date software. The latest news and release of software versions may be found at the HUMAX website . http://www.humaxdigital.com. It is recommended that you periodically check for the availability of software update. OTA (Over the Air) OTA, an abbreviation of Over-the-Air, means that the software can be downloaded through your aerial.
Software Upgrade If new software is found when powering on 1. A message will be displayed to notify that new software is found. 2. Select Yes and press the OK button to update the software. 3. Starts downloading new software. Please wait until the updated is completed. 4. When completing the software update, the equipment is automatically powered off and on again. If updating software from Menu 1. Press the DTV SETUP button. 2. Select Installation using the GGGG̵/̷ button, and press the OK or ൘ button. 3.
Software Upgrade Manual Update You can perform Manual Update only if you know the multiplex information of the software update correctly. 1. Select Manual Update using theG̵/̷ button, and press the OK or ൘ button. 2. Select the channel number which provides updated software. You can also enter the frequency instead of channel number in which updated software is provided. 3. Select Mode. If the information is not known, then Auto can be selected. 4. Select Guard Interval.
Software Upgrade Software Auto-Detecting and Time You can specify the software detecting time. If the LCD-TV powers on during software auto-detecting, Detecting will stop. 1. Select Software Auto - Detecting using the ̵/̷Gbutton, and press the OK or ൘Gbutton. 2. Select Enable or Disable and press the OK or ൘Gbutton whether or not setting the software detecting time automatically. 3. When you select Enable, you can set the detecting time in the Auto - Detecting Time.
System Information You can view all system information, and signal detection. 1. Press the DTV SETUP button. 2. Select System using the ̵/̷ button, and press the OK or ൘ button. Status You can view the System information 1. Select Status using the ̵/̷ button, and press the OK or ൘ button. 2. Confirm the information about Hardware version, Software version, Loader version, System ID, and Update Date.
System Information Common Interface You can view the current status of the CI module. 1. Select Common Interface using the ̵/̷ button, and press the OK or ൘ button. 2. Select Slot 1, and press the OK or ൘ button. 3. If Common Interface is available, you can view information about each Slot. Note : The displayed information about each Common Interface may differ depending on Common Interface type. Game This LCD-TV provides various games for user's entertainment. 1. Press the DTV SETUP button. 2.
Menu Map LCD TV Menu Picture Sound Analogue TV Channel Digital TV Setup Digital Channel Recording System Mode Brightness Contrast Sharpness Colour Colour Temperature PIP/TWIN Effect Bass Treble Balance Auto Volume Level TruSurround XT Sound Source Auto Programme Manual Programme Edit Programme Recorded Programmes Recording Schedule HDD Control Recording Quality CNR Language Time Setting OSD Transparency AV2 Output Antenna Power Aspect Ratio Backlight Brightness PC Main Menu PC Input Setting 69
Menu Map Digital TV MENU Parental Control Local Setting Preferences Miscellaneous Settings Edit Channel Lists Edit Channels Edit Favourite Channels Automatic Search Manual Search Installation Software Update Default Setting Status System Signal Detection Common Interface Games 70.
Troubleshooting Troubleshooting Before contacting your local service dealer, please make sure you refer to the following guide. If the LCD-TV does not work normally after completing the following trouble shooting, please contact your local LCD-TV distributor or service centre. 1. No message is displayed on the front panel or the LCD-TV has no power + Check the main power cable and check that it is plugged into a suitable power outlet. + Check whether the Power Switch is On. 2.
s Error message Possible causes What to do No or bad signal + The aerial is not installed correctly. + Adjust aerial. + Check the cable from the aerial. If you cannot resolve the problem you may need to have your aerial and installation tested by a professional. The channel is scrambled or not + The channel has a signal + Confirm if the channel but no audio or video. is currently on air. available. + The channel is for data broadcasting. + You cannot watch the channel in the usual way.
Troubleshooting Error Message Problem Check item No picture on screen and No sound from + Insert the AC power cord plug securely in AC power outlet. + Make sure the remote control is not in the standby mode (The POWER/Standby indicator is Orange colour.) speakers. + Turn on the MAIN POWER button on the bottom of the display. No picture / + Check the brightness setting of the display. No picture from AV terminal. + Lamp may have malfunctioned. + Check the cable from the VIDEO INPUT terminal.
Specification Specification Item LCD Panel Specification + Type - Colour active matrix TFT-LCD + Display Area - 26.0" (566.4(W) x 339.84(H) mm) + Display Colour - 16.7 M + Pixel Pitch - 0.4425mm x 0.4425mm + Max. Resolution - 1280 x 768 pixels + Interface - LVDS Interface with 1 pixel / clock + Viewing Angle - R/L : 170 , U/D : 170 (CR > 10) + Contrast Ratio - 800:1 (Typ) + Brightness - 450 cd/m (Typ) + Horizontal Frequency - 48.
75.
Service and Support You can get information such as a troubleshooting guide, software upgrades and product support guide from the following web sites and call center (Hotline). Please try to contact to your local dealers first when you have any problem. Web site and e-mail Homepage http://www.humaxdigital.com http://www.humaxdigital.com (English) (Deutsch) http://www.humaxarabia.com (Arabic) HCSA (Humax Customer Service Area) Software Download, Information and Technical Q&A http://www.humaxdigital.
LCD-TV Digital and Analogue HTVGB26TPVR_100GB P/N 20010-0090