Digital Set-Top Box with Irdeto embedded
Contents Safety GB2 Copyright & Glossary GB3 Reference GB4 ~ GB5 STB Connections GB6 ~ GB9 Remote Control Unit GB10 ~ GB11 Function Guide GB12 ~ GB16 Main Menu Guide GB17 ~ GB45 Motorised System GB46 ~ GB50 Troubleshooting Guide GB51 Menu Map GB52 ~ GB53 Specification GB54 ~ GB55 GB1
Safety This STB has been manufactured to satisfy international safety standards. Please read the following safety precautions carefully. MAINS SUPPLY : 90 - 250 V AC 50/60 Hz OVERLOADING : Do not overload a wall outlet, extension cord or adapter as this may result in fire or electric shock. LIQUIDS : The STB should not be exposed to dripping or splashing, and no objects containing liquids, such as base, should be placed on the apparatus.
Copyright & Glossary Copyright • • • • • VIACCESSTM is a trademark of France Telecom. CryptoWorks(TM) is a trademark of Philips Electronics N.V. Irdeto is a trademark of Mindport BV. Nagravision is a registered trademark of Kudelski S.A. Conax is a trademark of Telenor Conax AS. Warning • HUMAX cannot be held responsible for any problems caused by the use of unofficial software. The use of software versions other than HUMAX official software will void the manufacturer’s warranty.
References 1. DiSEqC 1.0 Connection All our receivers are designed to be DiSEqC 1.0 compatible. This allows multiple antennae to be connected to the STB simultaneously. If you have two or more fixed antennae or LNBs, you can use a DiSEqC 1.0 switch. 1. Connect the coaxial cable from the first LNB to the LNB 1 or LNB A DiSEqC switch input connector. 2. Connect the coaxial cable from the second LNB to the LNB 2 or LNB B DiSEqC switch in put connector. 3. Do the same for the other LNBs. 4.
5. Software Upgradeing The HUMAX digital set-top box is a highly sophisticated product-incorporating one of the best software applications. Whenever a problem is found with this software or extra functions or enhanced applications are added, the software in the equipment must be upgraded. In order to maintain correct product performance, it is essential to have the most Up-to-date software. The latest news and releases on software versions may be found at the HUMAX website - http://www.humaxdigital.com.
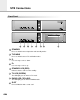
STB Connections Front Panel 1 2 3 4 5 6 7 1 STANDBY Press to switch between Operation and Standby modes. 2 TV/RADIO Press to switch between TV and Radio modes. 3 PUse to change services down. 4 P+ Use to change services up. 5 STANDBY LED (RED) Indicates that the STB is under standby. 6 TV LED (GREEN) The LED light goes on when in TV mode. 7 RADIO LED (YELLOW) The LED light goes on when in RADIO mode. 8 SLOT For a CA Module with a smart card.
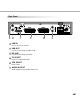
Rear Panel 1 LNB IN Use to connect an antenna. 2 LNB OUT Use when connecting to another STB. 3 RS-232C Use when connecting to your PC. 4 TV SCART For the TV audio/video input. 5 VCR SCART For the VCR. 6 AUDIO OUTPUT Audio signal from your STB to VCR or TV.
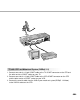
STB Connections There are several ways of connecting the STB to your existing Audio/TV system. For best results, we recommend using one of the following set-ups: TV only 1. Connect one end of a 21-pin SCART cable to the TV SCART connector on the STB and the other end to a SCART socket on your TV. 2. Connect the coaxial cable from the LNB to the LNB IN socket on the STB. TV with VCR 1.
TV with VCR and Motorised System (DiSEqC 1.2) 1. Connect one end of a 21-pin SCART cable to the TV SCART connector on the STB and the other end to a SCART socket on your TV. 2. Connect one end of a 21-pin SCART cable to the VCR SCART connector on the STB and the other end to a SCART socket on your VCR. 3. Connect the coaxial cable from the LNB of your motorised system(DiSEqC 1.2 Motor) to the LNB IN socket on the STB.
Remote Control Unit TV/RADIO STANDBY SOURCE NUMERIC BUTTONS FAV (FAVOURITE) GREEN RED GUIDE GREEN RED YELLOW BLUE YELLOW BLUE CURSOR OK EXIT P-/P+ V-/V+ MENU RCL (RECALL) i (INFORMATION) HELP FREEZE MUTE OPT+ (OPTION) GB10
1 TV/RADIO Press to switch between TV and Radio modes. 12 STANDBY Press to switch between Operation mode and Standby mode. 2 SOURCE Press to select the TV/SAT mode. 3 NUMERIC BUTTONS Press to select a service, enter your PIN code or number on a menu. 4 FAV (FAVOURITE) Press to see the current service configuration or edit during A/V play. 13 GUIDE Press to display the TV/Radio Electronic Programme Guide 14 YELLOW Press to select a Service Network in the Service List.
Function Guide Information Box (I-Plate) The detailed information on a service and its event is automatically displayed at the bottom of the screen (I-Plate) whenever a service changes. To obtain this information when watching a service, press thei ( ) button. If you press the i ( ) button again while the I-Plate is displayed, the I-Plate disappears. The I-Plate is divided into a “service information” part and an “event information” part.
If you press the HELP ( ) button while the I-Plate is displayed, the detailed description of the event will be displayed on the help window instead of help messages. If there is no available data for the detailed description on the air, the help message is displayed on the help window instead. Changing Services There are several ways to change a service. • Use the NUMERIC buttons: key in the service number using the NUMERIC buttons and press the OK ( ) button.
Function Guide Soundtrack To change the audio language in the current service, proceed as follows: 1. Press the OPT+ ( ) button and select the Soundtrack item. 2. Press the button to activate the list of supported audio languages. 3. Select the desired audio language in the list using the keys. 4. Select the audio mode (mono, stereo, Dolby) in the desired audio language using the buttons. 5. Press the OK ( ) button to confirm the change, or the EXIT ( ) button to cancel the change.
Service List There are four service list types: All Service, Favourite Service, Network Service and Alphabetical Order Service. There is also a Configuration Service menu to change the attributes of each service in the list. In the service list, some buttons are used to switch the service list type or select the service. • • • • • • buttons: Used to move the cursor up/down in the service list. buttons: Used to move the cursor left/right in the service list. RED button: Used to select the All type Service.
Function Guide Service Favourite Services can be grouped in the favourite list. To add a service to a group in the favourite list, the Configuration Service box or the Service Organising menu in the main menu can be used. (Refer to the related item for a more detailed description). To select the “Favourite Service” list, press the GREEN button with the service list displayed. Service Network In the Network Service mode, the service list is organised according to the network to which a service belongs.
Main Menu Guide The Main menu contains the TV Guide, Parental Control, Installation and Utility menus. (For more detailed information about menu structure, please refer to the Menu Map page at the end of the User’s Manual.) 1. TV Guide The TV Guide is useful when all the services are being navigated, since it offers all possible viewing options. The TV Guide supplies the following information: • Start/end time of all available services. • Short description of all available services.
Main Menu Guide 1. TV Guide The TV Guide offers more detailed information on the service (both TV and Radio services) such as start/end time, short description and extended description. The service can be reserved in the TV Guide. To activate the TV Guide menu, do one of the following: • Press directly the GUIDE ( ) button • Select the TV Guide in the Main menu If the TV/RADIO ( ) button is pressed with the TV Guide displayed, the service list is toggled between the TV service and Radio service.
Now mode The NOW mode displays information on the present services and following services. The information includes service name, event name and start/end time of an event. To activate the NOW mode and surf the services, proceed as follows: 1. Activate the TV Guide menu using the GUIDE ( ) button or via the Main menu. 2. Press the RED button to select the NOW mode.
Main Menu Guide Weekly mode The WEEKLY mode displays information about all the services that will be transmitted over a week. The information includes service name, event name and start/end time of the event. To activate the WEEKLY mode, proceed as follows: 1. Activate the TV Guide menu using the GUIDE ( ) button or via the Main menu. 2. Press the GREEN button to select WEEKLY mode. To reserve a service event, proceed as follows: 1. Select the desired service event using the button. 2.
Reserved mode The RESERVED mode displays the services which have been reserved. In this mode, the reservation mode can be changed. The service can also be removed from the reservation list. To change the mode or remove a service event of, proceed as follows in RESERVED mode: • Activate the TV Guide menu using the GUIDE ( ) button or via the Main menu. • Press the YELLOW button to select the RESERVED mode. • Select the desired service event using the buttons.
Main Menu Guide 2. Parental Control In the Parental Control menu, it is possible to change the Parental Guidance Rating and the PIN code. To set the Parental Guidance Rating, proceed as follows: 1. Activate the Parental Control menu via the Main menu. (To activate it, the PIN code should be entered). 2. Select the Censorship classification item using the button. 3. Select the desired Parental Guidance Rating using the button. 4.
3-1. System Setting This sub-menu supplies the miscellaneous functions. Language Setting The Language Setting menu supplies Menu Language, Audio Language and Subtitle Language. Menu Language The menu language is a language used in the text of the menu. To change the menu language, proceed as follows: 1. Activate the Language Setting menu via the Main menu. 2. Select the Menu Language using the button and press the OK ( ) button. 3.
Main Menu Guide Subtitle Language The subtitle language is a language selected as a default when a service with subtitles is playing. It is also possible to change the subtitle language via the Soundtrack menu in the Option List menu. To change the subtitle language, proceed as follows: 1. Activate the Language Setting menu via the Main menu. 2. Select the Subtitle Language menu using the button and press the OK ( ) button. 3.
Wakeup Time To disable or enable/set the wake-up timer, proceed as follows: 1. Activate the Time Setting menu via the Main menu. 2. Select the Wakeup Time item using the button. 3. To disable the wake timer, set to “Disable” using the button. 4. To enable and set the wakeup timer, set the item to “00:00” using the button. (The numeric mark, “0..9” appears on the right of the Wake Time item). Set the desired wake-up time using the NUMERIC buttons. 5. Press the OK ( ) or EXIT ( ) button to confirm.
Main Menu Guide A/V Output Setting The A/V Output Setting menu supplies menus that configure the functions related to Audio and Video output. • Configure the Video output of TV SCART as CVBS, S-VIDEO or RGB mode. • Configure the Audio output of TV SCART and RCA (Cinch) Jack as Mono or Stereo mode. • Configure the screen aspect ratio (4:3 or 16:9) of the TV connected to STB. • Configure the video display format (Centre or Letter-box) on the TV. • Configure the NTSC mode. There are two NTSC modes, NTSC 3.
Screen Mode To configure the TV screen mode, proceed as follows: 1. Activate the A/V Output Setting via the Main menu. 2. Select the Screen Mode item using the button. 3. Select the desired TV screen mode according to the connected TV using the button. There are two modes: 16:9 and 4:3. 4. Press the OK ( ) or EXIT ( ) button to confirm. Display Format To configure the display format on the TV, proceed as follows: 1. Activate the A/V Output Setting via the Main menu. 2.
Main Menu Guide If the Screen Mode is selected as 16:9, there are two modes, Full and Pillar-box, in the display format. If the video is formatted as 4:3 and the display format selected as Full mode, the video is expanded to fit the 4:3 video into the 16:9 TV screen. If the video is formatted as 4:3 and the display format selected as Pillar-box mode, the video is displayed on the centre of the 16:9 TV screen without modification. The right and left sides of the TV screen are blacked out.
OSD Transparency To set the OSD transparency, proceed as follows: 1. Activate the Other Setting menu via the Main menu. 2. Select the OSD Transparency item using the button. 3. Select the desired level between Opaque and Transparent modes using the button. 4. Press the OK ( ) or EXIT ( ) button to confirm. Info. Box Display Time To set the duration time of Info. Box display, proceed as follows: 1. Activate the Other Setting menu via the Main menu. 2. Select the Info. Box Display Time using the button. 3.
Main Menu Guide Organise TV Services The Organise TV services menu supplies two organisation methods: Organise All Services and Organise Favourites. Each offers a method of organisation with its own characteristics. Organise All Services The services are sorted according to the service number in the Organise All Services menu. Each service can be deleted from the TV service list, moved to another position, locked or skipped when zapping the service.
To lock a service in the service list, proceed as follows: 1. Activate the Organise All Services menu via the Main menu. 2. Select the desired service in the service list using the button. 3. The button can be used to page up/down the service list. 4. Press the YELLOW button. The icon then appears at the end of the service name. If the YELLOW button is pressed again, the icon disappears. 5. Press the OK ( ) button to confirm or the EXIT ( ) button to cancel.
Main Menu Guide Organise Favourite Services The services are sorted according to favourite groups in the Organise Favourites menu. There are three columns: the favourite group column, the favourite list column and the service list column containing services not belonging to any favourite group. The Organise Favourites menu supplies the following functions: • Add a service to a favourite group. • Remove a service from a favourite group. • Move a service to another position in a favourite list.
To skip or lock a service in a favourite list, proceed as follows: 1. Activate the Organise Favourites menu for TV services via the Main menu. 2. Move the cursor to the favourite group column using the button. If the favourite column is selected, the column is highlighted. 3. Select a favourite group in the favourite group column using the button. 4. Move the cursor to the favourite list column using the button. If the favourite list column is selected, the column is highlighted. 5.
Main Menu Guide To move a service to another position in the service list, proceed as follows: 1. Activate the Organise All Services menu via the Main menu. 2. Select the desired service in the service list using the button. The button can be used to page up/down the service list. 3. Press the GREEN button with the desired service selected. The icon then appears beside of the service number. 4. Move the selected service to the desired position using the button.
Organise Favourite Services The services are sorted according to the favourite groups in the Organise Favourites menu. There are three columns: the favourite group column, the favourite list column and the service list column containing services that do not belong to any favourite group. The Organise Favourites menu supplies the following functions: • Add a service to a favourite group. • Remove a service from a favourite group. • Move a service to another position in a favourite list.
Main Menu Guide To remove a service from a favourite group, proceed as follows: 1. Activate the Organise Favourite menu for RADIO services via the Main menu. 2. Move the cursor to the favourite group column using the button. If the favourite column is selected, the column is highlighted. 3. Select a favourite group in the favourite group column using the button. 4. Move the cursor to the favourite list column using the button. If the favourite list column is selected, the column is highlighted. 5.
Organise Networks The Organise Networks menu supplies the following functions: • Delete the network. This will delete all services belonging to the network. • Move/reorder the networks in the network list. • Sort the services according the network. In the Organise Networks menu, there are two columns: the network list column and the service list column. The services are displayed in the service column according to the their networks. To delete the network, proceed as follows: 1.
Main Menu Guide Delete Satellites The Delete Satellites menu supplies the following functions: • Delete a satellite. It will also delete all services belonging to the satellite. • Delete a transponder. It will also delete all services belonging to the transponder. • Sort the services according to the satellite and the transponder. In the Delete Satellite menu, there are three columns: ‘SAT” (the satellite list column), “TP (MHz)” (the transponder list column) and “Services” (the service list column).
3-3. Service Searching Antenna Setting The Antenna Setting menu sets the characteristics of each antenna. 32 antennae can be supported, one of which for SMATV. The Antenna Setting menu supplies the following items to characterise the antenna. Antenna Alternative Assigns an index to each antenna. Hence, the value is unique for each antenna. It can assign up to 32 indexes. Satellite Name Assigns a satellite name to each antenna. The available satellite names supplied by default can be used.
Main Menu Guide Manual Search The function of the Manual Search menu is to search services in one transponder using information from a satellite transponder. (If the Network Search option is enabled, services in other transponders are searched). The following items are supplied as parameters: Antenna Alternative Specifies the antenna used for searching. Frequency Sets the frequency of a transponder. Polarisation Sets the polarisation type (horizontal or vertical).
To manually search the services, proceed as follows: 1. Activate the Manual Search menu via the Main menu. 2. Set all the parameters according to transponder information. 3. Use the progressive bars at the bottom of window to check whether or not the transponder is locked. 4. Press the OK ( ) button to activate the search services. During the search, a sandglass rotates vertically. 5. To cancel the search, press the EXIT ( ) button. 6. If the search has been carried out, the searched services are displayed.
Guide of Main Menu Automatic Search The function of the Automatic Search menu is to search services using information from a satellite. The following items are supplied as parameters. Antenna Alternative Specifies the satellite in which the automatic search will be performed. Automatic Skip Enables/disables the automatic skip option. If this option is enabled, the scrambled services are skipped during the search. Search Type Specifies search type.
3-4. Status The function of the Status menu is to supply users with information on several STB statuses, such as: • • • • Information Information Information Information on on on on the Software version, the Hardware version, the signal level of the current locked TP, OTA availability. This information is mainly intended for operators or installers. STB Status The STB status menu supplies information on the software and hardware versions. To receive the information, proceed as follows: 1.
Main Menu Guide 3-5. Conditional Access The Conditional Access menu supplies information on IRDETO embedded CAS. There are four sub-menus in the menu: • Version Information, • Smart Card Information, • Transport Stream Information, • Monitoring ECM/EMM. Version Information The Version Information menu supplies technical information on IRDETO embedded CAS. To retrieve the information, proceed as follows: 1. Activate the Conditional Access menu via the Main menu. 2.
Monitoring EMM/ECM The Monitoring EMM/ECM menu periodically supplies information on the ECM and EMM. To retrieve the information, proceed as follows: 1. Activate the Conditional Access menu. 2. Select the Monitoring EMM/ECM menu using the button and press the OK ( ) button to retrieve the information. 3. Press the EXIT ( ) button to exit the menu. 3-6. Mail Messages The Mail Messages menu shows the mail messages received over the air. The mail messages are intended for the operator, to inform users.
Motorised System DiSEqC 1.2 User Instructions If you have a DiSEqC 1.2 motorised system, you can use the available DiSEqC 1.2 functions. The following instruction describes how to use the DiSEqC 1.2 functions to store the positions of the satellites and search for the services (STAB Rotor Sat motor recommended). 1. Satellite Setting Menu Options When the DiSEqC Motorised System is Enabled in the Antenna Setting, a new menu is available for configuring the motor.
3. Initial Satellite Position Search This is required when you first set your receiver up to use DiSEqC 1.2, and sets the positions of all pre-programmed satellites. 1. Make sure your motor is installed correctly with the calibrations adjusted for the region in which you are located. (Please consult the user’s manual for your motor). 2. Make sure your receiver is set up to use DiSEqC 1.2. (see Section 2 above). 3. In the Main menu, select the Service Searching option and press the OK ( ) button.
Motorised System 6. To set the East Limit: a) Select “Movement” and use the buttons to move your motor East or West until it is at the position you wish to use as your East Limit. Use the buttons to stop the motor at the correct position. b) Highlight the Store East Limit option and press the OK ( ) button to store the current position as your East Limit.
6. Moving to a pre-set satellite Once you have stored the positions of the satellites you want (see below left) you can search for the services transmitted from them. Before doing this, you must move the motor to the position of the satellite you wish to search for. To do this, you must access the Satellite Settings menu. Proceed as follows: 1. Select “Service Searching” from the Main menu and press the OK ( ) button to display the Service Searching menu. 2.
Motorised System 8. Automatic Search It is possible to use automatic search using the DiSEqC 1.2 motorised system. 1. Ensure that the position for the satellite you want to search for is correct (see Section 3 and 5 above). 2. In the Main menu, select the channel searching option and press the OK ( ) button. 3. In the Service Searching menu, select the Alternative Antenna that you 3set for this satellite. 4. When you search new services, please refer to Automatic Search on page GB42. 5.
Troubleshooting Guide GB51
Menu Map GB52
GB53
Specification Conditional Access Interface Irdeto Embedded 1 Slot Smart card Tuner & Channel Input Connector Frequency Range Input Impedance Signal Level IF IF Band width LNB Power & Polarisation 22 KHz Tone DiSEqC Control Demodulation Input Symbol Rate FEC Decode F-type, IEC 169-24, Female 950 MHz to 2150 MHz 75Ω -25 to -65 dBm 480 MHz 36 MHz Vertical : +13.5 V Horizontal : +18 V Current : 500 mA Max. Overload Protection Frequency : 22 ± 4 KHz Amplitude : 0.6 ± 0.2 V Version 1.0/1.
A/V & Data In/Out TV SCART VCR SCART AUDIO R/L RS-232C Video Output (CVBS, RGB, S-Video) Audio Output (Resolution : 20 bits DAC, Max. 2 Vrms) Video Output (CVBS) Video Input (CVBS, RGB, S-Video) Audio Output (Resolution : 20 bits DAC, Max. 2 Vrms(fixed)) RCA/Cinch Volume and Mute Control (Resolution : 20 bits DAC, Max. 2 Vrms) Transfer rate 115,200 bps, 9pin D-sub Type Power Supply Input Voltage Type Power Consumption Standby Power Protection 90 - 250V AC, 50/60 Hz SMPS Max.