
Installation Guide


7
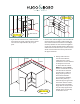
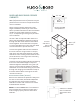
10 For designs with a corner cabinet, set the
next cabinet tight to the rst cabinet and
use clamps to hold it place while you level
it, and make sure that the front edges are
ush. Attach the two cabinets together
using 1 1/8" particle board screws. Attach
the cabinet to the wall with 2 1/2" screws
into the studs. Continue with the same
process for all base cabinets.
Filler
9 For designs without a corner cabinet, start
with the rst cabinet leaving space for a
ller, as per your plan.
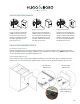
FILLERS
A ller is always required against a wall. To cut your ller, measure from the cabinet to the wall
and cut the ller accordingly.
Hold the ller in place; turn it over and on the back side make a pencil mark at the top and
bottom where it should be cut. To prevent chipping when cutting llers, place masking tape over
the surface that is being cut. Join the two marks with a pencil line and saw along that line. Put
the ller in place and drill a pilot hole at hinge-level through the cabinet and into the ller. Attach
the ller to the adjacent cabinet by fastening together with wood screws.
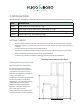
When installing a sink or cooktop, trimming
the top support rails may be necessary. Using
the template supplied by the sink or cooktop
manufacturer, cut the top rails as required
using a jigsaw.
SINK/COOKTOP